
What are
/r/ender5plus'
favorite Products & Services?
From 3.5 billion Reddit comments
The most popular Products mentioned in /r/ender5plus:


The most popular Services mentioned in /r/ender5plus:
Cults.
PlatformIO
Gofile.io
PuTTY
The most popular Android Apps mentioned in /r/ender5plus:

The most popular reviews in /r/ender5plus:
New machine I presume? They don't come prelubricated it seems, so you also may need to lubricate the smooth rods. If that doesn't fix it, buy some POM antibacklash nuts like these. You want the 8x4 (2mm pitch, 4mm lead)
It's a pretty common issue with these machines, and I think it's related to how heavy the bed is. I've also seen people having success with "breaking in the machine" by writing a gcode that raises and lowers the bed for hours on end.
Assuming you are removing the blue clip, pushing down on the plunger on the top and inserting it as far down as it will go. If it's still not catching (or even if it is) you will probably want to replace that extruder with a metal one and get a decent bowden tube. The stock ones are terrible.
i've used theesun PLA wood filament. I didn't have to make any adjustments for it and it was actually a reliable filament to print. My printing room smelled like a woodworking shop but the filament was still a bit plastic feeling.
Grab this kit.
https://www.amazon.com/dp/B081DN6RM2/ref=cm_sw_r_cp_apa_fabc_cvvSFbG18829Q?_encoding=UTF8&psc=1
Follow this guide (it's the same process on the 5+) https://youtu.be/0pa4GNBixDk
To add to the great response from kadske, you can use bearings to separate the vertical load from the stepper. First Google result I could find https://cults3d.com/en/3d-model/tool/ender-5-z-axis-axial-bearing
There are ones on Thingiverse too.
I've found binder clips to be a real headache, even with the E5+ large build plate, invariable my skirts ended up pushing them off. I absolutely love these:
They sell an 8 pack, but every once in a while, whilst trying to remove a print from the bed, I'll slide the built plate just a bit and invariable one or two explode off into another dimension. Extras are great, and I usually find the missing ones a week or two later, lol.
Haven't doe it for my 5 plus yet, but n my 3 pro I used this https://www.amazon.com/dp/B0714MR5BC/ref=cm_sw_r_cp_apa_glt_fabc_APDFJW7JMWRMXXMQC2Q2
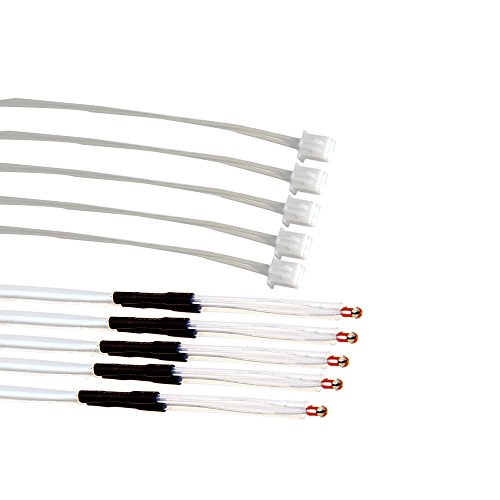
You might have a short somewhere. I would still pick up a replacement set of thermistors. This is what I used, with no issues.
​
I found it odd that I had an issue only 4 months into owning an E5+, whereas my E3 has had motherboard issues I've never had an issue with a thermistor in 3 years of ownership. I have a feeling that there's an installation issue with it at the factory.
I've had good results with this. But yeah, no helmet should take that much material. Watch cura how to videos and practice slicing, watching print time and material used, then go back and adjust a little bit and slice again. Changing 1 thing at a time between slices will help learn the impact of that setting on material use.
https://www.amazon.com/gp/product/B08B6F1FV5
This is the kit I bought. I actually had bought it before I bought my printer for other things (mostly pi-hole and a local dns server) but it runs octoprint without any issues for me.
I'm still learning. But I found that acrylic sealant does a decent job of keeping the prints from allowing water penetration. And it's cheap.
https://www.amazon.com/gp/product/B003W0A19U/ref=ppx_yo_dt_b_search_asin_title?ie=UTF8&psc=1
If you are sill using the brass z-axis nuts, any screeching you are hearing is most likely coming from these brass nuts. No matter what lubrications I used, I could not get it to shut up. I ended up upgrading to a POM Anti-Backlash nut and it has not made a peep since.
I would also avoid using any greasy or oily lubricants as dust and dirt collects on the rods and may cause issues as well as needing to be cleaned on a regular basis. I ended up using a 100% dry-film Teflon Coating and lubricant made by DuPont and that has worked really well... almost to well.
Here is the link to the POM nuts I used.
Hope this helps.
Thermal heatsink silicone on the heated bed, put the glass on top of it. It holds the glass bed really well, helps distribute heat, and no clips.
Which extruder do you have? This one?
WINSINN Dual Gear Extruder, Works with Creality Ender 3 CR10 CR-10 Pro CR-10S Tornado Upgraded Aluminum Drive Feed for 3D Printer 1.75mm Filament https://www.amazon.com/dp/B07SY745CF/ref=cm_sw_r_cp_api_glt_fabc_WTSMJP2TX03R3VDYZMRT
If so check that the gears haven’t worn down
I'm gonna assume you cycled the power and the same thing happened unscrew the 2 screws holding the fan shroud on and check the wires going to the heater cartridge inside the heat block. Track the wires all the way to your board. If they are all intact could be a bad heater cartridge. Here's one for $12 on amazon. https://www.amazon.com/HICTOP-Pieces-Cartridge-Heater-Printer/dp/B01HGIMI2G
The tubes and connectors used are pneumatic parts - for air driven systems - you can find the connectors as those parts.
https://smile.amazon.com/Houkr-Straight-Pneumatic-Connector-Long-Distance/dp/B07K88K7K4/
Will they not freely turn? I realized that I had to squeeze them together 100% while screwing the z rod through them. That was a true pain in the ass. Here are the ones I bought. Kersey had the link in his essential 5+ upgrades video. https://www.amazon.com/Printer-Backlash-Threaded-Eliminate-Accessories/dp/B07XYQH1JX. They should be the Pitch 2mm Lead 4mm ones.
I bought this board. I don't have an EXP3 port on the board itself.
I switched to a different SD card but now VS code is having trouble finding the card.
Then unfortunately it is probably damaged under the bed. The good news is that thermisters are stupidly cheap.
The process for replacing it is easy as well, but a bit of a pain. you need to remove the yellow tape under the bed (dont damage it because you will like by reusing it) and carefully pull out thermister wire. My bed is that at the end of it, you will see one wire broken off.
Take the new thermister head and put it in the same spot, slap the tape back on (or put new kapton tape down) and plug the new thermister into the connector to the mainboard and you're done.
Creality will send you a new one for free if you ask them but usually it takes some time to get there. You can buy a few of them off amazon for cheap and get it within a couple days instead.
I'd try bending before anything else. The angle being wrong will likely lead to belt wear and possibly to print issues. Or, you could replace both sides with this
https://www.amazon.com/dp/B087YWMHM2/ref=cm_sw_r_cp_apa_fabc_pYP3FbDARRHM6?_encoding=UTF8&psc=1
DO NOT BUY THE CAPRICORN LINKED ABOVE! the brass colored fitting shown doesn't have teeth and the tube will continue to slip. Buy this one, trust me I've bought both...
This happened to me recently. I discovered that the pneumatic coupler that secures the PTFE in the extruder was broken on the inside. I could push the PTFE tube into the coupler but it would not hold. I replaced the coupler and it worked just fine. I try to keep several of these in my parts replacement kit.
Looks like you broke a heater cartridge wire. You can get a 5 pack of both heater cartridges and thermistors for about $15 total on amazon from comgrow. (Comgrow is an official creality reseller).
Here you go: CCTREE 24V 40W 620 Ceramic Cartridge Heater and NTC Thermistor 100K 3950 for 3D Printer Creality CR-10 V2,CR-10S Pro, CR-X,Ender 3,Ender 3 Pro (Pack of 10pcs) https://smile.amazon.com/dp/B07L6XH4D4/ref=cm_sw_r_cp_api_i_t9nOFbAN9WX61
You might have to extend the cable with soldering or twist on wire cap.
You don’t really want solid. You want something more firm than the stock springs, yet still flexible. Otherwise it would be impossible to actually level the bed.
Having said that, Here is what I bought and have been happy with.
FYSETC 3D Printer Leveling Parts,... https://www.amazon.com/dp/B07MR7Q986?ref=ppx_pop_mob_ap_share
I got these: BIGTREETECH Direct Anti Backlash Spring Loaded Nut Pitch 2mm Lead 4mm Elimination Gap Nut for Acme Threaded Rod Lead Screws DIY CNC 3D Printer Parts https://www.amazon.com/dp/B083JWJT8W/ref=cm_sw_r_cp_apip_7XJaywsmb84mF
Make sure you get the 4mm pitch (I’m assuming you have a newer Ender 5 plus)
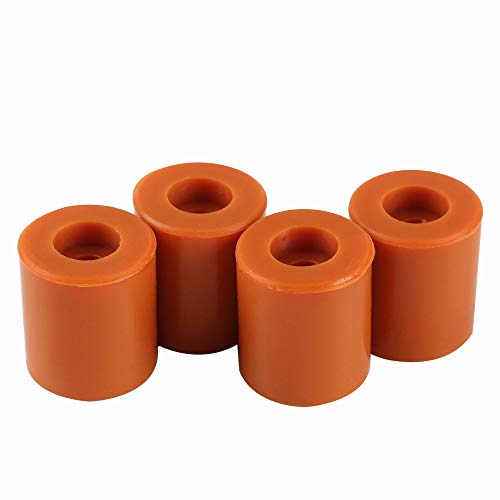
Rather than springs, people have been recommending silicone bushings. I have yet to buy them but search that term and you’ll find more posts about it.
From Amazon: https://www.amazon.com/gp/product/B082PFVMCY/ref=ppx_yo_dt_b_search_asin_title?ie=UTF8&psc=1
It's a drop-in replacement so it is actually very easy. The hard part was removing the hot glue Creality uses on the connectors without breaking them. That was a annoying but nothing too difficult.
You need some that are for 20x20 or 20x40 extruded aluminum. It’s a different spec for each profile.
That might work, but I've never tried it. I mean the product that is actually branded as Bed Weld.
I went ahead and ordered an upgraded kit on amazon for 10.99 that comes with the wheel but I did find some that look right. https://www.amazon.com/gp/product/B07MV1X613/ref=ewc_pr_img_1?smid=A3UG15SP2UP106&psc=1 but wont be here till next week. 5.37 for 10 is a pretty good risk if they are correct so I will order these as well.
This Ender 5 pro was already upgraded with the metal housing. It just the bearings that came apart for the filament roller. I went ahead and ordered an upgraded kit on amazon for 10.99 that comes with the wheel but I did find some that look right. https://www.amazon.com/gp/product/B07MV1X613/ref=ewc_pr_img_1?smid=A3UG15SP2UP106&psc=1 but wont be here till next week. 5.37 for 10 is a pretty good risk if they are correct so I will order these as well.
I always start out fresh when having issues by cleaning off the bed with hot water and soap. I then spray it down with isopropyl alcohol to remove any residue.
Next, go to the level screen and make sure your z axis is offset to the "paper method" by setting it to where the nozzle has slight friction against the paper.
After washing, I apply Bed Weld. Once applied, I turn the nozzle temp and bed temp up to running temperatures.
I then run an AUX level. Remember, AUX level isn't setting your nozzle height so when you use this to level your bed, that is exactly what you are doing: leveling not setting height. You just want to run a piece of paper under the corner positions and get some resistance and match the resistance at all four corners. Just pick a resistance and match that in the corners.
At this point I'm usually good to go. If you go through these steps and for some reason aren't getting adhesion, check your filament and your extrusion settings. Also check to see if you are somehow changing your z-offset whether on the machine or in the code during the print.
​
Good luck in your future printing!
I upgraded to the BIGTREETECH SKR 2 using TMC2209 stepper drivers. I have independent Z control using this board. I loaded Klipper onto it and have configured ABL using the BL Touch.
My recommendation would be the Micro Swiss all metal extruder. A little pricy, but an amazing upgrade for your printer. https://www.amazon.com/Bowden-Extruder-Compatible-Creality-Tornado/dp/B09K1CNP6L/ref=asc_df_B09K1CNP6L/
Just start out getting the all metal official replacement. Its like $12 right now. Plan for direct drive in the future when you get more intimate with the machine and can do some research.
https://www.amazon.com/Creality-Official-Extruder-3D-Aluminum/dp/B09LQKN5WG
I bought this, not installed it fully yet tho - https://www.amazon.co.uk/gp/product/B0B1529QH2
I'd suggest replacing the hotend to an all metal one whilst you've got everything apart too, that way you can leave the original parts more or less alone and fall back to them quite easily if you decide you prefer bowden
Link to product on Amazon:
https://www.amazon.com/Creality-Original-3D-Extruder-Assembled/dp/B07WRKJG9N
Not an upgrade, just a replacement for what came with it, if yours got damaged.
You can still solder and heat shrink connections to those just fine. Even the pre-soldered male/female tails use the same connectors. Take a look at these, just the pcb mount soldered and heat shrinked:
https://www.amazon.com/JST-XH-Balance-Connector-Silicone-Woodland/dp/B07YKHV46N
I’ve been running it like you have it for a bit now with no issues. It’s such a better set up.
I bought these from Amazon but haven’t got a chance to try them yet.
RuiLing 4PCS 1.5M 59 Inch Stepper... https://www.amazon.com/dp/B07QHTG82K?ref=ppx_pop_mob_ap_share
These actually have a brass end on them, so, A-they won't fail should you
accidentally touch them, and B-they screw in where the screw that holds
the glass thermistor in place goes. This package even has extension
wires included just in case. https://smile.amazon.com/Gulfcoast-Robotics-Thermistor-Creality-Printers/dp/B08R3J6GJ3/ref=sr\_1\_7?crid=1Z2DKV656SWDK&keywords=brass+thermistor&qid=1668243693&sprefix=brass+thermistor%2Caps%2C92&sr=8-7
Here is the extruder I am using on my Ender 5 Plus. It works great, and has never give me any issues, and it's a few dollars cheaper than the one branded by Creality.
Printer doesnt need to go back, its just fine. this is a good time to get the all-metal extruder upgrade and get rid of the plastic one.
https://www.amazon.com/Creality-Official-Extruder-3D-Aluminum/dp/B09LQKN5WG/ref=sr_1_1
Stop using the "bluc clip" connector and compression fittings for the Bowden tube. I struggled with the same problem. These compression fittings do not just pop out like the numatic ones.
https://www.amazon.com/Hotend-Extruder-Compression-Fitting-Printers/dp/B09QKN2NR1
The "C shaped spacers" are collet clips for ensuring the collet doesn't get depressed allowing for the teeth inside to let the tube loose. But based on what your issue is, it sounds like the teeth in the pneumatic fitting are not gripping the tube correctly. I had this happen recently with the fitting on my hotend. The solution was to just buy some fittings on Amazon.
Like others said, salvaging the existing plug is unlikely to work, but soldering is quite easy, especially for something so large as an XT90 connector. However, if you don't have an iron, and/or no desire to solder, another cheap way out would be something like this (https://smile.amazon.com/Pigtails-XT-90S-Connector-Silicon-Battery/dp/B07TBDTM2D/ref=sr_1_6?crid=1G69PN9SNMKXP&keywords=XT90&qid=1662908781&sprefix=xt90+%2Caps%2C90&sr=8-6) and some crimp or wago connectors.
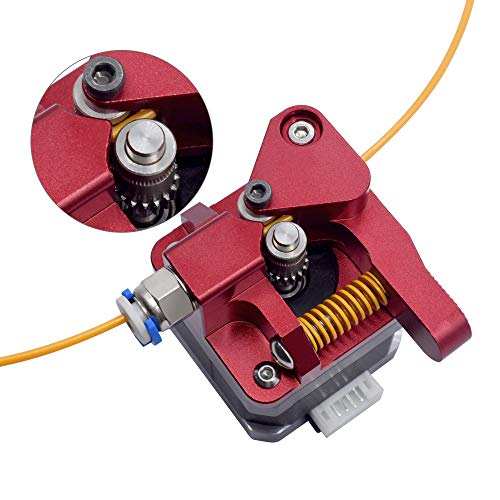
I've tried a bunch. The dual gear is the best. Here i what i use in my printers. Need to recalibrate the esteps after you install.
​
Yes - in my original comment - the BTT Skr mini E3 V2. On Amazon $37 https://www.amazon.com/BIGTREETECH-Upgrade-Control-TMC2209-Creality/dp/B0882QGFZR. $ 26 from BTT - ships from China.
Look at my original post, and take a look at the link to thingiverse.
I did not try and use the E5 Plus display, but used a Ender 5 LCD display, I know people have figured out how to use the Plus display. Message again if you need help.
Its fine when its all powered, only happens with power off, this should not have anything to do with voltage at this point. I did notice that after I press on each side z screw spins a bit lowering that side. I think its because the new backlash guides have much less friction than brass so screw doesn't have the same stability. I bought these https://www.amazon.com/dp/B07XYR3F4C?ref=ppx_yo2ov_dt_b_product_details&th=1 not realizing they are not metal. So I may replace for brass version since these might be too slippery good :)
I bought a screw in thermistor. It is a right fit but it works fine, and instead of rerunning the whole wire, I cut part of the old one off and connected the two, I covered it up with shrink wrap. I also used it on other parts of my machine and it works without a problem
This is the one I got. I use it with my Micro Swiss. It did not have a flat spot on it for the set screw. It was round like the stock creality, so I just spent a few minutes on it with a file and ground down a flat spot on the shaft. It’s been working great. It did seem to be running a little hot though. I probably could have reduced the voltage a tiny bit, but I just bought these stick on heatsinks.. Put them on the extruder, X, and Y steppers and they all seem to run significantly cooler.
Not sure if this helps but
- I only use the glass side
- Amazing product, I have it in my subscribe and save >> 3D Printer Adhesive Glue Bed Weld Original, Strong Grip Reduces Warping for ABS, ASA, PLA, and PETG Filament on Heated Build Plates, 118ml, 4 fl oz https://www.amazon.com/gp/product/B079984GV5/ref=ppx_yo_dt_b_search_asin_title?ie=UTF8&psc=1
I'm just speculating, but after all your changes and with the dual gear extruder, it appears that the filament is not being grabbed properly.
Based on this image this looks to be a mechanical issue and not anything software or settings related. I had a similar issue earlier this year. In the end the solution was to just replace the extruder gear. I'm assuming you have this dual gear extruder. I have one too, but haven't installed it yet.
Since I think the problem is the tension on the extruder, look into putting a metal shim between the spring and the screw. If you still have the screw cap for the old extruder that went in there, use that.
If I were in your situation I would look at a few things;
- The home position of your printer is in completely the wrong location if all the levelling points are out. Was your routine to press z home, aux level, z home again, then run the measuring/bed level? That's my usual go-to.
- That there are 15/16 points circa 24mm out of position, and one point in suggests the touch probe could have failed. If you've got a new printer I'd look to return, if it's old/second hand I'd have a go at replacing it, they're not super expensive.
- There may be some serious kinematic issue with the machine build. Have you checked everything is tight? This guide/video series is possibly the best beginner resource on the web and includes a section on this. My e5+ has an annoying habit of slipping on one or both of the z axes when the motors are off, so I have to faff with syncing them before re-levelling every time I turn the printer on. Knowing that, are you sure the shaft couplers are fully tight? these slipping could be the cause.
By no way is what I've suggested exhaustive, if none of this helps I hope somebody else has a solution for you. Good luck.
Ok, use this: https://www.amazon.com/dp/B00175VGUA?ref=ppx_pop_mob_ap_share for the metal support bars, and use this: https://www.amazon.com/dp/B000XBH9HI?ref=ppx_pop_mob_ap_share for the screw bars itself. Took away my pain
if the noise is coming from the Z screws then some anit backlash nuts may fix it.
​
my z axis screws were making noise (not as bad as this) and i tried this and that and lithium grease and etc. but these things worked almost immediately. they are only about $12 so its not some investment if it doesnt hit the spot.
hope this helps.
Ask your family and friends if anyone has a drill press that you could use to drill your holes. If not, you can get this drill guide rather inexpensively, then keep it for woodworking, or other crafts. https://smile.amazon.com/Milescraft-1318-DrillMate-Drill-Guide/dp/B014A1Z92I/ref=sr\_1\_5?keywords=drill+guide+for+straight+holes&qid=1657251569&sprefix=drill+guide%2Caps%2C137&sr=8-5
The thermistor can be replaced with this screw-in type: https://www.amazon.com/gp/product/B07B42NPW3/. That's going to be about $9. Or, you could replace the entire hot end for $16. That's what I'd do.
Or, if you're within reasonable driving distance of Madison, WI or the twin cities, PM me and I'll take the whole printer off your hands.
That was my reason as well, and unfortunately I had to make most of the wires for the most part. The only ones I could find were long cables for the stepper motors but they were pinned out incorrectly and to be re-pinned, easily enough but still a pain. The rest I just clipped the wire an inch or so from the existing connection and soldered in a wire of matching gauge. Also if you seen these things (Amazon link) I believe they are a god send. Makes the soldering and insulating one step with a heat gun.
The wires for the replacement probe are never long enough to reach the connector between the case and the probe. The probe also doesn't come with the connector attached, so you have to splice the wires together. When clipping the cable, pull the red cable's out of the wire sleeve and cut it at the halfway mark. That should leave you with enough slack for this probe and future probes. If you don't have some Solder Seal Wire Connectors, i would recommend picking some up to make connecting the two wires much easier. You're going to need a decent wire stripper as well.
What firmware are you running? I've seen this issue happen with Kersey Fabrication firmware. You can fix it by installing Insanity Automations firmware and screen firmware. Their thermal runaway protection is a little more forgiving and solved my heating problem.
If you don't think it's the firmware, then you need to check a couple things.
- Bust out your multimeter and measure the power going into your heating element. It should read a constant 24v.
- If the power is good at the board, then measure it at the connector between the heating element wires and the wires going into the case.
- Be extremely careful not to short the connector when measuring the voltage. This will instantly cause smoke and possibly a fire.
- Measure the voltage at the heating element.
- If all voltage is good, then I recommend replacing the heating element.
Try upgrading to Cura 5.0 - it's a major improvement over 4.11. It's not going to fix this issue, but you'll like the new slicing engine.
As for your issue, time to put on your detective hat. The first thing we need to do is make sure your temperature probe isn't screwed in too tight. This can cause false readings that will trigger unwanted temperature fluctuations. Take off your fan shroud and check how tight you have the temperature probe. It should be loose enough that it allows for a very small amount of movement, but tight enough that it keeps it in the hole.
If your temperature probe is fine, then it's time to check the hotend. Gently pull on the two red wires and make sure they are connected tightly to your hotend. If so, then you'll need to bust out your multimeter and take the case off. Turn on the heat and measure the voltage going to your hotend by touching the red and white wires of your multimeter to the two separate screws that connect to your hotened. Leave it on there for a little while and make sure you are getting a constant 24v. If the power is fluctuating, then it's likely that your mainboard has gone bad. Check the bottom of it for burns and the top of it for popper or pregnant capacitors. The top of the capacitors should be smooth, if you see any lines then it's pregnant and you need to replace your mainboard. If the board looks fine, then it could be your power supply.
To check the power supple, measure the voltage going into the mainboard by putting your multimeter onto the red and black wires that go from the PSU into the mainboard. If the power is fluctuating from 24v, then your PSU is likely bad. How long have you had your printer? The power supplies are rated for 5 - 8 years based on use.
In my experience, 99% of the time it's a bad mainboard, not the PSU.
Replace your Extruder Gear. Pickup a pack of steel gears and screw them on. Once you put the new gear on, make sure to calibrate your E-Steps again.
- Clogged Nozzle
- Extruder has cracked
- Extruder gear has worn down
Those are my guesses with the available information we have. If you need to replace your extruder gear, pick up a pack of steel gears and screw them on. Once you put the new gear on, make sure to calibrate your E-Steps again.
No need to buy a new extruder motor. Just get a RC-Gear puller and remove the old gear. Pickup a pack of steel gears and screw them on. I did that with my press fit extruder, and it works just fine. The D-Shaft is nice, but not necessary.
It may be bent just enough to cause it to stick inside the solenoid. If it's bent, don't even bother trying to straighten it out. I tried that and it was never able to level correctly. If it's snapped, don't bother trying to glue it back together, it'll get stuck in the solenoid.
Luckily, it's an easy fix. Pick up a new one if you don't already have a spare.
Remove the 2 screws holing the fan assembly and BL touch to properly get to it. Don't worry, you can't do too much damage by doing this. I've done this a bunch of times.
Slightly loosen one screw and remove the other. This will expose a black set screw in the top. Remove that set screw and pop the pin out and replace with the new one. Before popping the new one in, check for any obstructions, or just blow into it. To test it out, just fire the printer back up and it should do it's self test by going in and out. If it works, put it all back together.
Mine did this when it was new. It sounds like it could use some lube on the lead screws. I use this:
I forget who did this recently, props to you for the inspiration.
I picked up these 24v 40mm rgb fans because why not and decided to just do a mod because, why not. The cable length isn't long enough to get to the header, so I had to cut the leads and splice them in. Still, a fun little mod.
Had the same issue after a couple months with mine as well. I picked up a small tube of synthetic grease and it went away.
This is a food grade grease. So if you ever start printing with PETG to make stuff that may come in contact with food, it's a safer alternative than a petroleum based grease.
A small dab on above and below the Z screw nut should last a few months. Reapply as needed.
This is happening because of the 'Power Loss Recovery' feature. It disables the read-write protection on the SD card and heavily taxes it. If you disable that feature, you'll stop burning mSD cards up. If you want to leave the Power Loss Recovery on, then you need to buy a V60, UHS-II card. These can handle the fast, read/write speed that the printer demands. They are a little pricy, compared to the cheap ones, but they will not corrupt. This is the best deal I could find on one.
If you dont mind cheating a little, this stuff is a miracle from God.
https://www.amazon.com/Printer-Adhesive-Layerneer-Original-Filament/dp/B079984GV5/
I have the Eibos Easdry, specifically this one:
https://www.amazon.com/gp/product/B09QGLMQJY
It has a fan for circulating the heat for good consistent drying and the fan is quiet. The humidity sensor seems to work and it will get as low as 10% RH after the 4-5 hours of drying. I was skeptical, but on those problematic filaments, it definitely improved them.
I have the micro swiss all metal dd setup. I will just say it's night and day the quality it produces. I have my retraction set to 2.5mm and have no stringing. I still run 80mm/s and on a test cube there is some ringing and ghosting, but on a normal print that has contours like a bust or figure it's running absolutely flawless. I will say however. Check your extruder motor before you pull the trigger on it. Make sure it's not a pressfit gear on it. if you have the D shaped shaft with a set screw your golden. if not you can get a 42-40 creality replacement for like $18 on amazon https://www.amazon.com/gp/product/B091CXPXVP/ref=ppx_yo_dt_b_asin_title_o04_s00?ie=UTF8&psc=1 That's the one I got and it worked perfect out of the box. I did have to update my steps on the extruder. which is a bit of a pain. But once you do it you'll never have to worry about it again.
Well I finally got it out, the issue was that it was stripped smooth from the factory. to the point they actually dented the heat element. But I am upgrading it to the Micro Swiss direct drive I finally got it drilled out enough to get an extractor to bite. It was a bitch but I got it.
I ran into this issue trying to change to a dual gear extruder. The press fit one is also a shorter shaft which wouldn't work even if I ground a flat spot into it. To my annoyance I had to buy a new stepper motor and this one has worked for me.
If the back is lower than the front, by as much as you say it is, it's likely not the screws you tightened. That's usually caused by poor bed leveling when you created your mesh. Make sure to level the bed as much as possible with the printer off and manually adjust both z-axis by turning the z-axis screws manually until the bed is level. Then turn the printer on and perform your usual level regiment.
Lastly, which build plate springs does your printer have? The strong yellow ones or the old style silver ones? If it's the older ones, i would recommend upgrading your springs. Comgrow makes great ones that i use on one of my printers. You can find them (here)[https://www.amazon.com/Upgraded-Creality-Aluminum-Leveling-Springs/dp/B082PC59BP/ref=sr_1_3?crid=1SD7MS5A7N0A2&keywords=creality%2Bbed%2Bsprings&qid=1652419887&sprefix=creality%2Bbed%2Bsprings%2Caps%2C170&sr=8-3&th=1]
​
Something like that. Doesn't have to be that one, they're all quite similar
Either buy a new motor:
Or remove the gear:
This one works great for me Creality Ender-5 Plus PEI Magnetic Flexible Heated Bed, 3D Printer PEI Printing Plate 377X370X2mm https://www.amazon.com/dp/B09GJPV8JY/ref=cm_sw_r_cp_api_i_GSJ05EP1TPP2PMG92D01?_encoding=UTF8&psc=1
Let me know how that works for you. I've read about that working, but never heard of it working in practice. Make sure not to bend your gear shaft.
You may be having the same issue I was having last month
/***********/
TL;DR - New tubing, new hotend and new extruder gear is what you most likely need to do. All three are easy fixes.
/***********/
Short story long - I was having clogging issues, and lots of under extrusion. Replaced the nozzle, checked for clogs in the hotend, all good. Noticed the extruder gear was worn, so replaced that. Still got clogs and under extrusion after a couple test prints. Thought maybe the hotend was failing, but I verified with a thermometer that the nozzle temp was ok. Decided that there must be an issue with the hotend that I couldn't see.
Tried to pull the Capricorn tube, but no dice. Ended up replacing the hotend with an OEM one. Took apart the old hotend and gunk was in the tube around the heatbreak: plastic mixed with glue stick residue, etc... When it's cold, PLA moves freely. When hot, then cold, then hot again just enough expansion in there to clog it up. It doesn't take much to get it to clog apparently. Also, the Bowden tube after a year moves around just enough that the teeth in the pneumatic fitting grind away and shavings do find their way into the heatbreak.
All that to say, learn from me and if you haven't done so yet, replace the extruder gear, bowden tube, and the hotend.
Toaiot 3D Printing Hotbed Flexible Steel Spring Sheet 13.7x13.7 inch/350mm Heated Bed Buildplate with PEI + Magnetic Base B Compatible with Tronxy X5S/ Voron https://www.amazon.co.uk/dp/B091KKS9YR/ref=cm_sw_r_cp_api_i_WX4SWTX993ZFFGZWX129
I use this one and I have had pretty much perfect bed adhesion
i mean you can replace it also with the stock block---14 bucks and it includes all the sensors and wires...plug and play basically...if you want to upgrade, you can go micro Swiss or one of those more easily drop-ins that fit the stock housing---or print a new housing shroud for one of the fancier ones...but it's an easy one to swap if you're just looking for a stock replacement.
​
For example I used this one: cheap and it is plug and play:
https://www.amazon.com/gp/product/B07WRKJG9N/ref=ppx_yo_dt_b_search_asin_title?ie=UTF8&psc=1
​
alternatively, you can just buy a bunch of packs thermistors and heater wires---you can buy them in multi packs real cheap. either way SUPER easy to replace. You got this :D
​
just remember to re-level and calibrate after you replace the hot end.
Thanks I’ll try that
Is it this hot end you’re talking about?
Micro Swiss All metal hot end kit for Creality CR-10 Pro/MAX .4mm M2591-04 by Technology Outlet https://www.amazon.co.uk/dp/B07P82F12K/ref=cm_sw_r_cp_api_i_23R0YNNNF1A2ZRN651PX?_encoding=UTF8&psc=1
Thanks I’ll try that
Is it this hot end you’re talking about?
Micro Swiss All metal hot end kit for Creality CR-10 Pro/MAX .4mm M2591-04 by Technology Outlet https://www.amazon.co.uk/dp/B07P82F12K/ref=cm_sw_r_cp_api_i_23R0YNNNF1A2ZRN651PX?_encoding=UTF8&psc=1
also whats the difference here??
I was repeatedly having clog issues due to filament leak form the mating gap between tube and the nozzle. I swapped the hoetend to the BIGTREETECH all metal hotend and working great ever since.
This is the one i got. It's only one sided smooth, i like it. Just know this one is thicker than the one creality sells and not as flexible and "snaps" really hard into place. Very solid imo. Someone complained about the magnet but im only doing PLA.
FYSETC Ender 5 Plus Printing Platform 3 in 1 Flexbile Spring Steel Plate 377x370mm/14.84x14.56inch with PEI Build Plate Heated Bed Cover + Magnetic Base Compatible with Ender 5 Plus 3D Printer https://www.amazon.com/dp/B09BTV3YBC/ref=cm_sw_r_apan_glt_i_8F54H5433Y8YMMD1AW50?_encoding=UTF8&psc=1
also superlube for the lead screws: https://www.amazon.com/Super-Lube-21030-Synthetic-Grease/dp/B000XBH9HI/
and PTFE for the linear rods: https://www.amazon.com/3-ONE-Multi-Purpose-PTFE-Lubricant/dp/B00J25JDDY/
Edsal 48"W x 24"D x 72"H 5-Shelf Steel Shelving, Black https://www.amazon.com/dp/B0195ESV2U/ref=cm_sw_r_cp_api_glt_i_FMP041X82S7EGSHWYZBX?_encoding=UTF8&psc=1
This is where I got I from. The basic length of one shelf is 2x4ft and the total height is 6ft. There’s some wobbling with both printers on but it’s super study
I had this at first on my right side rod, but after I greased my threaded rods with superlube and a number of prints evened it out, it didn't seem to do this anymore.
Overall its pretty common, especially if you have 8mm lead threads. My E5P came with 4mm lead. When most people "fix" this problem, they usually swap to 2mm lead screws. First, the bed wont fall on its own anymore, second the flatter thread profile results in more steps per revolution and thus better accuracy in the z-axis. This enables you to do more layer height variations without the printer having to round up or down. The only real downside if you print with z-hop during retraction, it might result in longer print time if there are a lot of retractions.
The other fix that might be easier to start with, is to install anti-backlash nuts on your threaded rods. You just need to confirm which lead you have. You will need to know which lead type you have to order the correct nuts.
If you go into terminal run M503. In the output, look at the M92 setting:
echo:Steps per unit:
echo: M92 X80.00 Y80.00 Z800.00 E93.00
If Z is 400 then you have 8mm lead and very likely to fall on its own. If Z is 800 like mine, then you have 4mm lead which is only slightly likely to fall, usually only if you bump it trying to remove parts. If Z is 1600 then you already have a 2mm lead but that would be surprising to me.
Here is the link to the anti-backlash nuts (see there is a choice for 2mm/4mm/8mm lead)
2-Pack TR8x4 T8 POM Anti Backlash Nuts for Ender 5 / Pro/Plus 3D Printer, Pitch 2mm Lead 4mm Acme Threaded Rod Eliminate The Gap Spring (Pitch 2mm Lead 4mm) https://www.amazon.com/dp/B07XYR3F4C/ref=cm_sw_r_cp_api_glt_i_WETWQTJEWF3EGW3S6TS4?_encoding=UTF8&psc=1
Been using this one and am quite happy. FYSETC Ender 5 Plus Printing Platform 3 in 1 Flexbile Spring Steel Plate 377x370mm/14.84x14.56inch with PEI Build Plate Heated Bed Cover + Magnetic Base Compatible with Ender 5 Plus 3D Printer https://www.amazon.com/dp/B09BTV3YBC/ref=cm_sw_r_cp_api_glt_i_TJY6NSFDXF1VW89FF7GM?_encoding=UTF8&psc=1
Yes, you should buy a new extruder motor. I'm guessing the gears you want to use have screws. If so get a motor with a flat side so the screw is seated fully. This should work: https://www.amazon.com/dp/B091CXPXVP/ref=cm_sw_r_apan_glt_i_XJXZS3CXK08AE8RXNQGM?_encoding=UTF8&psc=1
Creality Official Upgrade Extruder, MK8 Extruder Alloy Block Bowden Extruder 1.75mm Filament for Ender 3 Series, Ender 5/5 Plus/Pro, CR-10 Series 3D Printer https://www.amazon.com/dp/B08F23ZNTG/ref=cm_sw_r_cp_api_glt_i_VQMGHJRA7SC165R3WYM1?_encoding=UTF8&psc=1
This one is what i use and is prefect. You will also need a new stepper motor because the stepper that comes with the printer now is to short
Creality 3D Printer Original Stepper Motor 42-40/1pcs and 42-34/3pcs 2 Phase 0.8A 1.8 Degree 0.4N.M for Most FDM Printer CNC Accessory Replacement, 4pcs/Pack https://www.amazon.com/dp/B08FM74CNC/ref=cm_sw_r_cp_api_glt_i_JPR7YCNSG09KH3J4FBXR?_encoding=UTF8&psc=1
Those glass boards typically start having the problem you are talking about and it seems like whatever you do, you can't get good adhesion. I had that problem with my glass bed and other people have to. You have two options to resolve this. The first is to purchase a PEI Build Plate. Smooth or textured will work. The best priced one is here: $75.99 out the door is the best price you'll find. I own two of them. One textured and one smooth. You'll never have to worry about adhesion again. https://www.amazon.com/dp/B09P8KD4B2/ref=cm_sw_r_apan_glt_i_HP2A8DP8XK6YAKBZQAY6
The second option is a DYI solution. You put blue painters tape over the smooth side of the glass bed and use a glue stick on it. Works amazingly well for all filament types. There are tons of YouTube tutorials on how to do this.
BCZAMD 235 X 235mm 120V 500W Silicone Rubber Heater Mat/Pad with NTC 100K Thermistor Strong Adhesive for 3D Printer Parts https://www.amazon.com/dp/B0814YRGGK/ref=cm_sw_r_apan_glt_i_0Y2BTTV0J5TJMK0FWBFG?_encoding=UTF8&psc=1