
What are
/r/Homebrewing's
favorite Products & Services?
From 3.5 billion Reddit comments
The most popular Products mentioned in /r/Homebrewing:


The most popular Services mentioned in /r/Homebrewing:
Google Docs
Brewtarget
eBay
Walmart
Instructables
Google Sites
TreePad
TeeSpring
Google Play Books
Costco
Barnes & Noble
eHow
Google Drive
Camelcamelcamel
Alibaba.com
The most popular Android Apps mentioned in /r/Homebrewing:

Wort Homebrew Calculator

Biermacht
Brew.io Pro - Homebrewing
Brew.io - Homebrewing Toolkit

Brew Buddy

Multi Timer Free

Lists! Free
Craft Check
BJCP 2015 Beer Styles

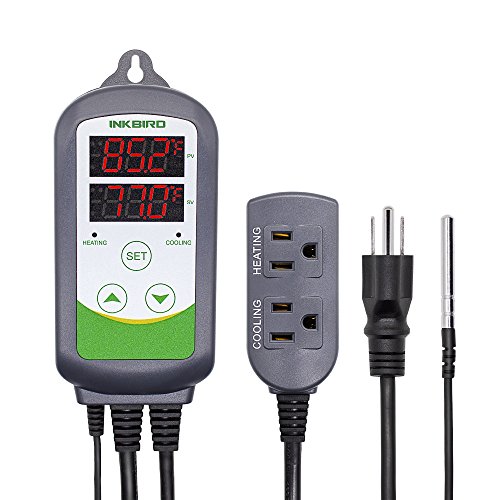
Inkbird
BreweryMap - Find the Source

ES File Explorer File Manager
Wort Homebrew Calculator Pro

Imgur: Memes, GIFs, and More

Multi Timer StopWatch
The most popular reviews in /r/Homebrewing:
You need a potable water hose.
Camco 50ft Premium Drinking Water Hose - Lead Free, Anti-Kink Design, 20% Thicker Than Standard Hoses (5/8"Inside Diameter) (22853) https://smile.amazon.com/dp/B004RNR9QY/ref=cm_sw_r_cp_apa_i_jl6jCbJE0XG1E
I know that the homebrewfinds guy does a lot of linking for referrals and such, but I'm not sure how well he vets a lot of his links. I would NOT trust anything he posts that isn't from amazon or a well-known brewery shop.
It's not clear where this information goes once you complete it, but that website is definitely just phishing for information. A simple google search shows this.
Slick deals link stating it's a scam: http://slickdeals.net/f/6647540-free-wine-or-champagne-bottle-thermometer-cafe-marsanne
Another: https://www.mywot.com/en/scorecard/cafemarsanne.com?utm_source=addon&utm_content=popup-donuts
Do yourself a favor and stick to simple kits until you become comfortable with the process. I understand the desire to jump in feet first and brew a more complex beer. Most of us went there when we started brewing, but few were happy with the results. I'd suggest extract kits from any of the larger home brewing shops. Most all of them have nice IPA recipes.
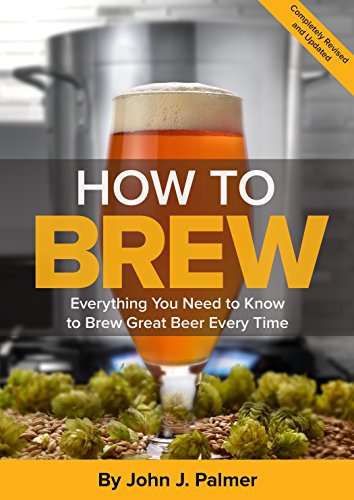
Also, you'd really benefit from this book:
The first few chapters will teach you everything you need to successfully brew your first batch. Later chapters will lead you into more advanced brewing methods and contain lots of information on a variety of brewing subjects. I've been brewing for 12+ years and still find it to be a great reference.
If $20 doesn't fit your budget, an earlier edition is available free at: Welcome to How to Brew - How to Brew . Much of the information in this edition is outdated, but the basics are similar enough to brew good beer.
The Inkbird ITC-308 is the go-to for a lot of us around here. And it's cheaper than the one you linked to. I've got one myself, and it hasn't let me down yet.
Can't figure out how to link to the actual episode on Netflix, but theres an interesting documentary called 'Cooked' that has a section that goes into some of the science behind fermentation of beer, cheese, and chocolate. The episode is titled 'Earth' on Netflix, I'd recommend the others as well if you are a fan of cooking in general but that is the one that deals with fermentation.
http://michaelpollan.com/videos/netflix-documentary-series-cooked/
https://www.netflix.com/title/80022456
I'd second Brew Masters about Dogfish Head, great show that was cancelled all too early...
Way too expensive. There are better options on the market, including a 1.5 gallon torpedo keg, 1.75 gallon cannonball keg, or something like this:
Materials:
- Igloo 5.2 cu ft chest freezer w/ "weak refrigeration" option
- 10 ft 2x6 (cedar)
- 8 long wood screws
- 8 short wood screws
- 2 Perlick 525SS Stainless Steel faucets with 4" shanks
- 1 cabinet handle
- 1 wall-mounted bottle opener
- 6 1/4" disc neodymium magnets
- 1 bar magnet
- 8" plastic/metal drip tray
- 2 3" L brackets
- 1" spade bit + power drill
- 1" thick pink foam
- indoor/outdoor sealant
- wood stain, black spray paint, chalkboard paint
We started with an Igloo 5.2 cu ft chest freezer (on sale for $150) that has a built in refrigeration option. We double-checked the temperature by putting thermometer in there and letting it stabilize after 24 hours…confirmed, it is ~40 F.
Edit: Don't forget to drill pilot holes for all of your screws! It will help with alignment and make things SO much easier. You will also have to drill a pilot hole for the taps, all the way through the board. You'll have to drill the spade bit on both sides to get all the way through, so this pilot hole will ensure your two cuts line up.
Earth Eagle Brewing in Portsmouth NH is one of several breweries specializing in Gruit (they do plenty of other great "normal beers" too). Their book "Against All Hops" is a lovely introduction to the world of Gruit.
​
The major trick you have to address with a gruit is finding an alternative source for bittering and preservation (unless you're intentionally shooting for a sour).
​
Brooklyn Brew Shop has a Dandelion Gruit that is a nice starter recipe for what that is worth that includes lemon peel, black pepper, and dandelion instead of hops. The recipe is one of the first in their book "Make Some Beer" and thanks to the preview function on Amazon it is fully view-able using the "look inside" feature. So I'd check that out as well (and consider supporting them; I found their kits to be a great introduction to all grain 4 years ago). As a warning this recipe usually yields a tart beer not unlike a Berliner if you use the T-58 (60's to low 70s) and dandelion (whole foods is a good source for the dandelion).
​
In general the math on Gruit is far less established so you'll need to either track down similar recipes and/or be willing to experiment since unlike hops there aren't nearly as many calculator resources to help you dial in your bitterness etc.
​
best of luck.
I really like this idea and went on ahead and created a public google docs page with a template to get it started. I have not added a recipe yet but I hope others will.
https://docs.google.com/document/d/1Od-DmpYxcvOY2pjRIvW0_RTgNhtyEBQPiaYZfi1RRu4/edit
The beer styles are from http://beeradvocate.com/beer/style
Go for it! They were fun to do.
I used 3/4 maple. Cut and sanded to 220 (tried to convince my husband I needed a scroll saw vs. Jig, lol) Then painted with acrylic and waterproof ink pens. Used oil based polyurethane.
The hardest part was putting on the ferrules, surprisingly. I used these for the ferrules. The tricky part was needing to pre-drill the holes for the bolt (which I expected) but then buying locking nuts to get the hanger bolt on and they still required lots of oooph. It looks like amazon has a set for wider tap handles too.
I want to make our friends a couple with leftover chestnut I had from my husbands present and maybe woodburning those.
Beer Tap Handle Standard Ferrule and Hanger Bolt Set, 5 of Each (5) https://www.amazon.com/dp/B00J5W8O0C/ref=cm_sw_r_cp_apa_i_ZeFcEbFB9861D
A friend won a raffle to have something 3d printed by my university's engineering club, and he wanted a nude figurine as a tap handle.
I used this STL file for the body, and mounted it on the black base-of-sorts. They were joined with a plastic epoxy.
I found a threaded insert for wood at Lowes, like this, heated it up and screwed it into a hole that was in the bottom of the base. All the joints are very stong, as is the body itself.
If you want the best general resource, How to Brew by John Palmer is the standard. Honestly, if you just want to see if it's for you or not, get a one-gallon kit and follow the directions. It might not give you the best beer on your first try, but it'll give you a pretty good idea of what it takes.
this isn't double wall. So it's not really a great value. These can be found without the copper finish for about $16.00 on amazon. You can find double wall 64 oz for about this price, why buy a single wall for $25.00
wow, I got this one for like $23 on amazon, nothing fancy or anything though.
https://www.amazon.com/Inkbird-Itc-308-Temperature-Controller-Thermostat/dp/B01MDSWXY4
Pretty sure this is what you are looking for. Plug this I go the wall, set your temp range, put the probe into the keezer (some people put it into a water bottle so you are getting the liquid temps in the keezer), then plug your keezer into the cold side of the ink bird
From the early 1900s: Basically pale malt with invert sugars. They were the ancestors of modern bitter.
Check out Shut Up About Barclays Perkins: http://barclayperkins.blogspot.com/?m=1
Or his books...
This one in particular has a section that talks about light dinner ales.
https://www.amazon.ca/Home-Brewers-Guide-Vintage-Beer/dp/1631593641
Nice, saved! For the extract folks (myself included for now), not difficult to convert to lbs of extract.
I've personally been working my way through the "CloneBrews: Recipes for 200 Commercial Beers" book and their recipes have been great! Since this past October I've made the Saison Dupont, Harpoon IPA, New Castle Brown, and most recently Guinness... all turned out great! Still deciding what's next, maybe Chimay Red, or I'll be looking through this list for something.
Pretty good text. I read a good chunk of it when I was researching my Thomas Jefferson ale.
Some interesting bits for me were that they would sparge up to four times, but they didn't call it that and the first runnings would be boiled for up to 3 hours.
Also, they believed that hops would be wasted if they were not boiled for at least an hour.
Also, this is the 1804 printing. There is an older one on archive.org that was scanned from the new York public library and the library checkout stamp on the front cover has John Adams handwritten name from when he checked it out, which I think is really cool. I'll see if I can find it.
Edit: I was slightly mistaken. The John Adams copy is from the Boston Public library and it was actually a copy he owned. His name is signed on the title page: https://archive.org/stream/theorypracticeof00comb#page/n5/mode/2up
Deschutes makes great beers and includes a Homebrew tab on a number (all?) of their beers. It won’t give you exact ratios, but all the critical info to make a good clone is there, it can be helpful to fill in some blanks with Ray Daniels book Designing Great Beers.
Not online, but Craft Beer for the Homebrewer has a lot of good recipes from well known breweries.
Get a bottle tree. The rinser that goes with it is awesome too. I can't believe I bottled for so many years without it. I've been kegging now for almost 2 years but this weekend I bottled seven gallons of a blended oud bruin and I forgot how accomplished I feel afterwards. Those bottles will cellar for months and be consumed over the course of 2-3 years.
Bulk Grain storage lightning deal EDIT:2 looks like these are coming up a few times during prime day. https://www.amazon.com/gp/product/B004L0Z4HO/ref=ox_sc_act_title_1?smid=ATVPDKIKX0DER&psc=1
Edit: Inkbird controllers going up for lightning deal starting at 6:00 p.m PDT https://www.amazon.com/dp/B07PVBG8K1/ref=gbps_tit_m-6_3b69_801408ea?pf_rd_p=db08f08d-45f1-490b-aa6c-1f4d543b3b69&pf_rd_s=merchandised-search-6&pf_rd_t=101&pf_rd_i=14611812011&pf_rd_m=ATVPDKIKX0DER&pf_rd_r=H6HJTJX7ZZV5HBJ9Z47P
Maybe you can try some sour cream extract? The other option for more real flavor is sour cream culture, but that likely will just turn it into a sour and completely take over the flavor, good if you need a lot of that flavor, bad if you need a touch.
I have 9 taps on, and it really depends on the beer. We have beer/bbq "Meat-ings" every month or 2 so I get a lot of help. If the beer is super popular like an IPA, NEIPA, or some of the ciders we've done, then they'll be gone in days. Same goes with a good light lager: German pils, Czech, American - doesn't matter. that's what goes fast.
Big beers could hang around for months - and that's fine. I always try to keep some slow burners in there along with the fast movers.
Average time for something in the middle is probably 4-6 weeks.
I highly recommend one.
Many people complain that they are only useful for OG calculations. They can actually provide accurate readings for FG as well, provided you use an alcohol correction factor. Refractometers work by measuring light as it passes across the refraction index of water and is bent accordingly. Dissolved sugar increases the refraction index, which causes the light coming into the refractometer to bend more than it normally would, which shifts the point at which it illuminates the scale.
Original gravity will be very accurate by this method, but since alcohol also increases refraction index, it causes FG readings to appear to be higher than they really are. This can be overcome with a correction factor, which uses a combination of your original gravity and your final gravity reading to calculate the real final gravity. Morebeer has a spreadsheet you can use for this, which makes the process fairly simple.
I actually view this "downside" as a positive thing, because if you ever forget to take an original gravity reading, you can just take two final gravity readings (one with hydrometer, one with refractometer) and use the spreadsheet to calculate your original gravity and alcohol content purely from the finished beer.
Here's the refractometer I bought. From what I can tell it's the same model you see at homebrew stores for $60+. Its definitely a high quality device, and comes in a nice padded case with eyedropper, calibration screwdriver and non-abrasive wipe.
If you need any tips on working with TeeSpring, let me know!
Rule #1 of your campaign is to take advantage of any excuse no matter how flimsy to post a link to your page... Mad Fermentationist T-Shirts!
You're going to need food grade RTV silicone and a sacrificial flexible cutting board. Amazon has both. you'll use the rtv silicone as glue put some on the piece you cut out and some on the cutting board, use the cutting board as a patch. https://www.amazon.com/dp/B00NU6VN6G/ref=cm_sw_r_apan_glt_fabc_PV06GNMGKPQT9H9VBDE8 https://www.amazon.com/dp/B07V28JKFQ/ref=cm_sw_r_apan_glt_fabc_E8860D98DE9C71EX3P77
No one is using Wort Homebrew Calculator?
I've tried and used Beersmith, Brewers Friend, Biermacht and a few others, but always come back to Wort. It's simple enough to use that I can work out a recipe on the fly at the brewstore, does a nice job of calculating mashing details, and just makes sense with how I think about things.
It would be a shame to spend a bunch of money on something just to find you don't enjoy it. I suggest you get a typical bucket kit and try it a few times before you invest in something more expensive. This is the one I started with.
If you find you do really enjoy it then I do suggest jumping to quality stainless steel equipment. Otherwise you'll end up with a bunch of equipment you won't use again.
>ITC-308
https://www.amazon.com/Inkbird-Temperature-Controller-Thermostat-Fermentation/dp/B015E2UFGM/
Your local Brew Store might carry a temp controller, give them a call!
Pick up a temp controller, like the popular Inkbirk ITX-308. Inexpensive and works great for both heating and cooling. I tape the probe to the side of my fermenter for more accurate temps.
Cheap corona mill from amazon, I got it for $28. I replaced the handle with a regular bolt and drive it with a cordless drill. Other than that, no modifications necessary. It works great (80-85% efficiency), paid for itself super quickly, never jams/slips, and I can use it for other grains like whole corn pretty easily.
I used to own a ~~cereal killer~~ barley crusher (rollers rusted out in a basement flood). Only thing I liked better about it was the bigger hopper. Other than that the corona mill makes zero difference to my brew day / beer, and cost me less.
That product sounds like a cleaner and not a sanitizer. I already use starsan, which is a no-rinse sanitizer. Others use iodophor, which is also no-rinse, but I think you’ll find starsan the more popular choice around here.
Anyway, I always just rinse mine out immediately after drinking the beer so no residue gets sticky up in there and then come bottling day I rinse the inside and the lip with starsan. I also use this to take away some of the hassle.
> Only 9 panelists correctly identified the different beer, suggesting a moderate OG beer fermented with a single vial of yeast is generally indistinguishable from the same beer fermented with an adequately sized starter.
This is not true. Sensory standards say that p<.10 is "marginally statistically significant", and 9 panelists getting it right falls into p<.10 so this is actually a marginal positive result. It would be far more accurate to say that this xbmt suggests that it does matter, rather than doesn't.
If you wanted to make the above statement, you would need to perform similarity testing which would require 50-100 panelists according to sensory industry evaluation standards.
Also, article says p>.05 when it should say p<.05.
So, I decided to have a fun lunch today. Looked up some literature on the isomerization. Here are some papers on the work. pH effects and kinetics of isomerization (sorry that I didn't link the PDFs, but I don't know the copyright laws). I didn't fully read the kinetics paper since I don't have enough time right now and was just interested in pH effects.
The key points/summary of the pH paper are:
They tested the hop utilization (yield) of iso alpha acids at 60 min from pH of 4.8 to 7.
Similar to the lit you've seen/read, they observed the same trend. Higher iso acids at higher pH. They added 60 mg/L of alpha acids to each batch. The iso-alpha acid concentrations at 60 min were 24.7, 27.4, and 34 mg/L for pH 4.8, 5.2, and 7, respectively.
The three reasons that they provide are lower solubility of iso alpha acids, that acid (read low pH) is facilitating reactions with other acids (amino or alpha), tannins, or proteins, and that the first step in the mechanism is base catalyzed (abstraction of a proton from the alpha acid).
I would definitely like to dig further but don't have the time now. After seeing their results, I initially thought that it would have been lower yields at lower pH because of the series reactions. However, they had ~10% of the alpha acids unaccounted for in each reaction. I'm not sure how much I believe the solubility explanation either. The system is monphasic (one phase), so that shouldn't matter. If there was an organic layer on top that they didn't quantify at 60 minutes, I could believe it. So, I guess I believe the base catalyzed first step the most.
Just like all my guesses before reading exbeeriments, I'm wrong again.
Without the right permits selling lemonade is illegal too (just not as well enforced).
Here is the Rationale:
- user is selling a product to people.
- Product has the potential to harm user (food poisoning, improperly distilled/"supplemented" alcohol, Lead paint in toys).
- People say "Someone should make sure they are not making dangerous product" so they turn to the government.
- Government hires people to regulate it.
- Government needs money to pay regulators, issues permits/licenses and/or taxes to pay for regulators.
Making stuff for personal consumption usually isn't a problem (homebrewers) because you don't want to poison yourself. Many people though when selling it to others will create stuff they wouldn't eat/drink themselves. For example, in China Melamine milk, fake eggs, "recycled" buns.
Alcohol is a harder sell for deregulation as it is a substance that is proven medically harmful in moderate quantities.
I just started getting into brewing sour beers and really liked this book, American Sour Beers. I'd recommend giving it a read. They've got a lot of different information on different souring techniques and how to do them at home, including on spontaneous fermentation and lambic style beers.
I'm not sure I would call it advanced, but I found Brewing Better Beer as an awesome companion to How to Brew.
While How to Brew focuses on science and techniques, Brewing Better Beer is almost a philosophy book - a zen approach to brewing. I enjoyed it very much, and got a lot out of it.
If I only had 3 books, it would be How to Brew, Brewing Better Beer, and Brewing Classic Styles.. You simply can't beat the recipes in BCS - they are perfect starting point for entry into any style.
The MkII pump is actually just a "ripoff" as well, if you want to look at it this way. KegLand (AU) did not design or manufacture that pump.
The MkII, the pump in the Grainfather, and many similar looking pumps are all part of the Chinese-made MP-series magnetic drive pump, or knockoffs. There are many manufacturers in China making these. An American company can travel to China or work through an agent in the U.S., EU, AUS/NZ, etc. to contract for a private label pump based on one of this family of pumps. As a part of it, you can choose which pump from this series you want to use as the base model, customize it, get your own decal put on, and then use another agent to have them shipped to your warehouse.
In the case of OP /u/sktyrhrtout, it looks like they made the SS pump head standard equipment rather than an upgrade, and to have a different cord put on (a switched cord). This one's specs seem to indicate it uses less power to get the same flow rate and head, so it's possible the impeller design is a little different. But it's the same or close to the MP-15R pump. Compare this similar product, where the label clearly identifies it as a MP-15RM-110 model pump.
Considering that Amazon protects you from fraud (I think), it seems like a good deal for someone looking for this type of pump. I have a Riptide and a little solar pump, so I'm not in the market.
Brew outside. No more indoor spills. Can just hose down the entire station.
Propane is the fastest boil I've had done.
keep the lid off, no more spillovers and flies are just protein for yeast.
attach a cheap $20 hand operated mill to a drill and grind 25lbs of grains in 10 min. Something like this has served me for 3 years now. Just pull off the handle, put 1/4 in bolt and fix the other end in a drill. https://www.amazon.com/grinder-crank-manual-grains-coffee/dp/B01M3UZ94P/ref=mp_s_a_1_12?keywords=hand+mill&qid=1563403384&s=gateway&sr=8-12
Get rid of plastic buckets, once they spoil once they cannot be cleaned. Go all steel and glass for everything
I absolutely must use RO filtered water. If you have any doubts, take a glass of tap water and a glass of filtered water. The difference you taste in just the water is what you will taste in the finished product. It's not going to magically go away
No, but I would be tempted to invert a gallon jug.
Fit the lid with a valve, drill some other holes to fit with corks/valves/airlocks.
I pull enough for the hydrometer sample plus more to fill a 12oz plastic bottle. After the reading I chill the bottle in my fridge and use a carbonation cap to carbonate it, giving a more accurate tasting sample.
Lots of people do this! I have a 60lb vittles vault and I buy 55 lb sacks of 2-row for my base malt. So most beers I make I am using that in. Then I have a few airtight containers that I throw ziplock bags of the leftover 2-3 lbs of grains in.
https://www.amazon.com/Vittles-Vault-Stackable-40-Container/dp/B0002H3S5K
Used this recipe. Took out 1 cup of flour, tossed in 1 cup of spent grain. Didn't have many chocolate chips at home so I also put in some peanut butter chips. Delicious!
I figure for the the 2014 brewing competition, I'll offer up a few custom packages for the winners as long as the mods are ok with it. If you don't want to wait, I've listed them at my Etsy shop. I have a 10% coupon running till 3/24 for everything with no minimum order - HOMEBREW
I'm a designer so I wanted to try my best to make it look legit, I based it off of another designer I follow (I'll credit it him later, I can't seem to find his Dribbble page at the moment)
For now I'll use this for all my beers and just hand write all the info in, if I make a special beer I may decide to mix it up a bit.
EDIT: The designer my label was inspired by was Riley Cran, really awesome label designs for anyone who is interested.
KAB6. Great burner for under $100. I've seen (read) that it's the same as the Blichmann, but I can't attest to that. /u/homebrewfinds sometimes posts deals on the KAB6 and KAB4, so it's worth watching there for it. Amazon has the KAB6 for $89 shipped right now.
I know you mentioned you didn't want magnetic, but the magnets on these bad boys are pretty strong. I haven't had an issue with them falling after people place the glass on it when getting filled up. I also have a sign on my fridge door with "tips on pouring your beer" that mentions not to do this to help prevent that. It's worked so far!
If brewing software is new to you and you want to dabble without spending Brew Target is free, open source and pretty straight forward - although the interface is outdated, much like Beer Smith.
Personally, I abandoned Beer Smith for BeerTools Pro, but it also comes with a learning curve. However, it is very easy on the eyes and that made a big difference for me.
Questions are being accepted through next Tuesday. Your question may be combined with another similar question and I may not be able to ask every single question out of respect for Dr White's time. Questions are being accepted by email. I will also scan this discussion and try to pick out good questions.
I’ve keg hopped with no oxygen on the transfer the last few batches and noticed a dramatic improvement. I’ve stopped doing a dry hop charge in the fermenter just to avoid any oxygen exposure if possible. I add the pellet hops (typically 2-4 ounces for a 4-5 gallon batch) to a container like this.
Beer Dry Hopper Filter,ProMaker Stainless Steel Hop Strainer Micron Mesh Beer Filter Cartridge (2.8 X 11.8 inch) https://www.amazon.com/dp/B07DW534PP/ref=cm_sw_r_cp_api_glt_fabc_DMQV48YSSKYQ62T06TZN
Container and keg are all sanitized at this point prior to adding hops. Then I string the container up connecting it to the keg lid. Most of my keg lids have a little keychain ring which works perfect. I seal the empty keg with the hops in and then purge the keg with CO2.
Then I direct transfer from the Fermonster to the liquid post of the keg, venting the PRV on the keg lid as needed to maintain a flow. It works great, and you can adjust the length of string based on how long you expect to drink the keg. I’ve kept hops in contact with the beer for weeks and never noticed any off flavors though.
Best of luck!
This is pretty much what I do. I bought this pump from Amazon. My wort chiller came with a hookup for a normal garden hose. I bought the cheapest garden hose I could find at Lowes as well. Since the two size attachments that came with the pump did not exactly fit the width of the garden hose after I had cut into it, I had to use scissors to cut about an inch of the inner rubber core out, while leaving the outer green section intact. This fit pretty securely over one of the included pump attachments. Then I used a stainless steel adjustable clamp to make sure they stayed together.
This setup works pretty well for me. I do 5.5 gal batches BIAB style. I freeze tupperware containers of water to make big ice cubes, then fill a cooler with water, the big ice cubes, and put the pump in. To start off with, I hook directly into my garden hose and let that go for 10-15 minutes, because otherwise the super hot wort/water at the beginning melts through the ice quickly. I prefer to let it cool down some before I disconnect from the hose and connect to the pump.
And just as a heads up, double check the tightness of the connections between the copper wort chiller and its plastic tubing. My clamps were not tight enough and I had some foreign water spray into my wort. I just brought it back to a boil and all was well.
They aren't cheap but they also aren't $15/bean. You can get 5 for $20 with free shipping on Amazon
I use the Wort app.
Pros: Calculates everything, has style guidelines, can scale recipes and import/export using beerxml. The developer is helpful and responds quickly.
Cons: Uses the cloud for almost all storage. Does work offline, but when it's connected it'll trust the cloud more than what's on your device. This leads to the occasional error where numbers don't transfer over right. But there's a notes section so I just put everything in there.
It's not perfect but it works pretty great for me.
I truly appreciate your input, thanks! This was actually my initial line of thinking as well, I thought the topic was basically settled, then quite a few folks mentioned they'd like me to perform an exBEERiment on it and I figured there's nothing wrong with throwing more data into the pool. I've heard Charlie, James and guests on Basic Brewing, folks on the BN, etc. talk about how it's a non-issue. Then in a talk at the 2013 Music City Brew Off, John Kimmich of The Alchemist mention something about how the vorlauf splashing down the side of the mash tun is "just terrible, you can't do that to the wort" (question asked by audience member at 34:55). Being quite possibly one of the best brewers in the world, at least judging by the popularity of Heady Topper, many of us are compelled to heed his advice. That said, he is obviously brewing on a much larger scale, which perhaps produces completely different results. Either way, the people have spoken and if they want to see an HSA exBEERiment, I'll do it!
Cheers!
EDIT: around 36:10 in the video is where he nails HSA specifically as being "wrong."
The data started out as JSON scraped from the PDF and I did a bulk import into a CMS (I am using Craft CMS (which is an amazing CMS for complex data structures) so the data is stored in MySQL. Once in I had to do a bit of cleanup which took on average about 2 - 5 minutes per recipe, so yeah it took a little time. The BeerXML I am building up using simple PHP templating called Twig so it serves it much the same way as a normal php webpage. I am not validating the BerrXML but I will look into it.
You'll need a blower to move cold air into the tower. This is a bit overpriced, can probably make something similar for cheaper
https://www.amazon.com/Coldtower-ST-Kegerator-Tower-Cooler/dp/B00IGBTZDI
​
You also might need to check line length/inner diameter. Many years ago my wife bought me one of those cheap nostalgia electrics kegerators and it foamed like crazy until I got the tower cooler and made the lines at least 10-12 feet long. Or you could just buy a flow control tap.
Make sure you know your GF wants to brew. It's kinda like gifting someone a pet, it doesn't make itself. Lots of people love beverages but not the work associated with making them. Granted, cider is definitely on the easier side, but still a couple hours plus two ish weeks idle project time (for a first go through).
Not a huge fan of amazon for hardware. I absolutely do not like goofy plastic conical fermenters as shown in this listing; they're problematic. For whatever reason, Northern Brewer undercuts their own website in re beginner kits on Amazon, but the rest don't even bother listing their kits. If you're tied to amazon, I'd recommend either Norther Brewer or Brooklyn Brew Shop You'd be much better served with a beginner kit revolving around 1 gallon batches. Some places to look include Adventures in Homebrewing, Atlantic Brew Supply, Williams Brewing, MoreWine/MoreBeer, Love2Brew, just to name a few online vendors.
Finally if the kit comes with some "cider HFCS syrup" concentrate, go to the store and buy organic preservative free apple juice or fresh-refrigerated cider. The results will be vastly superior.
Haha it was a pretty simple build. I bought these (https://www.amazon.com/uniquegoods-Digital-Display-Controller-Stepless/dp/B00QLYO7XU) off amazon. All I had to do was build the box, swap out the potentiometer knob with a longer one that would fit correctly for my dimensions, and fire it up. One huge improvement I made to the new one from my old stir plate was using washers to space the magnet from the fan. I found before that the magnet would freeze the fan from spinning unless placed just right.
Save a few bucks and get the same thing off Amazon. I have one, works good.
It’s the same type that blichmann uses too.
P.S.: Booo inbev
Yes, you're right, yeast will mutate and adapt to their environment...but what does that mutation make beer taste like? Maybe the mutation will drift towards lower attenuation or an undesirable fruity flavor (in a lager for example). Farmhouse beers aren't known for their clean flavor profiles, they're different because their yeast is different.
The unknown changes over multiple generations is why you need a fresh yeast pitch every now and then. I know pros will often go 10 batches before tossing and starting over, so you can definitely get consistent results over 3 batches.
If you want to learn more, this book is great. https://www.amazon.com/Yeast-Practical-Fermentation-Brewing-Elements/dp/0937381969
Doesn't look like it will work. Apart from the fact that it looks WAY too big, it's not insulated and it has no lid.
You can get some pretty cheap igloo coolers that will work just great as a mash tun.
I cannot cease to recommend the ebay aquarium temp controller.
It's only $24, with free shipping. It takes about 2 weeks to reach though. You have to do some basic wiring (and by basic I mean really basic), and there's a guide on homebrewtalk anyway.
It's a dual stage, so outside lagering you can use it as a fermentation chamber temp controller as well (which is what I do). It works great, is digital, has an adjustable differential, has a wide temperature range... I cannot stop praising it. I've used it at cold crash temperatures, bottle conditioning temperatures as well as fermentation temperatures and it has never failed me :)
I am bringing a couple growlers of homebrew to the family Rib Competition tomorrow, Saison, Mosaic IPA, and American Wheat. Should go over well!
Next week is my bachelor camping trip, may bring a keg of my beer? No idea yet...
Today is the last day for the I heart hops! shirt sale!
No, don't worry. My first beer went that long too. Leave it in the primary for about 3 weeks (i know the kits say one or two, but its easier to let everything settle before bottling). Your going to open it in three weeks and see some real gross stuff, grey build up on the walls. Don't worry, thats fine too. Then after you siphon it out (DO NOT POUR IT) into a bottling bucket, you'll find a bunch of sludge at the bottom. That is the yeast cake, it simply contains all the yeast and solid particles still in your beer after you put it in there.
Also, if you open it before hand and see something like This, it does not mean your beer is infected. That is called krausen and is a result of fermentation. That will die down as well and sink to the bottom.
Pyrex sadly is tempered soda lime glass now, gotta find the old stuff to get borosilicate. http://www.consumerreports.org/cro/magazine-archive/2011/january/home-garden/glass-cookware/glass-bakeware/index.htm
If you're trying to go cheap and bare minimum, 40qt pot and do BIAB. Add a 48qt cooler if you don't want to wrap your pot in blankets for mashing. A large BIAB bag fits perfectly inside this coleman cooler.
https://www.amazon.com/dp/B0000DH4LT/ref=cm_sw_r_cp_apa_fabt1_vqWSFbXF05VX6
While I agree with /u/ that additional surface area for air transfer is a benefit. The best part about Erlenmeyer Flasks and a stir plate is you can boil and cool the wort directly in the Erlenmeyer--no need to sanitize a jar, boil in a pot and then cool and transfer. Constant stirring results in more yeast cells and increased vitality.
2L Erlenmeyer flasks are only $19 on Amazon. If you have access to a spare 8v power supply and an old computer, you can built a stir plate with a computer fan, hard drive magnet.
One of these remote controlled outlets for my pump. $10 on Amazon and it makes all grain brewing a snap!
Woods 32555WD Outdoor Wireless Remote Control Kit, Weatherproof, 100ft Range https://www.amazon.com/dp/B001Q9EFUK/ref=cm_sw_r_cp_apa_eteiAb74820CW
As a canner, I know well the rust that accumulates on the rings, but newish lids (the flat parts) should not rust, and have the advantage of letting some air OUT if thats what is needed. I just bought a bunch of these plastic lids with silicon gaskets and they are what I use now https://www.amazon.com/gp/product/B07T1G3MNK/ref=ppx_yo_dt_b_asin_title_o03_s00?ie=UTF8&psc=1
If he used it for his aquarium, it is likely a saline refractometer. What you need is a Brix/SG refractometer. link to random amazon refractometer
On the subject of notes, I created this mad-lib brew note document. The formatting changed going from Word to GoogleDoc, but it isn't hard to decipher what is going on.
I've used it 3 times and it is very helpful in reminding me to keep notes. There are some useless fields that I plan to edit some day.
There are a bunch of these on-line, but I created this one to help aid in consistency among batches.
First of all, there's already something that basically does this: https://www.kickstarter.com/projects/1708005089/picobrew-zymatic-the-automatic-beer-brewing-applia
Commercial breweries tend to do test batches on something like a Sabco BrewMagic system. If you could design something that was better, easier, or cheaper than that, you might have a shot with commercial breweries.
I would bet that most homebrewers wouldn't be interested in something like this, though. I wouldn't want to shell out a large amount of money for something that I'd have trouble upgrading later, that didn't give me the control I want, and that I didn't build. Homebrew is a very DIY hobby, so I'd imagine most other homebrewers would agree.
Do you want to buy a Mad Fermentationist t-shirt? Featuring a big (new) logo on the front; holes for a neck, two arms, and a torso; and now in four fun flavors (as long as you count black, dark gray, and light gray separately).
Awesome!
I am maintainer for a Brewtarget package on Chocolatey (like apt-get, but for Windows), updated package was just submitted and is under review currently :-)
One of your main concerns with post-fermentation beer and wine is Acetobacter, which converts alcohol into vinegar. After a quick search it's possible its tolerance matches any natural fermentation process with an upper limit around 20%. That's why if you leave your 14.5% wine out for too long it'll turn to red wine vinegar.
Additionally, most labs use 70% ethanol as a disinfectant so even regular spirits don't necessarily cut it depending on how long you're willing to wait. When you're soaking oak chips in whiskey, you're not only waiting for the flavours to be drawn out but also for the bacteria to die in a hostile environment with no nutrients.
Beer and wine are also different from distilled products because of the impurities present, such as sugar, that bacteria would love to feast on. Spirits are more pure products. However, I have no idea how much you can dilute your vodka before it becomes ineffective over a reasonable period of time.
For the most part I use QD hoses but also have this clamp set which I use to hold the hoses in place. They're on little hooks in my brew shed. Once I was draining my boil kettle and the hose came out of the fermenter... never again.
If you're ok with an artificial flavoring I've added this cake batter flavoring to an imperial stout that makes it smell/taste ridiculously close to cake.
I tried with the Muslin bags before but couldn’t tell if they were working or not. Hop spider became duel purpose reusable and easy to clean for 20 bucks. https://www.amazon.com/dp/B07HRV2DF7/ref=cm_sw_r_cp_api_glt_fabc_RX22JZ7RD7KK59NHXQR6?_encoding=UTF8&psc=1
I’ve been very happy with this, a bit higher than $50, but I think they have a cheaper model. Agreed roasted malts will drop pH and may have impacted mash efficiency. But I’m leaning towards the 1 gallon less strike water. That’s like going from 1.25 qt/lb to 1.75 qt/lb mash thickness. My mash efficiency increased a few percent with a thinner mash.
Edit bad formatting, here’s the link: Apera Instruments AI311 PH60... https://www.amazon.com/dp/B01ENFOIQE?ref=ppx_pop_mob_ap_share
I think I figured it out. Check out the reviews for the product on Amazon: https://smile.amazon.com/LD-Carlson-Phosphoric-Solution-Making/dp/B01D2935QQ?sa-no-redirect=1
> I bought this before with no issues. This time I think they confused the strength. I used the usual amount in my beer at a projected 5.4 mash PH and came out to 2.9. I compared the first bottle I got with this one and the acidity level is exponentially higher...May be lactic advertised as phosphoric. Be aware of inconsistent product.
And guess what 7ml/gallon of 88% lactic gets me? 2.3pH. It's fucking lactic acid advertised as phosphoric.
Well, if I could make an English PDF I could sell it via Amazon, just like I do with the Lithuanian book. So there are possibilities...
They're a pain to get the ball valve to seal. Ask me how I know. Regular price on these is like 19.XX, so not much different
edit: you can get one shipped from amazon for 19.86 https://www.amazon.com/Coleman-5-Gallon-Beverage-Cooler/dp/B00363RW4A/ref=sr_1_3?ie=UTF8&qid=1490231513&sr=8-3&keywords=5+gallon+cooler
I have the Javelin by Lavatools, (amazon link) that is currently $25.99. I've had it for over a year, use it for brewing and cooking (with good sanitation practices) and haven't had an issue. Some report the hinge breaking though. Lavatools also makes a stick version for less than half the price and has the same precision.
I just got this one off amazon and so far so good. Really easy to install and setup
Inkbird Itc-308 Digital Temperature Controller Outlet Thermostat, 2-stage, 1100w, w/ Sensor https://www.amazon.com/dp/B011296704/ref=cm_sw_r_cp_api_-L1MAbC4EPRYM
Those bottles are called a Boston Round. Not sure if there's a better source for the caps, but Amazon has them for $0.39/each (if you buy 12 dozen of them.)
​
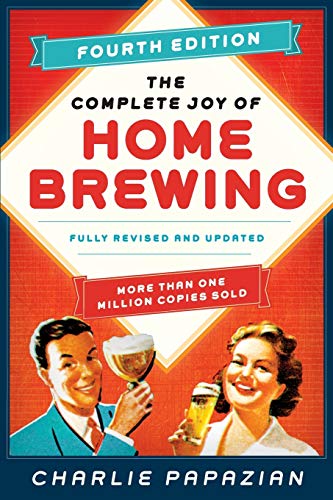
Have you read any homebrew books? The Complete Joy of Homebrewing by Charlie Papazian and How to Brew by John Palmer are in most homebrewer's collection and excellent starting points. Charlie's book is a nice relaxed approach to homebrewing. John Palmer's is also easy to read but more packed with knowledge.
I recommend starting simple by purchasing beer recipe kits or using pre-made recipes on the net. You don't need to worry about formulating your own recipe until you're ready to tinker.
so, maybe I shouldn't bring it up as it's not my best work, but a few years ago I made an app called "My beer vault" for android - <strong>https://play.google.com/store/apps/details?id=mcconnellapps.mybeervault</strong>
Sorry, just realized you specified IOS.
The app is literally just used to keep track of your bottles.
It's super basic and needs some updates probably, but it seems to still work.
​
edited to apologize for not seeing the IOS specifications
I prefer the approach advocated in the book "The E-Myth Revisited".
Basically, you make every part of your business a metric as if you were opening a franchise. Something you could hand to a total stranger and they would understand everything you do and how. Literally every activity is written down and formalized - including human interaction points (smiling, welcoming them, saying have a great day, asking if they need anything while in the store, etc... all formalized).
The idea is not to eliminate the human element but rather to account for it and make sure it's never missed so that every customer has a happy, consistent, enjoyable experience.
Pretty excited that we released our newest game this week and that it’s getting lots of downloads (doesn’t hurt that it’s for Stranger Things). Check it out if you want something to play while you’re waiting around on brew day...
https://itunes.apple.com/us/app/stranger-things-the-game/id1220479307?ls=1&mt=8
https://play.google.com/store/apps/details?id=com.bonusxp.legend
Going to take a break from IPAs and make a Schwarzbier next. Surely there’s some good Stranger Things-themed names for a schwarzbier... hmmm
Yup just responded. Congrats again winners!
To get us started on prizes here are 10 promo codes for Brew.IO Pro (Android only sorry iOS)
~~8Z5P24Q2JJ6XG97NURSTXBW~~
~~461WL17EVBX440DJ18W51BV~~
~~VEW39WPJ36ZEH1QQWX6NFMS~~
~~ZG4MYWRA85V4KYMUR6HZNJF~~
~~GF4XMQYS5K6U5W7NJDNY0YM~~
~~VQZXYY8HC8HWPPLTWWD75F0~~
~~08Z8DZ375HGQXRH7PT7JSVM~~
~~Q7U01ET4HX0TLVMH6HAXX7D~~
~~LU5WAFECTY4H8X0Y53RB2UB~~
~~P710UPEG5GCW536DGA1FF21~~
I think you'd be fine with the Speidel. As long as the seal is good and the airlock remains filled, plastic is acceptable for long-term aging. The old tales of buckets making acetic beer are really more about the lid seal than the plastic itself (no need to submerge in water). Go by taste, if it starts tasting slightly acetic you can change vessels.
With a low-fermentability wort, Wyeast Lambic should do fine. I'd encourage you to toss the dregs from a few choice lambics/gueuze in as well (whenever you happen to drink one). This will add more microbial diversity and result in a more interesting beer.
Your plan sound fine otherwise. However, lambics are traditionally aged in primary on the yeast (autolysis contributes sugars and fatty acids for the Brett). You might consider brewing one batch a weekend, adding them to the solera as you go, allowing the yeast blend that fermented the first to keep working on the second, and then the third.
The average age of the solera will tend to the inverse of the pull amount. Pull ½ a year, the blend will eventually average 2 years old for example. I made a solera spreadsheet that lets you play with the variables.
Good luck!
Belgian yeasts are often POF+ as far as I'm aware.
Awhile ago I did some searching and couldn't find a definitive answer to what phenol is responsible for the spicy/peppery flavor of Belgian yeasts. I suspect that it may just be lower level 4VG. The weird thing about smell is that more doesn't always smell like more, it often changes into something else.
Edit: Relevant Oxford Companion: 4-VG
This: https://imgur.com/PFdF2
I've made this recipe several times, and it's a huge hit every time. I just can't get enough, but my friends end up stealing a good portion of it.
I've also substituted other fruit in for cherry. I've also made a blueberry and a peach beer using the same base recipe.
for anyone who wants a trippy sorta label... first go to weavesilk.com, fucking epic little classic. Canva.com is also a damn good thing to use, just gotta create an account (no paying required though, just an email and a password) then good to go. ive used it to make labels in the past, also thumbnails, text images. pretty decent tbh how much stuff is on there for free
I translated a finnish maltsters pdf on the blend that they (Viking malt) makes:
"MALT MIXTURE The malt -brewed beer (mixture) is prepared pilsnermalt and a small amount of dark malt. Used dark malt to give the mixture a typical flavor and aroma. Taken into account in the preparation of sufficient enzyme activities and free amino nitrogen For the correct amount of fermentation."
I think you should listen to this episode of brewing radio since they are interviewing Lammin sahti Oy. https://player.fm/series/beer-sessions-radio-tm/beer-sessions-radio-episode-254-lammin-sahti-oy
In my personal opinion, you should use the local bread yeast, since that will create the best local character of the beer. Using finnish bread yeast is not required at all. You won't be using finnish water from savolaks, no finnish juniper growing in the forest behind your house etc.
So use what you got locally. Which is how it's made in Finland.
If you don't serve it with this I'm going to be so disappointed in you Mr.Use https://www.amazon.com/Final-Touch-Black-Watermelon-Tapping/dp/B00KNXISEE
Plug your mat into an Inkbird and you can control the temperature. I like to wrap my mat around the fermenter for even better control.
Inkbird ITC-308 Digital Temperature Controller 2-Stage Outlet Thermostat Heating and Cooling Mode Carboy Homebrew Fermenter Greenhouse Terrarium 110V 10A 1100W https://www.amazon.com/dp/B01HXM5UAC/ref=cm_sw_r_cp_api_glt_fabc_258VY924AZ07TH68W990?_encoding=UTF8&psc=1
https://www.amazon.com/dp/B07F8NMKGR/ref=cm_sw_r_cp_apa_glt_fabc_TQ7SJWG4MNN5KPX7GT2R?psc=1
These come sterile, in two sizes. 15ml and 50ml. Are autoclavable and are what labs use for medium to longish storage of yeast cultures. Pour agar on a slant, streak your culture and store under mineral oil for up to a year frozen.
If all that sounds like an enormous hastle, you wouldn't be wrong.
You need to cut the rubber off first to determine where the leak is coming from. To do that you first need to cut some slits on the outside with a razor blade and then use a torch on the inside to melt the rubber from the back. Peal the rubber off, clean it up with a wire wheel then pressure check it to find the location of the leak. You could then use silver solder w/ flux on it with a propane torch .
https://www.amazon.com/dp/B0015H6JYS/ref=cm_sw_r_cp_apa_glt_fabc_0CMF54AAEZQ8NQ5JTYTA
I have this book and it's a little expensive but has some good references like ABV calculations, SRM charts etc...
I like handwritten notes though. Each recipe page has plenty of space.