
What are
/r/metalworking's
favorite Products & Services?
From 3.5 billion Reddit comments
The most popular Products mentioned in /r/metalworking:


The most popular Services mentioned in /r/metalworking:
HackADay
Instructables
Alibaba.com
Aliexpress
HubPages
Walmart
Tumblr
Blender
Imgur
Shutterstock
MoI - Moment of Inspiration
ipernity
Google Search
Onshape
Cults.
The most popular Android Apps mentioned in /r/metalworking:
The most popular reviews in /r/metalworking:
This would be more practical to fabricate with sheet metal and wire.
If you really want to cast it, it should be a solid medallion with the design in relief. The bottom roots can be detailed in the metal result with a dremel. But as the open-work design stands, this is just too delicate for a beginner with rudimentary tools. You can carve it of casting wax... do lost wax casting
Source: Used to cast bronze sculptures professionally (30 years ago!) and briefly worked for a jeweler.
Edit: clarity
What? Welding engineer here. Aluminum does not emit radiation in the visible spectrum unless super heated, it has extremely low emissivity and incandescence, you would have to ask a physicist or chemist but I'm sure someone can pull up the theoretical emmisivity spectra of aluminum. I have seen molten aluminum it does tend to look shiny if pure, the aluminum oxide layer tends to look dull grey and you can see it form as the aluminum leaves the trailing gas.
I don't know what the sunlight has to do with it, having sunlight on a metal won't effect thermal emissivity and bright light like sunlight would wash out any emissivity. It will catch the sunlight the way any mirror would.
That's like trying to ask what color is a mirror when you take a picture of it pointed at the sky.
here's the article on emissivity http://www.wikiwand.com/en/Emissivity
You are getting a lot of nonsense information here so please listen. It is obvious you are a novice when it comes to tools so I would not use any power tools. What you need is a Hacksaw like this. It cost around $8 and can easily be used safely. To round the edges just use some 120 grit sandpaper on a wood block. With how simple you need is this is all you will need.
Now the exact wrong tool to use would be an angle grinder. They are pretty much the most dangerous tool a amature could have. They are fragile 4.5 inch discs spinning at 11000 RPMs so if misused they tend to explode. Also they (abrasive discs) are designed to only cut ferrous metals so will be likely to gum up if cutting brass which could also cause the disc to grab and explode.
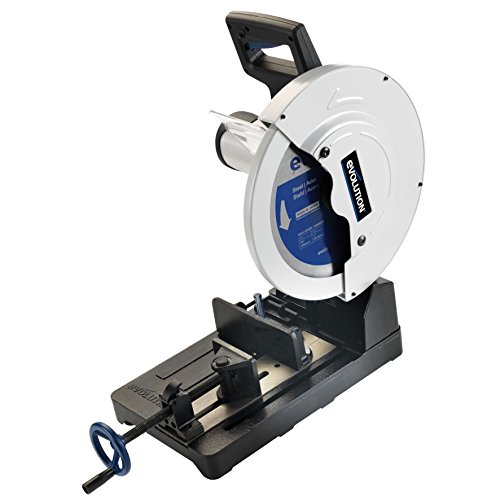
I'm used to seeing cold-cut saw referring to a very slow speed blade (50-100 RPM), usually with flood coolant.
This is what I'm used to seeing called a dry-cut saw. They run faster, usually 1000+ RPM for steel. Something like this saw.
I think the dry-cut saws sometimes get called cold saws, even though they throw some sparks.
I always used low-halogen markers in mild steel applications they are basically permanent but are not necessarily "paint" like... More like a chemical crayon.
Here: Sakura Solidified Paint Low Halogen Marker, Black (Box of 12) https://www.amazon.com/dp/B00C6CJD6W/ref=cm_sw_r_other_apa_5zs0AbB3DM1Z5
Professional sandblaster and powder coater here.
For an indoor gym, you will not have any issues until long after you've stopped using it. You are fine. Unless you live on the coat, salt air is harsh.
If you wish to go overboard, you could coat the inside with a product like this.
It's a waxy oil that is meant to coat the inside of inaccessible places to prevent rust. Usually in automotive stuff. It sprays through a long straw, and has a 360 Degree fan. I have some sitting on my desk now, its good stuff. And not terribly priced when compared to getting a professional coating done.
I don't think pockets are a good idea for a welding apron. They will accumulate sparks and slag unless they have a flap in top, and if they do then they will be hard to access with gloves on.
This is what I use to carry the tools I need most often. It's nice thick leather and when worn at my back it stays out of the way and doesn't catch any sparks.
As for aprons they have a good selection on Amazon but I just use the cheap ones because they are going to get torched anyway.
Edit: changed slap to slag; thanks autocorrect...
There's no simple chemical fix.
There are tons of products on the market, and almost everyone thinks they have the uber-secret ultramegarustfix technique using some kind of special blend of obscure chemicals. "It worked for my Uncle's friend's brother, it's definitely the best!" Don't waste your time.
Short of dipping the entire rack in a tank of acid, the best possible way to fix any rust is to mechanically remove it, then properly prime the clean bare metal and top coat it to prevent corrosion in the future.
I'm assuming you don't have a full shop of tools to work with, but you can probably find a battery drill. Get a wire wheel like this there on Amazon or at basically any hardware store. Put it in the drill and go to work. Just remove all visible rust. Use a maroon paint prep scuff pad to scuff the surface of the rest of the rack. Wipe it down with wax and grease remover.
Your choice in top coat paint will determine the best course of action following removal of the rust. I'm an automotive painter, so I always recommend going with 2k catalyzed automotive materials for the absolute best in durability other than powder coating, which is much more expensive.
You don't have a lot of rust there, so not much will be bare metal. You can get away with self-etching primer rather than epoxy, which is tougher. Spray a light coat or two over the bare metal, let it dry, then scuff with the same maroon pad. Wipe down the surface with wax and grease remover again, then top coat.
I'm assuming you want the rack black again, so I'll recommend a catalyzed chassis black paint.
That's exactly how I'd do it. You'll end up with a very durable, good looking surface.
Scrolls are an ancient decorative devise used mostly to fill space and look aesthetically pleasing.
Blacksmithing is an ancient craft and in ancient times iron was horrendously expensive to manufacture and work. It was reserved for weapons and tools, but it was also used as a show of wealth.
Even the wealthy wouldn't want railings or gates of solid plate so the iron was used decoratively - check out this Cathedral screen in Winchester from the 13th Century, or these decorative hinges / studding on the doors to Notre Damme.
Scrolls can also be used structurally, they act as cross bracing in gates to keep them square, or support shelves or loads.
They are basically an ancient detail that has stuck for centuries because they work and look impressive when done well. Unfortunately they are also used by the lazy and unimaginative and can look stuck on and pointless. The value of steel has dropped massively since the industrial revolution so they are no longer a cost saving measure, it actually costs more to make scrolls well, as labour costs are high.
Source - I am a blacksmith.
Don’t waste your time. Just buy fender washers. Not saying this one it’s just an example. look local as many hardware stores carry them
Something like a countersunk washer a bit like these ones might work if you can get the right size (m4-ish external, m3 countersunk internal). The belleville washer suggested elsehwere might work, but since they're usually intended (afaik) as springs rather than for this sort of thing, it might not work too good.
Of more concern generally is that the holes & their countersinks in your new plate appear to have been made by an angry baboon with a cheesegrater. They're not exactly what you'd call round, and have cut almost into the central bore. If you're considering using this for any sort of high-load or safety reliant system, I'd look at getting it redone/properly fixed.
If you don't need the heads countersunk, you could drill them out to a nominal washer size, then stack small one (drilled size x material thickness), big one (for actually holding the bolt). Might need to file down the inside edges to clear the central hole though. Oh, and you'd want longer screws to account for washer & no countersink too.
You're getting a lot of mixed answers here because you're saying "CNC machine" which is just not descriptive enough.
By your description you're building a CNC router. The router you've pictured doesnt use ER collets or collet chucks, it just has a 1/4" collet. Often times those kinds of router's will be built using a spindle motor with an integrated ER collet.
you'll find plenty of the correct bits with a 1/4 shank anyway so its not a huge problem.
forget about 4 flute endmills. for the size, speed, and materials you're working you'll be using 1 or 2 flute
https://www.amazon.com/Presto-05420-FryDaddy-Electric-Fryer/dp/B00005KB37
Great for heating up small bearings. I've brought in and used a regular house oven for bigger bearings before.
I watched someone use a metal pail of oil and a driveway sealer type tiger torch before but I wouldn't try it, especially inside.
https://www.amazon.ca/Huntington-Desmond-Dresser-No-0-2-Face/dp/B009KVPGWM
Desmond brand wheel dressers are far superior.
I use a single point diamond to true (make wheel concentric to it's rotational axis) and a Desmond dresser to dress "sharpen" the grinding wheel.
A Desmond dresser removes glaze like aluminum and brass that loads the wheel and breaks up the surface to expose sharp grains. Every time those little spurs hit the stone, they break out a little pocket. This leaves the surface pock marked and reduces surface area in contact with the work. The result is greater unit pressure of work to abrasive grain, more metal removal and less rubbing/friction. Cooler and more free cutting action.
Spring steel is what you're looking for.
Rather than heat treating it yourself or sending it out to be heat treated, it is much easier to buy it already heat treated (although this makes it a little harder to work with).
I've had good luck with getting sheets in the right thickness from Amazon - https://www.amazon.com/Precision-Spring-Assortment-Tempered-Polished/dp/B00065V062/
Only thing is be careful when you cut it, as if you get it too hot, you'll lose the temper and it will no longer be springy.
here is the process i used, but i used a hammer to shape the outside of the band, and a dremel on the inside. its not COMPLETELY done yet, i still need to buff & polish the inside of the band, but it is wearable now.
as for trying on other quarters, the metal didnt quite want to shape right, so i was flying blind going into the silver one when it comes to the flat band, but it all went well. just took some time.
There's a good example here. The geometry of the groove is really what's important. The guy in the link above uses a chisel--I've never done it, so I can't speak to whether it's easy, or if it's the best way.
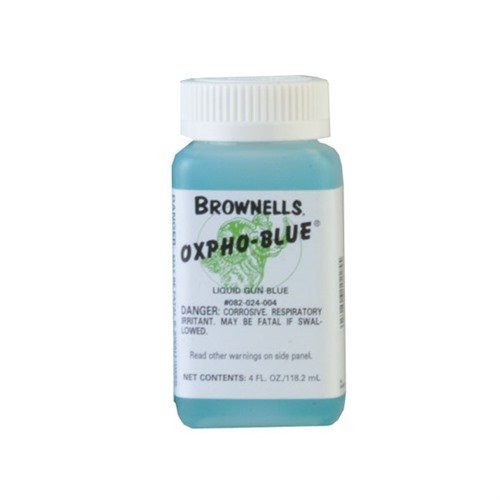
You can give the surface a nice blackened patina by cold bluing it. Wal-mart sells BW Cacey Perma Blue or you can find a few other brands online. https://www.walmart.com/ip/Perma-Blue-Liquid-Gun-Blue/17163515 Clean the metal with acetone and apply the bluing compound with a scotch bright pad.
Edit: http://imgur.com/2c6PEf3 Here is a picture of a part that I blued.
Anodizing is incredibly easy. http://www.ehow.com/how_4491907_anodize-home.html
A battery charger and a tub of sulfuric acid till the bubbles stop. When it's done bubbling, put it in a thick rite dye mixture your boiling in a roasting pan on the stove top. Let it cool and you're golden.
I would consider using a product like Renaissance wax. It will give a protective coating without changing the appearance or damaging the tray, even if you decide to clean or polish the tray using a wax polish after will protect it and keep it from becoming tarnished in the future.
A saw like that is probably made out of some kind of spring steel, maybe 1075 or 5160.
The teeth were probably originally cut when the saw blade was in an annealed state. It's going to be very difficult to cut now that it's been heat treated. I would probably use a rotary tool with a diamond cutting wheel. But you can get diamond blades for your hacksaw. Here's an example: https://www.amazon.com/C-R-Laurence-Diamond-Wire-Blade/dp/B006JFNOSK
For something small and detailed like this where you only want one or a couple I would definitely go the lost wax casting route. That is the sort of casting that is done for jewelry.
This book: https://www.amazon.com/dp/0830604146 How to Cast Small Metal and Rubber Parts (2nd Edition)
Might be useful.
Now if you want to make a large number of them then you should probably go the create a die and press them route.
Looks like the bracket that holds a wheel for a bed frame. I just made the steering for my Kidd's soapbox racer out of them.
Wonderful! I found a video online that shows it can be done with silver as well. Do you know what other metals it can be done to?
Looks like something close is about $20-50K. Unless you're looking at an incredibly high volume it's going to be cheaper to pay someone to make them.
Woodward Fab has worked out great for me. I don't have much experience about other two. If you want more information, you can read it here
They were steel in Canada from 2000-2014. Your assertion that the US is the primary source of reddit traffic is correct at least according to alexa, however, except for India, several of the top counties do indeed have (or have had previously) a penny. My guess is a good third of the traffic to this thread is non-american (myself included), and therefore, I'd suggest the statement "Also, depending where you are, there's a good chance that pennies are steel [...]" is a reasonable qualifying statement.
I'll see myself out.
This is an example of a mill to cnc mill conversion. The cool thing is that with the mill you can mill out all your cnc parts. the only catch is that you cant do large things. http://hackaday.com/2012/01/24/converting-a-mill-to-cnc/
I used to own and operate a high quality finish powdercoating business. A sand blasted substrate gives the melted powder something to grab on to. If the importance of blasting is not brought up, walk away. Also glass beads do not cut the surface so avoid it. If a clearcoat look/finish is what you would like, you don't need another product, clear with PC. There is no difference in material between clearcoat PC and color PC. 10X stronger than paint and wet sandable.
If the parts are small you can get into PCing for very little investment.
paint pen is cheap and easiest! like this:
It's got a little cup you fill with paint and you can just drip it in. No excess to remove,
Also good for filling chips in automotive paint.
You can get some decent taps cheaper, depending on the size. Try yg-1. https://www.amazon.com/YG-1-Vanadium-Bottoming-Chamfer-Tolerance/dp/B00F8T4ST2/ref=mp_s_a_1_4?dchild=1&keywords=yg+tap&qid=1623519549&sr=8-4
Other good brands: osg, widia, guhring, union butterfield. Also mcmaster-car or msc direct usually have good tools aimed more at machinists as long as you have time to order something.
I don't know the best kind. Cheapest stuff from Amazon? Do a test pour. Use the lower end of temps as that will make it more viscous, will take longer to cure but if it's warmer it'll leak through tiny pinholes because it doesn't really have surface tension, at higher temps it turns from a honey like consistency to more like maple syrup. I'm not sure if flexible conduit will hold it, but it might. https://www.amazon.com/dp/B0843JTZM6/ref=cm_sw_r_cp_apa_glt_fabc_87Y419YE4GBY690NQFWS?_encoding=UTF8&psc=1
This is the blade I use (14-18tpi):
https://www.amazon.com/gp/product/B003CYL6DG/
I have Prime, so it makes sense to order from Amazon, but there's a local place that'll fabricate bandsaw blades as well.
Looks like you should use 3M 77 spray adhesive, according to www.thistothat.com
https://www.thistothat.com/cgi-bin/glue.cgi?lang=en&this=Metal&that=Fabric
Say I want a 17" x 18" kind of like this: https://www.amazon.com/gp/product/B079DPJBTC/ref=oh_aui_search_asin_title?ie=UTF8&psc=1
How much do you think that would run? I might be better off buying a couple of these and loading them together.
https://www.amazon.com/gp/product/B004RGV08O
​
I use this stuff for all my projects that sit outside. It ain't cheap but it dries hard. I don't even prime.
Can this miter saw be used to cut this 4040 aluminium profile?
I've done some research and it seems like if it's only for a few cuts, it should be fine but would like some confirmation.
If I use it in an apartment, how much do I have to worry about filings/dust?
Thanks
polymerized Lipids are tough. Try soaking in Five Star Brewery Wash. I've never seen anything it can't get off and do it without damaging anything https://www.amazon.com/Five-Star-PBW-Non-Caustic-Alkaline/dp/B0064O7XBA/ref=sr_1_2?crid=1L4BCB8F3WRKV&keywords=five+star+brewery+wash&qid=1670901822&sprefix=five+star+brewery+wash%2Caps%2C128&sr=8-2
i use these
​
the bad news is, they take some time to dry.
​
to actually hold down something like a machine shop fixture, you need a lot. i have a 150 lb one of these, and it was insufficient to hold something on a drill press table. perhaps a 600 lb one would work.
I wrap my blade in leather. But any machine shop will have copper removeable jaw sets. I made a set out of aluminum angle.
A ring mandrel is what you want. Very affordable.
Drill spins too slowly, and its not made to take the sideloading forces.
A set of the dremel ones is quite cheap if you want to give it a go.
You probably ought to be more specific
Shells for Electronic components could be :
RF shield made of tin plate, tools for this are essentially a hollowed out bit of metal and an anvil you press into it to which you put a blank and press down with a hydraulic press. The blanks probably need to be pretty precise, especially if they have legs that are soldered through slots in the board.
Project box - thin steel or aluminium, you can cut this by hand and with adequate planning could form this with a vice mounted brake. That will leave you with sharp edges which may or may not matter in your application, you could tig or mig the corners and take them down in a belt sander.
Industrial tv enclosure. Thick gauge steel, for this you need a dedicated press brake.
So, what are you actually trying to do, size, purpose, volume?
I think you need some sliding jaw vice grips so you can lock pieces down to those pieces of square steel. Something like these, but better quality if you can find it.
When I worked at a pizza place we used the fixed blade ones. I never understood why anyone would use anything else if they were cutting a lot of pizza. https://www.amazon.com/Bull-24128-PizzaQue-Pizza-Cutter/dp/B00569JE98
I have seen a number of people use bearing splitters in the press.
this was the first one on Amazon when I googled it.
Hmm, I would try to source something similar like that:
https://www.amazon.com/SPWOLFRT-Tartlets-Bakeware-Resuable-Nonstick/dp/B0816NMV87
DIY would request, I think, more than one die as to press it in steps so it won't rip and then someone would need to design these dies and that's pricey so it depends on volume of the order if it is reasonable.
Fantastic! Spent 30 years in the sign industry, this book is a MUST in your Library: https://www.amazon.com/Mastering-Layout-Art-Eye-Appeal/dp/091138068X/ref=sr_1_1?crid=1UNFJ1H8N1NZP&keywords=Mastering+Layout%3A+On+the+Art+of+Eye+Appeal&qid=1663955868&sprefix=mastering+layout+on+the+art+of+eye+appeal%2Caps%2C261&s...
Jig Saw Blades for Aluminum
I was using a jig saw (to get a custom fit) to cut an aluminum threshold ramp which is between 1/8" to 1" thick (item). I ended up using my metal jig saw blades that ranged from 18 to 10 tpi (all I had) but they wore out really fast even with slow speed. I guess 18 tpi is too fine and clogged fast. The 10 tpi also clogged quickly but even after cleaning it, it was dull. It took 4 blades to cut this.
For the future, what is the proper jig saw blade to cut this item
That's fantastic advice, thank you. I picked up this Bosch 18T blade to start, only need to make around 6-8 cuts at the moment. I'll try one of those Bi Metal 24T blades in the near future.
I've done it hundreds of times. It will look as good as you want it to. For easiest control, use rounded edge flap disc https://www.amazon.com/67200-Polifan-Zirconia-Alumina-Diameter/dp/B0742KQ649
For smaller jobs, like in OP's picture, I just finish it with the cutting disc because it's the fastest and I dont have anyone from reddit telling me I cant use cutting disc for grinding.
Another option is this: https://www.amazon.com/Krud-Kutter-MR012-Inhibitor-1-Gallon/dp/B07RB82HG6/ref=sr\_1\_4?crid=16Q3TWFIVOR6Q&keywords=krud+kutter+rust&qid=1660514238&sprefix=krud+cutter+rust%2Caps%2C71&sr=8-4
It is primarily phosphoric acid I believe and you can just spray it on. It also has a rust inhibitor in it which is good but I usually coat whatever I have in machine oil afterwards (if i don't want to paint it). Its a good alternative to muriatic acid (as far as acids are concerned) as it isn't as harsh and doesn't flash rust. If you do go this route then wear the appropariate protective gear for breathing and eyes but its much less of a worry than muraitic acid in this regard.
Also vinigar works too but it will just take a lot longer.
You won't need 16 amps unless you're working it close to its limits, to start with you can just use one of these to plug it into a regular 13 amp socket.
I use small files for fitting knife parts to handles. the holes are quite small, 2-3 mm by 20 mm. They fit and do the job. Use something like this.
https://www.amazon.com/Piece-Precision-Needle-File-Set/dp/B006N3EPKE
Yes, but it's more of a "I want to try doing this because it sounds interesting" type of thing.
Also - 3D printing can be excellent for making molds. As far as I'm aware, it's incredibly common for injection mold prototypes to be made via printing.
This is the resin I intend to use with an Anycubic Photon Mono. That material is specifically made for injection molding.
If you were really really arsed it could, but you can go on Amazon and buy a new green one for a fraction of the cost. You have to source supplies (rods electrodes), power the welder, not to mention your time.
Fantastic advice. You were right, even without the research!
https://www.amazon.com/Mauviel-France-MPassion-2191-30-12-Inch/dp/B0002L5GHE
thank you for the vinegar and salt advice as well! This was something I was really concerned about.
Thank you o Netopalas. People I had asked irl had me thinking the roundness was a design flaw- I could have been making meringue this whole time.
I found the bowl online thanks to your clues! Merci merci
https://www.amazon.com/Mauviel-France-MPassion-2191-30-12-Inch/dp/B0002L5GHE
The best way is finding a bodyshop that's working with aluminium and have a eckold (expansive machine between the 10 and 40k). And have them shrink the radius. Ik you can't find one near you you can use a metal shrinks from a cheap shop . Like (us based) amazone https://www.amazon.com/Mophorn-Shrinker-Stretcher-Construction-Expansion/dp/B07S7GJZ5D
or (eu based) HBM https://www.hbm-machines.com/nl/p/hbm-ss-12-strek-en-stuik-machine or
Not sure of your regulator output threads, I am assuming 1/4" NPT
https://www.amazon.com/Parker-4-4-4-Fitting-Street-Female/dp/B00NEG1MCC
Nor the psi range you plan on but
That should get you in the proper direction anyway
if you buy a pack of 25 cubitron 2's it comes out to around 4.50cdn a pop https://www.amazon.ca/3M-Abrasives-System-Division-05902658065040/dp/B01MY2ZHEW/ref=mp_s_a_1_5?crid=2HROSHUZ0AAS&keywords=cubitron+ii&qid=1656099378&sprefix=cubitron+ii%2Caps%2C106&sr=8-5
Snap ring. Here is a tool on amazon for install / removal. Harbor freight also has a set for sale as well.
​
My $0.02 for what it's worth!
There is not enough shaft sticking out from the other side of the hammer to make a solid solder joint.
Was looking for something I could fill into the hole of the the hammer and press/tap the shaft in and let it dry.
I think the green PRESS FIT stuff would be what I'm after. Didn't know about green. I'm assuming this is it https://www.amazon.ca/Genuine-Loctite-Retaining-Compound-General/dp/B07BCDYD2C/ref=sr_1_5?crid=28SB4NZ8S5B4N&keywords=loctite+green&qid=1655760958&s=hi&sprefix=loctite+green%2Ctools%2C91&sr=1-5 Pricy little bottle that is $$.
Thanks for suggestion, I think that is EXACTLY what I was after 👍
>ATG Maxiflex
These seem like the standard, is that correct? https://www.amazon.com/ATG-34-874-MaxiFlex-Ultimate-Micro-Foam/dp/B00IMMDHIA
Thanks for all the product specifics!
I see you got a lot of answers for your question, but it seems overly complicated to me. Why not use copper cooling shims? On this amazon listing someones review shows photos of a very similar install. Might not work for you but figured I'd drop the idea just in case.
Lufkin make one that's not too bad
Well, how long is long?
I think the end is called a hook: Google large hook tape measure turns up a few likely candidates
https://www.amazon.com/Perfect-Measuring-Tape-Professional-Wide-Read/dp/B07DGHR8K1
25 years Metal Model Maker/Machine Toolmaker here.
I'm guessing you have hundreds of these points to blunt in one way or another so you want something fast.
The way I would do it, and also probably the cheapest nice looking way to do it for someone who doesn't own a welder or Ox/Actyl Torch and wants to finish it in one afternoon, is a 4.5" angle grinder using a Course Grit Flap Disk. With very little practice you can round those off in a matter of seconds. The grinder I linked is a very high quality, but very affordable grinder. Everything required (less paint) would be under $100.
If I wanted them flush with the top rail, (the safest fix) I would get a good heavy set of bolt cutters to chop them off, and then use the grinder to grind them flush, and then paint with Flat Black Rustolium.
Angle grinder goes brrrrr
They also sell rubber or vinyl caps in all sorts of sizes to cap off shop objects.
CRATEX Engine Turning Kit - Z086 https://www.amazon.com/dp/B07WC5K963/ref=cm_sw_r_apan_i_KMD37PGG7R5X25HMNBT7?_encoding=UTF8&psc=1
I have not used this but believe it is for what u are trying to do
If youre doing it all day you should be using something full face, but you can get plasma cutting lenses that are shaped like sunglasses.
Lincoln Electric KH965 Safety Glasses, COM IR5 Flip Lens https://www.amazon.ca/dp/B0148DRNMM/ref=cm_sw_r_apan_i_989R7ZGK6AB313YJMTA8
Shower Curtain Weights, Magnetic Silicone Wrapped Heavy Duty Premium Shower Curtain Liner Clips Added Weight - 4 Pack(White) https://www.amazon.com/dp/B08J81Z1JT/ref=cm_sw_r_cp_api_i_JWPGJ89N1FRZH7WKNJQM?_encoding=UTF8&psc=1
Totally worthless
Forgot to mention.
If you want to get rid of the grain pattern right away, use the buffing wheel 90 degrees against the sanding grain. it'll remove the most surface material and leave a smooth surface. then you can polish it out to a mirror finish with a felt/cotton buffing wheel.
[These] should do the job. just attach, turn on the rotary tool, apply compound and buff or polish.
Don't use regular sandpaper. What you want to use is lapping film. You can get a pack of 10 sheets on Amazon with grits that range from 250grit-500,000grit. This stuff is seriously the best for polishing/sharpening. I've used it on multiple knives that ended up so sharp I cut my finger down to the bone with very little pressure while whittling. Lapping Film
This tool will give you really nice square inner diameter corners:
This tool will give you straight (or curvy, your choice) runs through sheet metal.
Both of these tools can be started in the middle of a piece after a pilot hole is created.
There are power versions of both of these tools, but you only need the hand versions for your project.
I use the Forney Pro and have nothing bad to say about it for the price. Been using pretty much every day for over a year now, have a few other hoods including more expensive Lincoln Viking and I like this one better. Comfy head gear, big Lens cheap to replace visibility comparable to much more pricey units, plenty of settings but nothing over the top, grind mode if you’re into that kind of garbage… my only complaint is that it’s a bit heavy if you’re wearing it all day like 6hr +
I think I’m understanding what you want. I’ve got 3 ideas. First is to get one of these and run it off a truck inverter. But you’ll need to machine a rear base to match the curvature of the pipe to not deform it. https://www.amazon.com/dp/B08PTPXF8J/ref=cm_sw_r_cp_api_i_SS8PHHW6XW6NVW37N275?_encoding=UTF8&psc=1
Second would be get a cobalt 15/64 or 1/4 drill bit and make the hole and have someone behind you soldering the rods in place.
Third I think may be time prohibitive but you could thread the rods and use a threaded river to fasten them to the pole. Rivets aren’t the most demanding in terms of hold dimensions so you could just drill those too but at least they’d be easily removable.
Wolfcraft 4525404 Multi-Angle Drill Guide Attachment For 1/4In. & 3/8In. Drills,Silver https://www.amazon.com/dp/B000JCIMEA/ref=cm_sw_r_cp_api_i_8AEYBP64RA40HZX8B8XT?_encoding=UTF8&psc=1
Slide a drill guide over the pole if you can.
You could get one of these and replace the flat base with a custom rigged base with a curvature to saddle the back of the pipe. A drill press will definitely make your drill bits last longer than drilling without a press, and do it faster.
YEEZUGO Floor Drill Press Stand Table for Drill Workbench Repair Tool Clamp for Drilling Collet,drill Press Table https://www.amazon.com/dp/B01FZB3HQC/ref=cm_sw_r_awdo_P7N19SD79NWA65TN1X31
How small is the shaft? Are you using good quality drill bits? I haven't had much issues just drilling straight into pipes/shafts. Sometimes I put a marker pen into the chuck, then move the piece around while slowly lowering the marker, until it makes a mark on the highest point of the shaft. Or you could use a proper centering tool https://www.amazon.com/Generic-Center-Machinist-Metalsmith-Measuring/dp/B000RB2EEC
Then just use a small, sharp bit to start the hole. I never bother with a center punch.
https://www.amazon.com/uxcell-Turntable-Bearing-16-inch-Capacity/dp/B076HDDN4X
​
uxcell Square 2-inch Lazy Susan Turntable Bearing 5/16-inch Thick 44-Lb Capacity
get a thickness sander from the woodworking guys and run it through the grids till satisfaction, this way you can run several bars at a time
https://www.amazon.com/Jet-JWDS-1020-723510-Benchtop-Sander/dp/B07Y9546K5/
that's not brazing.
you're not going to braze high speed steel with plumbing solder and a propane torch.
without investing in some real hardware...
use some superglue gel https://www.amazon.com/gp/product/B0000DD1QQ and activator. https://www.amazon.com/gp/product/B0166FFCCS
All these answers are wrong. My friend, get you one of these and go figure eight until scratch gone.
I was in your same position. I tried a grinder. It sucked. Put a metal blade on a jigsaw and it worked awesome. Even on like 3mm steel sheet. Only thing was, was that i had to drill holes when my design made a sharp turn, so i could reposition the saw. But you need a drill and some bits to make the other holes in your design anyway. Its seriously the best, cheap DIY option.
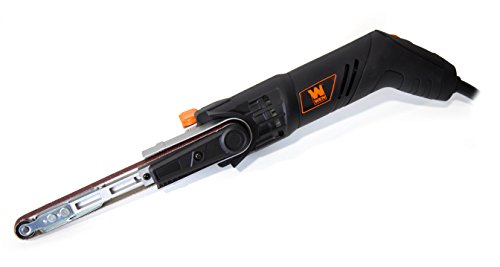
Not sure what you’re making, but to give you an idea, I can make pretty much any simple car part I want with just the raw steel, a welder, jigsaw, an angle grinder, and a drill/drill bits. Files, a file sander, a dremel etc. help. I use this thing way more than I ever thought I would: https://www.amazon.com/WEN-6307-Variable-Detailing-Sander/dp/B072Q2FTLY/
I always use PB blaster. I restore alot of rusty parts and use it after sanding and it usually takes care of any remaining rust. Here it is: (https://www.amazon.com/Blaster-PB-PENETRATING-Lubricant-OZ/dp/B00XOSYNM6/ref=sr\_1\_2?keywords=pb+blaster&qid=1649078891&sprefix=pb+b%2Caps%2C67&sr=8-2)
This epoxy is really popular for knife makers who are affixing wood knife scales to steel (stainless and other alloys).
West System G/Flex Epoxy https://www.amazon.com/dp/B07MZFSK61/ref=cm_sw_r_awdo_8961CJ103800SRGF0WGE
I have one from this company Sewinfla Professional Inflatable Paint Booth 28x15x11Ft Environmentally-Friendly Air Filter System Portable Paint Booth More Durable Inflatable Spray Booth with Powerful Blowers https://www.amazon.com/dp/B085MZDSG3/ref=cm_sw_r_awdo_RH4BK1WJE2710BJQ58QG?psc=1
They have lots of sizes and I have never had issues with mine. I don't use it super often, but when I do I haven't had issues. I have never used it for painting an entire car, but I have done trailers, bumpers, chassis, and a small boat