
What are
/r/Luthier's
favorite Products & Services?
From 3.5 billion Reddit comments
The most popular Products mentioned in /r/Luthier:


The most popular Services mentioned in /r/Luthier:
Inkscape
Dropbox
Instructables
Clyp
Payhip
DuckDuckGo
Microsoft Bing
Circuit JS
ReverbNation
LibreCAD
Autodesk Tinkercad
Creative Market
Blend4Web
Color Hunter
The most popular reviews in /r/Luthier:
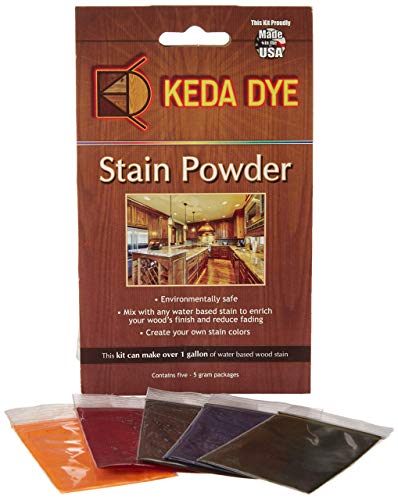
If you want to "stain", look into keda dyes. They are cheap and you can mix the color to your liking. I've done a couple of burst finishes with them and it was no problem. Here is a telecaster album with the dye process:
you need a on/on/on DPDT. they're a little uncommon, but this looks about right.
looks like the bridge switch is the same as well, FYI, so get two if you're building this entire circuit.
You can buy radius bits on amazon. This is a link to a collection of radius, but you can buy them individually. I have a 12” and use it all the time. Doesn’t get it perfect, but gets me to 90% and then I finish sanding with a radius block.
You basically raise the bit until the tip is at the center of your fretboard, cut one half, flip over and cut another half. I created a jig to carry my fretboards and quickly align everything.
Yonico 13601 Guitar Finger Board Radiusing Router Bit Set with 1/2" Shank https://www.amazon.com/dp/B0713X5NLW/ref=cm_sw_r_cp_api_VsQOBb9FFXPAA
Lots of details of the finishing process in this book: https://www.amazon.com/Guitar-Finishing-Step-Step-Erlewine/dp/0977651908/ref=mp_s_a_1_3?dchild=1&keywords=guitar+finishing+step+by+step&qid=1610714978&sprefix=guitar+finishing+step&sr=8-3
???
It’s pretty common. I’ve made belt buckles out of it.
Simple amazon search:
EPOXY RESIN CRYSTAL CLEAR 16 oz Kit. FOR SUPER GLOSS COATING AND TABLETOPS https://www.amazon.com/dp/B01LWT156B/ref=cm_sw_r_cp_api_DguHzbHFXJ16E
I build guitars and when i started out i figured out quickly that if i wanted to make my own designs and assemble the boards myself i would have to get a planer. I found this for a great price on amazon but you could even find one cheaper on craigslist if you look hard enough. PORTER-CABLE PC160JT Variable Speed 6" Jointer https://www.amazon.com/dp/B004Q0I8YU/ref=cm_sw_r_cp_apa_i_8CktCbQ5RVZDS
Now I can make bodies with different types of wood which is what im looking into with my next build.
I see this failing wonderfully. Yet i still hope you try it. The things you learn from making mistakes in luthiery are very valuable.
I cant answer these questions definitively myself but I did come across this a while back. It may be of some use:
https://www.theguardian.com/science/life-and-physics/2012/may/12/harp-physics
I tried searching on Amazon but no luck. On the bright side, I found this sick ass train cookie cutter https://www.amazon.com/Wilton-Metal-Cookie-Cutter-3-Inch/dp/B007X707ZG/ref=sr_1_fkmr2_3?ie=UTF8&qid=1517347075&sr=8-3-fkmr2&keywords=little+round+metal+doodad
Find a book or two about guitar building on Amazon (https://www.amazon.com/Make-Your-Own-Electric-Guitar/dp/0953104907 this one is pretty excellent) and read it. The book will not only tell you every step of building an instrument, but it will also list every tool and material you will need to complete the project.
The first step to take, though, is to learn basic woodworking skills. Without them (and without good hands-on guidance from a skilled woodworker), you will not build an instrument worth playing.
Put the jack hole where the strap button is. Look around for a "strap button jack", I think they even have them on Amazon. The jack has a strap button on the end so you plug your cable in through the hole in your strap.
edit: Something like this: https://www.amazon.com/Chrome-Screw-Mount-End-Pin-Button-Guitars/dp/B007PSHFYE
Alnicov Headless bridge. I'm glad someone asked. Overall? Yeah, I'd probably use them again now I know how to set them up properly, especially for multiscales. My main complaint is how fiddly it is to perfectly install 7 individual pieces, that, and I had to solder some spare wire onto the high GBE to get the locking screws to grip properly!
https://www.amazon.co.uk/dp/B083TKY34Y?ref=ppx_pop_mob_ap_share
Guitar Plans Collection Give that link a go. If you can't use CAD, always look for PDF versions as they shouldn't distort when made bigger/printed. You can print it of 4 A4 pages if you are handy with printer settings.
I'm actually getting ready to paint a Squier body with Krylon indoor/outdoor matte white this evening. I'm going to rub the original finish with steel wool, wipe it down with denatured alcohol, and spray some thin coats of white primer. If you have some patience and good spray technique, you can get pretty good results. For a cheap guitar this works fine.
Here is an instructable I made where I go into detail about refinishing a cheap guitar, though I would not use that Duplicolor lacquer if I had to do it over again because it stayed pretty soft for a long time.
Here is a cool Stewmac article on stripping poly finishes with a heat gun.
I picked up a set of very good iceman plans from a user over at sevenstring.org,seems his file links have long since expired so ive uploded one of them for you to take a look at
https://www.dropbox.com/s/cglmv48wic00wjf/Iceman_HT_24_SetIn_25.5.cdr?dl=0
that's for a standard 25.5 24 fret Iceman Hardtail
it's in .cdr coraldraw vector format so you will need a program to open/view them,i suggest inkscape ( https://inkscape.org/en/ ) as its free and easy to use
Hope that helps
Precut stickers are available from various places. You can search for "Humbucker Sticker" and should find some decent results.
One example: Pickup Stickers for Humbucker // DiMarzio DP100 - Blue https://www.amazon.com/dp/B08M8YJ1KV/ref=cm_sw_r_apan_glt_fabc_53A1JXN5NR0X8871B565
I use this one: https://www.amazon.com/Alpha-Metals-am31605-4oz-032elec-Solder/dp/B000G36BYU
60/40 rosin core, .032"
I know both MojoTone and DylanTalksTone use basic rosin core for their work so if it's good enough for them then it's good enough for me.
EDIT: added link to Dylan's take on flux core
Sure! Super simple, it's literally just this followed by wet sanding (up to around 2000-3000 grit) and buffing (auto polishing compounds). If you want a flat surface with no pores showing, use a grain/pore filler on the mahogany; maple's grain is closed enough for the 2-part clear I linked above to fill all on its own.
Dremel a slot into it, then unscrew it with a slot-head screwdriver.
If that doesn't work, maybe buy some of these: https://www.amazon.com/Drill-Warehouse-Straight-Tapered-Cutting/dp/B0765SGHQB/ref=sr\_1\_6?dchild=1&keywords=plug+cutter&qid=1624134098&sr=8-6
Try a properly sized plug cutter to remove some wood around it. Then twist it out with pliers.
Or drill it out with a plug cutter, cut a piece of maple scrap with a larger plug cutter, and tap in a maple plug in the correct grain orientation.
This was the game changer for me. The motorized machines were far too expensive for me, and this has a 1:8 turning ratio, so with some practice to avoid breaking the wire I was able to get to about 5000 turns in 5-10 minutes or so after rigging a piece of wood to hold the pickup bobbin
It's been a long time since I've looked through them, but I believe one or both of the books linked below cover neck through builds:
https://www.amazon.com/Make-Your-Own-Electric-Guitar/dp/0953104907
https://www.amazon.com/Electric-Guitar-Construction-First-Time-Builder/dp/1574241257
tele's are the most basic guitar you can start off with, and they look great! here's a link to a site that basically gives you almost anything you need to know about building guitars. TDPRI also has some great threads. i also have a body plan and .dxf file for it courtesy of terry downs, if you need it, just private message me
Just google "screw up extractor" and get one of those (assuming you have a drill). Basically, you drill the end of the screw out and use the screw extractor to get it out. Here's a link: screw extractor
From the good folks at TDPRI: Waterslide decal questions.
Designing your own can be fun. Inkscape can help with this if you need graphics software.
Just realize there are legal issues with copying someone's design and/or selling copies as original products.
Yes, it goes to the heel. If it adjusts at the body, then the adjustment screw extends further to allow you to reach it. If it adjusts at the headstock then it ends there.
> that's like the 20th fret on most guitars.
You're dismissing pretty much every acoustic on the planet which hit the body at the 12th/14th frets, along with all stratocasters which hit the body at the 16th, Les Pauls which hit the body at the 15th etc.
Where you find the adjustment screw, and where it actually adjusts are not the same thing. This is a good visual of how the adjustment area starts a couple of inches away from the actual end of the rod where it adjusts. The truss rod only adjust the neck that is free from the body of the guitar between the nut and the neck joint
Fender makes a MIM "Road Worn" Telecaster that has the poly finish ... and as you say, it's only lightly worn with a few chips and scratches.
http://issuu.com/fender/docs/2011_fender_roadworn_ebrochure/12
They sell aluminum ones on Amazon. After you use it as a caul, you can attach PSA sandpaper to it to level the frets.
Just find the correct radius:
Guyker Two-Way Radius Sanding Block for Fret Leveling Fingerboard - Aluminum Sanding Beam Luthier Tool for Guitar & Bass Repair & Maintenance CNC Machined (1 Piece, Radius 12” + 16”) https://www.amazon.com/dp/B08GYSGK6N/ref=cm_sw_r_apan_glt_fabc_V9P0RXZEQ7FWRA2AKFFP
Once I put glue inside the cracks, how would you recommend I hold the wood together?
I got these for $40. Still pricey by way cheaper Than the stewmac ones (and they’re labeled)
Holmer Tapered Nut Files Double Edge Nut Slotting Files Set Fret Crowning Files Luthier Tools for Acoustic Guitar Set of 3Pcs. https://www.amazon.com/dp/B08JGJRKVT/ref=cm_sw_r_cp_api_glt_fabc_6MPPCWS2RDC7Y1DXNJ2M?_encoding=UTF8&psc=1
Yes, use the clamp/fence thing that's seen in the picture. Made it so much easier. You could also make one using a straight board. Just clamp it to the board measuring 1/2 the distance of the router to the fence, if that makes sense. Basically just measure a hell of a lot and make sure you have a good center line. Also, make a lot of kettle passes, and keep the router pressed against the fence, so you don't stray off from where it needs to be. You can see 1 little spot where I did this but it was okay. So I'm using a DeWalt handheld router that is 4 inches wide, so i know the center of the router bit is 2 inches from the edge. Here's a link to the clamp thing: https://www.amazon.com/dp/B08146J2T8/ref=cm_sw_r_cp_apa_glt_fabc_Z11DJKM0FZ6ACM41Y57K There might be a smaller cheaper version of that somewhere btw
I use this stuff for my motorcycle with a matte black finish. Just spray on and wipe with a microfiber. Detailer with a matte finish sealer that won't fill the matte texture over time. https://www.amazon.com/Ducky-D-1045-Matte-Finish-Detailer/dp/B00K56MRNW
edit: https://www.amazon.com/Chemical-Guys-SPI_995_16-Meticulous-Detailer/dp/B00FQHY64S/
cheaper and probably does the same thing
You need a sanding beam. This can be a piece of metal square tube that spans the length of the fretted area of the neck with some sand paper adhered to it or a fancy premade one. Masking tape, to protect the fretboard itself. A permanent marker, to mark the tops of the frets so that you know you're removing things evenly. A fret crowning file to crown the frets after you sand them and a fret rocker to ensure that your frets are, indeed, level. Various grits of find sandpaper can be used to polish the frets (micromesh would be nice). They also sell abrasive erasers for that purpose.
yes, and that little action gauge amazon is recommending would be a good investment too.
You can find them cheap on Amazon.
SE 81970SF 3" Adjustable Jeweler's Saw Frame, Professional Quality https://www.amazon.com/dp/B008CO8JZE/ref=cm_sw_r_sms_c_api_6G-XybVRKPVZH
And like the other redditor pointed out, a simple P95 mask MIGHT be ok if you're cutting pearl outside and upwind, but shell dust is like asbestos and is honestly dangerous enough to warrant a $30 3M respirator with the better P100 filters.
Just my 2 cents, but I've read some Gnarly stories of casual exposure
I've recently started using 4-40 blind nuts (Amazon link) to mount the pickups in my basses. I really like how smooth the height adjustment is and it'd definitely make it easier to do something like hot-swappable.
I bought one of these strat-style kits on Amazon as a lark. Decent, not perfect, but a good deal for $63.
Figure out the basics on something cheap and gain a better understanding of what you want from 'good' parts; locking tuners, electronics, neck radius...
Your best bet to get one of these cut is to find a local makerspace that has a vinyl cutter (sometimes your local library might have one). Places like that will usually do a one-off for you for less than $10.
As far as colors, you could just see what they have, or you could order your own vinyl from Amazon. A 12" x 5' roll of Oracal is about $7, and they have 30-40 different colors you can choose. ( https://www.amazon.com/gp/product/B01G7R8Z4M/ref=ppx_yo_dt_b_search_asin_title?ie=UTF8&psc=1 )
You can do very detailed designs with these cutters. I have a low-end, hobbyist model cutter and it will do anything I ask of it. Application involves peeling the pieces you don't want off the backing paper after it's cut. Then you lay down some transfer tape (I just use painters tape) on the top of the vinyl and peel it off the backing paper. Lay that down on your final surface and peel up the transfer tape. The tape peels off and the vinyl stays stuck (lots of YouTude vids on this).
These are permanent adhesive vinyl so they stay stuck with no problem to any relatively smooth surface. A fine sanded maple is just about perfect.
i'm going to try these for pickup mounting. not sure if they are good or bad, but they are the right size that I need. https://www.amazon.com/gp/product/B00270ZSIU/ref=ppx_yo_dt_b_asin_title_o00_s00?ie=UTF8&psc=1
There's two screw holes on these models, you can see them there where I haven't replaced the screws yet.
You can use one of these sandwich clamp devices to tighten a bridge down sufficiently by pulling the center up through the screw holes with wing nuts and countering the raised bridge sides with bolts going downward.
It's sufficient for letting the glue set, but that device I linked up there just did not have its bolt/nut placements in the right places to make me feel comfortable on this bridge, so I 3D printed my own to distribute the force more evenly.
Then, I did something risky and used some fast-setting wood glue. The clear kind that is not easy to melt off afterward if you make a mistake..
I took precautions, but I can't encourage people to use glues that can't be removed.
I told the client that I can't be doing any serious work at the moment because my workshop is still in the process of being rebuilt, but he gave me a couple big jobs anyway the next day...so I did all this on the end of my bed in my room.
I recently used this product on a horribly spray painted guitar body and it worked great.
No VOC, bio-degradable, water based, and doesn’t require any ventilation. I applied and scraped in my bedroom with no ill effects.
If you want pics of my usage let me know.
What about a Crowfoot wrench? Actually, first I've ever seen something like that - I might have to get a set myself!
For anyone else having this issue, please refer to these 12" long drill bits on Amazon. They're more flexible the smaller diameter you go, which is what you need to hit the correct angle from cavity to cavity.
You can save the edge of your control cavity from being scratched up (as the bit will be scraping the top edge at that angle) by putting a piece of plastic there for the bit to rest on. I use an old binder cover, it's just a thin sheet of plastic.
You just wired them backwards.
Not super sure about mini pot brands but there was plenty on Amazon that seemed reasonable. https://www.amazon.com/dp/B01JLT7PN0/ref=cm_sw_r_cp_apa_i_vzPdFbG4H3MAR
Personally, I'd much rather ream out the holes a bit and use full size pots unless there's really a space restriction.
You can sand back down to the bare wood again and start over, but it'll be a little work. Couple notes though:
You can only stain/dye things to be darker than they already are. If your filler is already too dark, you need to buy lighter filler.
If you want to make the wood darker than the filler, then you have to stain/dye the guitar before applying the filler... otherwise you'll just stain/dye the filler at the same time as you're coloring the rest of the guitar. Applying filler before color only works if you want the filler darker than the wood. Also, the color in the filler will color the rest of your wood if you haven't already sealed it.
I have never dyed my own filler. My advice would be to spend $15 on the right wood filler (something like https://www.amazon.com/Timbermate-White-Hardwood-Wood-Filler/dp/B001NV4VG4 ) and $10 on a 15mL sample bottle of dye (such as http://www.woodessence.com/ColorFX-Dye-Individual-Bottles-P46C12.aspx ), which is more dye than you'll ever need for one guitar. It's always easier to use the right materials instead of trying to force the wrong materials to do something they were never meant to do.
Looks to me like an old Teisco (or similar) crappo Japanese electric.
https://www.amazon.com/LYWS-Adjustable-Tailpiece-Vintage-Electric/dp/B07PJST2D5
https://www.amazon.com/gp/product/B07R7PR72H/ref=ppx_yo_dt_b_search_asin_title?ie=UTF8&psc=1
This is the tube of bearings I bought for mine, then I built it up based on the size of those bearings. A trip to a hardware store with a bearing in your pocket is probably going to suit you better. I used some old feeler gauge to fashion a washer the width of the fret tang to separate the two bearings that the tang rides in.
https://old.reddit.com/r/Luthier/comments/jxrh2m/my_take_on_the_diy_fret_wire_bending_machine/
It’s just been buffed shiny by the motion and oils from your hands.
Your best bet for reducing the speed that this happens is assuring yours hands/wrists are freshly washed when you play, wiping down your guitar with a microfiber cloth after each use and a satin finish protector like this one once a month or so whenever you change strings.
I have not used it on a guitar, but I can guarantee that MG nickel spray is very conductive. I've used it for EMI shielding on other projects, and to coat things for copper plating, which it works exceptionally well for. I will be using it on a future guitar build to test it.
As was mentioned, you will need to set your meter for ohms to read higher resistance values.
This model is pretty close. IMO, but i agree the size of the control cavity isn't quite the same. I know there's been a few iterations of these over the years (I used to jam with a dude maybe 10 years ago who had one with a more traditional LP layout and a bolt on neck). Considering how much this has been carved out and modified, I wouldn't be surprised if other modifications were made either to the control cavity (such as plugging holes etc) or moving the pots around.
personally, i think tortoise would be too much. it would distract from the finish. if you want to show it off, i'd stick with black and go as small as possible. i'd try one of these next:
https://www.ebay.com/itm/402739800084
https://www.amazon.com/Guitar-Pickguard-Cabronita-Telecaster-Pickup/dp/B00H5B3UOK
i'd stick with the black/white/black 3-ply to give the edge a nice definition, otherwise it would sort of blend into the finish, but you could try all black too. personally i think highlighting the edge with a thin white line helps, but i understand why some say it might distract the eye from the finish.
Here is what we get, same issues as I described..The inside is what it needs to be (i had redone the neck pots for this vid but it made 0% difference).
https://www.dropbox.com/s/bg2svl10p7pc5wz/2013-02-25_07-05-19_619.mp4
http://imgur.com/a/0o2WJ#0 <<<<5 pics imgur album
If you want more I can take more pics and shoot more video.
I updated it a bit, doing as you suggested and putting some electric tape around the frayed as well, even added grounding by going to a screw from the casing.
So to be clear, the 3 way switch is going to the jack and then one to each volume. The jack then has another wire coming off it which is going to the 2 grounds from the humbuckers (as shown where the elec tape is), and THEN I added a small red wire from that to a screw. The tone and volume from the Neck pickup, the top of the pic the green wire, are touching eachother because it reduced feedback when we did that, no other real reasoning.
No where else when touched reduced feedback.
This is aggravating as all hell for me !
https://www.dropbox.com/s/f5moibdoh01gn4x/2013-02-24_06-30-10_117.jpg
Still feedback, and when I touch it grounds out a great deal of it.
Ninja edit:
Grounding the tone knobs stops feedback but ONLY IF THEY are turned all the way down.
I found some control plates with a quick amazon search.
This one is prewired if that's your jam.
Then just buy a pick guard blank and cut it to your dimensions!
Gotcha, that’s a bummer. A lot of people use a mandolin-style tailpiece that might be your best bet, something along these lines:
https://www.amazon.com/Roosebeck-Mountain-Dulcimer-4-String-Fretboard/dp/B00GBC46YM
I haven’t picked out leds yet. I was thinking these
But was confused about them being 2v etc.
I meant wired in parallel all the positives together and all the negatives.
7/8"? This is the first thing that popped into mind when I was looking at that gaping hole----->Fill Your Hole With This! (obvy one that's a bit more.....robust)
> I've never tried those cylindrical headless tuners
I imagine you're talking about the Steinberger gearless tuning-machines:
But it might interest OP that these also exist:
https://www.etsy.com/listing/464275278/riot-works-tuning-machines-stainless?
Although they are not less expensive, then seem to be made of more durable material than the Steinberger tuners.
I have this book in my shop. Its good reference material, and the guy (who wrote it) is a low-budget home-built maniac.
This:
You might want to consider this style instead. It's a knockoff of a Stew-Mac design. You can buy similar bases much cheaper on ebay though, almost as little as the plastic Dremel base.
I have a non-plunging Dremel brand router base for my moto-tool and it's pretty lame in quality.
it's going to take experimentation. something like this : https://www.amazon.com/Everbeam-Black-Light-Flood-365nm/dp/B08635F9CX/ref=sr_1_1_sspa?keywords=uv+led&qid=1664901965&qu=eyJxc2MiOiI1LjIwIiwicXNhIjoiNC43MyIsInFzcCI6IjQuMjcifQ%3D%3D&sr=8-1-spons&psc=1&spLa=ZW5jcnlwdGVkUXVhbGlmaWVyPUEzUDNKVVhRN01BSkNSJmVuY3J5cHRlZElkPUEwNjAxMDY2M0RYWDBMVVVMMzBRNiZlbmNyeXB0ZWRBZElkPUEwMTgzMDkxWEFSRERSSjdMRUFLJndpZGdldE5hbWU9c3BfYXRmJmFjdGlvbj1jbGlja1JlZGlyZWN0JmRvTm90TG9nQ2xpY2s9dHJ1ZQ==
is what I use to cure UV resin, and would B L A S T it with UV... but you'd have to carefully watch to make sure you don't just invert the discoloring. A grow light will simulate the sun, a UV will accurate the SHIT out of it, how much is the question.
What I can't tell from the photo is how much of that is the finish discolored and how much is the actual Spruce tanning. Both have a limit of how far they will go. You could get lucky who knows.
I used one of these bad boys when a screw broke in one of my necks:
https://www.amazon.com/Single-Screw-Extractor-1-4/dp/B0032YWQ26
These little hole saws are great for being able to do a controlled cut with a drill press that leaves the area prepped for a dowel. The tool itself is pretty delicate, though, and only lasted for me for 2-3 screw extractions. Worth it for a high value chunk of wood like a guitar neck, though.
The 2mm screwdriver from a cheap set like this will do the job in a pinch, if you sharpen it! :)
For waterbased polyurethane, dry sand 100% of the time. For oil-based poly, you can wet sand. Tack cloth to remove dust in either case. These are the best tack cloths. https://www.amazon.com/Gerson-Blue-TACK-Cloth-GER-20001B/dp/B00V3QBMRU/
You need router template bits . No need to resize templates etc . I would buy higher ends ones etc. you will want different lengths so you can do pickups and neck pockets etc vs just out side body length. I also find doing the body with a router table is easier .
Read: https://smile.amazon.com/gp/product/1561582883/ref=ppx_yo_dt_b_search_asin_image?ie=UTF8&psc=1
Or buy something like this and read the label: https://smile.amazon.com/gp/product/B003DKXWOA/ref=ppx_yo_dt_b_search_asin_title?ie=UTF8&psc=1
But yeah, watch youtube
Personally I use a 2K spray can clear coat like this. You can get it at the link or from a local auto paint shop.
https://www.amazon.com/Spray-Refinishing-Permanent-Surfaces-3680061/dp/B0043B7UQY/ref=sr_1_3?keywords=2k+clear+coat&qid=1662915121&sprefix=2k+clear%2Caps%2C98&sr=8-3
I use the whole can to coat a typical guitar body, and maybe the neck as well. It is a 2K so if you follow the instructions it will still cure quickly even if it is on thick. I know a lot of purists will gasp at 'thick' finishes on guitars but for me on an electric it is not a big deal.
So one could even go with two cans. But, start with one, and if it is enough to sand flat then you are OK. If not, get another one. The smoother the base coat paint is, the less clear you will need all else being equal. Like with painting anything, prep is very important.
Ok man, so I am ride or die with this thing.
I just discovered this thing.
https://www.amazon.com/gp/product/B01BLAS0GI
The cost of paying someone to file the saddles to match the radius is kind of steep compared the price difference. So I ordered this up. Individual saddle height adjustment and more travel. Not sure how much more travel than stock but hoping it works. I kind of like the matte look of the Hipshot rather than the crazy shiny.
No. Order a .023" or .5mm bit. If you can't afford $15 for cnc bits you can't afford to build a guitar.
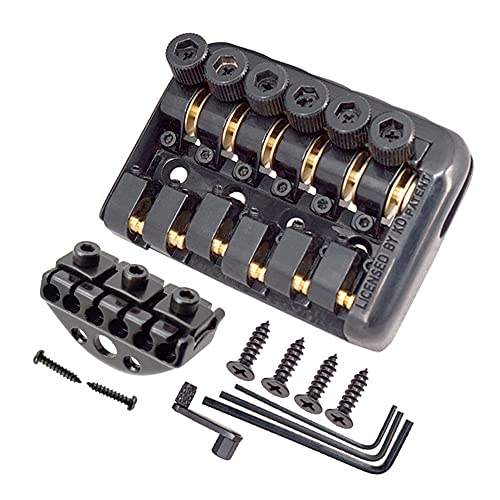
That bridge is for a string thru body.. That body is NOT string thru.. This will be what you are looking for.. https://www.amazon.com/Wilkinson-Ashtray-Compensated-3-Saddle-Telecaster/dp/B081CBKZPD/ref=sr_1_2_sspa?crid=CM35YQ1NCOEH&keywords=tele+bridge&qid=1662582269&sprefix=tele+bridge%2Caps%2C112&sr=8-2-spons&psc=1&spLa=ZW5jcnlwdG...
Cheers
This is the style of pickguard for that thinline. I am almost done building mine and you'll need a Merle Haggard style pickguard.
https://www.amazon.com/Fender-Haggard-Thinline-Guitar-Pickguard/dp/B085NRPZ1D
I am almost done with my build with the same/similar body and had purchased 5 different pickguards to finally get the right one. OP should be looking for the Merle Haggard pickguard.
https://www.amazon.com/Fender-Haggard-Thinline-Guitar-Pickguard/dp/B085NRPZ1D
It's hard to tell how to gauge the structual integrity from a picture, but may I reccomend whatever way you afix the bridge use something like this to mount the strings with.
This will prevent the strings potentially lifting in the future as the tension is coming from the end of the guitar now instead of a potentially unstable bridge. I've done it previously and it's been great ever since!
It is called the guitar neck "Relief".. " Neck relief refers to a small amount of concave bow intentionally created in the neck of a guitar or bass by adjusting the truss rod." "Which way do you loosen a truss rod?
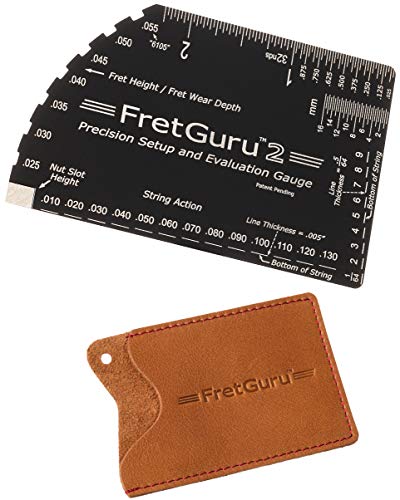
Once you have a picture of the neck as it is, you need to decide what way to turn the truss rod nut and how much to turn it. Remember in a single action truss rod: tightening the rod (turning clockwise) straightens the neck, loosening (turning anti-clockwise) permits it to bow." You should only turn the truss rod a 1/4 turn at time.. Hope this helps... https://www.amazon.com/UPGRADE-iLuiz-Straight-Luthiers-Fretboard/dp/B0776RBZF1 You may want to pickup one of these to get the neck straight and then adjust to your playing needs..
So from that clip, he seems to have used a Shure 'Green Bullet' harmonica mic, with what looks like a retractable cable reel of the sort you might find in certain vacuum cleaners, installed in the big hole he cut in the back of the guitar...
As to whether or not it is actually integrated with the guitar wiring or just uses a separate output isn't clear... it's pretty cool though! :)
If you've got an Android phone or tablet, there's an app called Luthier Lab that includes body shape planning - including bracing for acoustics - as well as fret position calculators, etc. They might have an iOS version too, no idea.
There are dozens of websites that offer fret-position calculators. For example, this one from Stew-Mac.
What specific part of the design process are you concerned about?
Thanks! here's a cool metronome, you know, for your next songs.
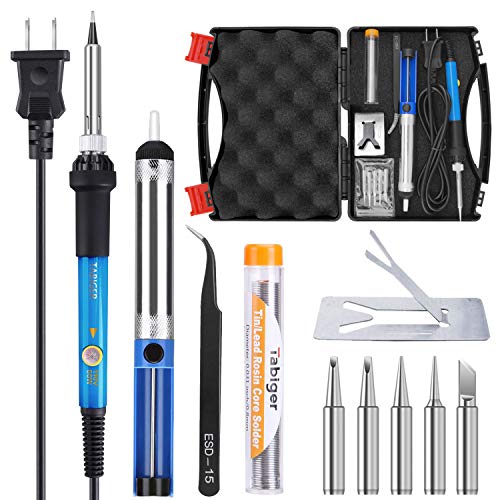
Absolutely! This is probably the easiest beginner guitar wiring fix.
If you don't have any wiring tools, this kit is perfectly fine for starting out.
I use the same model and have never had an issue with the iron, after thousands of diodes, capacitors, and resistors soldered with it.
Anyway, all you need to do is strip the small white wire to expose just enough metal to contact the output jack terminal again.
That wire is your positive lead, and will need to be soldered to the larger post on the jack, which connects to the 'tip' portion of a cable when you plug it into the jack.
The bare wire is your ground, or negative, and solders to the smaller terminal on the jack.
Check out a basic guitar soldering tutorial on youtube to see the procedure for using a soldering iron and the types of connections you can make.
Yep, they work well for this. The Stewmac ones are great, but expensive. These are cheaper, but I don’t know the quality.
And OP, tape the fretboard! It’s not hard and you’ll regret it if you don’t.
What type of tuner do you currently have? I think you might be overthinking it. It doesn't take a fantastic tuner to set the intonation. Fantastic tuners are good to have and they definitely help, but they aren't a requirement. The only thing that I wouldn't recommend for intonation is clip-on tuners. For an electric guitar, the "best" is a tuner that you can plug into, and the second best is a tuner with a mic.
This $14 tuner would be more than enough to get you going. There are a few tuners on Amazon that are $10-$11, but they are made by generic unknown Chinese brands so I wouldn't trust them. Korg is a trustworthy, well established brand, and it's well worth the extra $3
That being said, if you plan to buy a tuner pedal regardless (instead of a handheld non-pedal like this Korg), then you should just wait and buy the pedal. No sense in spending money on a tuner and then spending more money on the pedal and never using the handheld tuner. If you just need a tuner in general and you dont care whether or not its a pedal, the get a cheap handheld tuner like the Korg and spend the leftover money (~$70 i.e. another decent effects pedal!) on other gear that you want. Apologies if you're already aware of everything that I wrote about. There's a lot of eager young/inexperienced people in this sub so I like to cover all bases to help folks out just in case.
I use spade quick disconnect connectors. Example: https://www.amazon.com/TICONN-Disconnect-Connectors-Electrical-Assortment/dp/B08BZ972B5/ref=mp_s_a_1_10?crid=1MPYMLOI75D3U&keywords=crimp+disconnect+insulated&qid=1660422878&sprefix=crimp+disconnect+insulated%2Caps%2C117&sr=8-10#
Can often find them at auto parts stores and home improvement stores, as well as the internet.
You could try some naptha (lighter fluid), it shouldn't dissolve that nitro finish.
I'm also a big fan of this stuff, it does wonders on nitro finishes, cleaning up dull spots and such https://www.amazon.com/Virtuoso-Premium-Instrument-Polish-Cleaner/dp/B0088Q50BM
Turquoise is actually pretty inexpensive. I bought an ounce for this project and have a bit leftover after doing the fretboard and headstock inlays. This is what I used:
https://www.amazon.com/gp/product/B01FWQFIDA/ref=ppx_yo_dt_b_search_asin_title?ie=UTF8&th=1
I use resin for the fretboard so it's nice and smooth. CA glue for the headstock. Here is the resin I use for almost all my fretboard inlays:
https://www.amazon.com/gp/product/B08DW2M9N9/ref=ppx_yo_dt_b_search_asin_title?ie=UTF8&th=1
Scrapers and sandpaper. Although a really good finish and less elbow grease will be required if you get an oscillating spindle/belt sander. Like this one. There are various companies that sell what’s essentially the same thing with a different label. The oscillation (moving up and down) is what makes this a quasi indispensable tool in my shop. And one of the best values for cash. Use it for shaping/sanding body edges that are fussy by hand, for thicknessing headstocks (add a fence) with or without volutes, and shaping headstocks. After a router and a drill press, it’s the tool I’d recommend over a bandsaw for electric building - the bandsaw is nice, but a good jigsaw, this and a router will get you going pretty darn fast for a lot less money.
I use a 1/4" Philips bit in a tiny ratchet.
Not exactly this, but pretty much it https://www.amazon.ca/KAIFNT-Security-Ratchet-Wrench-34-Piece/dp/B07RN1VL18/ref=asc_df_B07RN1VL18/?tag=googlemobshop-20&linkCode=df0&hvadid=459598003913&hvpos=&hvnetw=g&hvrand=6961632684267004137&hvpone=&hvptwo=&hvq...
I occasionally use an X-Acto knife with a saw blade because it's the perfect thickness for a tight fret tang. I don't know if you're at the point where you can freehand it however you're welcome to try. I ruined a few boards when I was learning to cut.
So as stated, i’m having issues with this tele i built. the lacquer is somehow still soft after a whole year. When i took it apart i wet sanded it with 800 grit to aid curing.
I used acrylic lacquer
https://www.amazon.co.uk/Hycote-Clear-Lacquer-400ml-Energy/dp/B004SNLNY2
After a year its still soft and sticks to anything like foam on a guitar stand (quite badly), polyester t shirts (really bad if the shirt has a decal), paper, etc. literally anything
Anyone ever had this issue or have any advice to fix it? at this point i honestly don’t care about the body being soft and denting easily. i just don’t want it sticking to everything it touches for a brief amount of time lol
I wanna avoid stripping everything back as the artwork was done by a close friend and don’t wanna see it go to waste.
I probably did about 7-10 light coats of lacquer with 2 days between coats and wet sanding between each coat
Nuts are cheap , you didn’t list the model but you can get ones that are made for most . But you’ll need to deepen the groves . Or sand the bottom . So you won’t need the special spacing ruler .
80$ all u need . Find a used tool shop and buy a small vise for like 10$. I’ve filed them on the bass it self . Need to be careful on a non fender style cause you came break the “glue” .
I don’t glue nuts in . I use a drop of shellac if you ever need todo a repair or it gets bumped hard. You don’t need to worry about it tearing wood out .
It's probably that you used satin paint instead of using gloss.
Painting a plastic pickguard almost never works well, anyway. The flex and scraping just from putting the screws in will usually make the paint start to flake. You would at least need to use exterior rated paint and clear coat, as they contain elasticizers to allow for heat and humidity expansion and shrinking, which should help with that.
Why not just buy this or similar:
https://www.amazon.com/Musiclily-Aluminum-Jazzmaster-Pickguard-American/dp/B09K77QFT7
I have one of those but you're right, not long enough to do the side of a body but also probably more prone to tearout and gouges trying to cut the entire height of a body outline, better to get something shorter and take multiple shallow passes until you get all the material removed
like this Amana bit, you might see that as a nub but it'll force you to not take off more than you can chew and will also work for routing pickup cavities and such
Actually, that's some very reasonable pricing: https://www.amazon.com/Wilkinson-Adjustable-Wraparound-Compatible-Epiphone/dp/B084ZFXTFJ
I feel bad for suggesting the graph tech now just based on the cost.
Looking at doing some lite repairs on my Grandfather's Kona Guitar he picked up back in 2001/2002.
"Seasoned" woodworker with dreams of building a guitar or two, but never really got into it, yet.
The 6th String Tuning Peg has sheered off, and some of the other pegs seem to be bending. So I am looking at replacing them. A buddy recommended these Wilkinson 19:1 pegs.
Also, the battery cover for the pickup is missing, and I would either like to replace the cover, or the pickup in general. Any resources I should look to?
I'll take any suggestions on what product to use to clean up the body as well. Buff the finish, oil for the fret board, etc.
They do make drill bits that cut a square hole. I imagine you could drill two close together if you're careful. You can get 2 square corners out of it at least and then file tonfit. This is the first search result on Amazon for square drill bit
If I were you I'd go for one of these using the existing hole for the strap button. https://www.amazon.com/SAPHUE-6-35mm-Acoustic-Electric-Guitar/dp/B09DK7T8V7/ref=mp_s_a_1_8?keywords=guitar+endpin+jack&qid=1656534949&sr=8-8
Musiclily Pro Dual Action Guitar... https://www.amazon.com/dp/B09QX16S27?ref=ppx_pop_mob_ap_share
So far it seems pretty cool. I’m working on some inlay where the truss rod cover would typically go on the headstock.