
What are
/r/astrophotography's
favorite Products & Services?
From 3.5 billion Reddit comments
The most popular Products mentioned in /r/astrophotography:


The most popular Services mentioned in /r/astrophotography:
Stellarium
Google Drive
Dropbox
MEGA
SourceForge
Flickr
timeanddate.com
Microsoft OneDrive
Google Sites
GIMP
Vimeo
ImageMagick
Raspberry Pi
FileDropper.com
Wikimedia Commons
The most popular Android Apps mentioned in /r/astrophotography:

Sky Map

Polar Finder

Star Chart

ISS Detector Satellite Tracker

Photo Editor
DSLR Controller
Planetarium

ISS Transit Prediction Free

Camera FV-5 Lite

Planit! for Photographers Pro

Camera FV-5

SkEye | Astronomy

Heavens-Above
DSLR Remote
Clear Outside
The most popular reviews in /r/astrophotography:
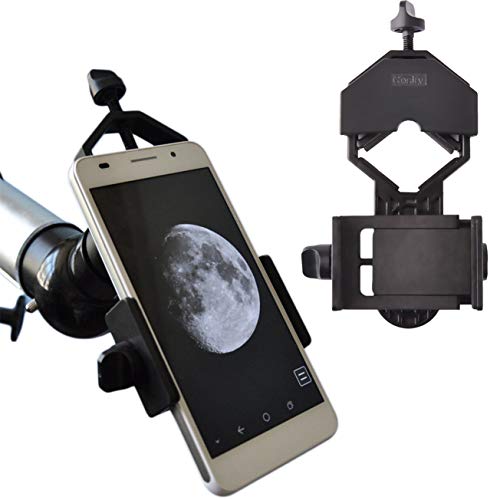
3" Orion Spaceprobe with 25mm eye piece.
Phone mount on eye piece.
Google Pixel using Google's Night Sight mode. (I am amazed at how much detail this shooting mode brought out).
Minor touch ups in post processing with photo app. Boosted the colors slightly, brought down the highlights to reduce the shine of the moon, and boosted blacks to enhance the dark spots of the moon.
I'm really pleased with how this turned out. I wasn't even planning to shoot last night, but it turned out to be a really clear night. I could just stand the cold long enough to shoot the eclipse as it started.
Edit: Those of you asking if you can use this as your desktop or mobile wallpaper, feel free!
Edit 2: Here is a link to the phone mount I used. https://www.amazon.com/dp/B01788LT3S/ref=cm_sw_r_cp_apa_i_bX0rCbS5051MS
Well, if your on Android, check out Planetarium. https://play.google.com/store/apps/details?id=com.andscaloid.planetarium
You'll receive notifications about all meteor showers (start and peak) and other astronomical events.
I don't know if it exists on Apple but an alternative must exists though.
Question, is this the same thing? It was my first summer in the Wisconsin North Woods and was definitely the brightest thing I've seen outside of the sun and moon.
This is an animation made from 11 consecutive frames.
The maximum elevation of the space station was 53°, not ideal but still pleasant result. Solar panels are looking great from this angle (as well)....
Prediction is from Heavens Above website, accurate as always. I did the usual setup, aligning Telrad with my dobsonian telescope and took a series of images with my high frame rate planetary camera.
​
Image acquisition
First I broke down the video into individual frames with a software called PIPP. This was I can save all the frames in .tiff format.
Then I carefully examined all the files. There were 11 consecutive frames with relative sharpness, so I stringed them together. But first in Lightroom all the 11 frames were post processed (brightness, contrast, shadow, clarity, saturation) cropped and rotated.
Then in Photoshop I put the arrows and text on one frame, then I opened all the other frames and copied them one by one onto the arrowed/texted frame. This was the markings remain the same place on every photo.
Eventually the animation was created on ezgif.com website, very useful and easy-to-use website.
Equipment
Skywatcher 250/1200 Flextube dobson telescope
Zwo ASI224MC colour camera
TeleVue 2.5x powermate
MANUALLY tracked
​
23/03/2019
There's this awesome program called f.lux that adaptes the color of your pc to the time of day. It also has a "darkroom mode" that is awesome for astrophotography, because it avoids harming your night vision
A few comments here...
First, obviously the bot took the "bait" posted elsewhere, as we've all noticed. That at least confirms that it is a bot/script/scraper, and will HOPEFULLY get it noticed.
Over in the /r/Astronomy thread, /u/EpistemicFaithCrisis shared this link for filing a DCMA takedown request with twitter, if your content has been stolen. I HIGHLY recommend eeryone affected do so, since there is some hope that twitter will notice the large number filed for this account, and shut it down.
Tumblr also as a DCMA infringement request form.
Obviously, whether or not anyone wishes to watermark their work is their decision. This subreddit will support whatever decision any content creator wishes to make along those lines, of course. We will also, as we've done here, be as quick and thorough as possible in helping you protect that content however you see fit.
The issue of wallpapers is a difficult one, particularly in light of the opinion, as several have said, that it is a compliment to the creator of the work.
Let me be perfectly clear, however. The position of this subreddit is, and will always be, that the work you submit here belongs to you (within the framework of the Reddit terms of use, of course).
Your work is just that...it is your work. For someone else to presume it is theirs to do with as they please is wrong, regardless of their motivation. It does not belong to them, it is not their right to act as though it does.
Obviously, the moderators can not prevent someone from setting your work as their wallpaper. We can, however, remind community members that the work is not theirs to do with as they please, and will do so where appropriate. We will further provide whatever information we can to anyone who requests information in pursuit of defense of their work.
Since my previous detailed album post was so widely popular, thought I'd better post an update for my 7 fans ;) I played around a bit more in GIMP with color levels and came up with something that doesn't look quite as dull as my previous final image. I'm much happier with the overall look now, but still have a LOT to learn in post-processing. Again, if anyone has time to give a shot at processing the TIF, the link is in the details below. Details copied from previous post, if you want MORE details about stacking options etc. see: http://www.reddit.com/r/astrophotography/comments/2c5l3u/first_time_stacking_milky_way_photos_album/
- Canon t4i on a tripod (no tracking)
- Canon EF-S 10-18mm lens at 10mm
- f/4.5
- ISO 800
- 22x25s lights (best 95%, so I guess 21)
- 12 darks, 10 bias, 24 flats
- All converted to TIF, then stacked in DSS
- cropped, contrast/levels/sharpness done in GIMP
- Technically taken from a red light pollution zone, but I'm looking over ~40km of dark ocean with Port Angeles on the other side causing a bit of LP at the bottom of the image. Street lamps behind me.
- (New updated) Link to final stacked unedited TIF: https://drive.google.com/file/d/0B90VzlYIGTQDTTNYa1dnZzNIZW8/edit?usp=sharing
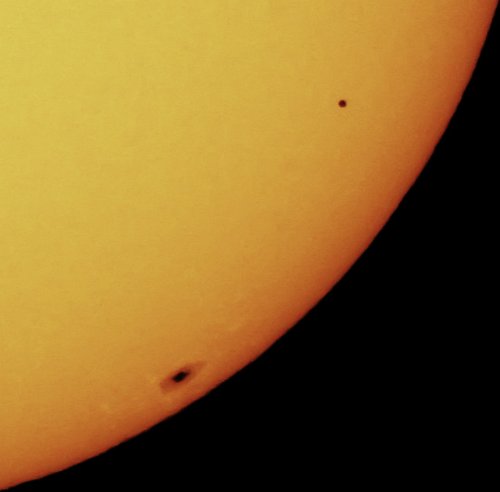
Testing out a little new software the other day, I decided to grab a shot of a mostly quiet Sun and do a little experimenting with post-processing.
The telescope was a Lunt 100mm H-Alpha, the camera was an Imaging Source DMK.
I took two short videos, exposing one for the surface and the other for prominences. The videos were stacked using AviStack2, and I combined the two images in PixInsight.
After a bit of experimenting with wavelets, LHE, and levels, this is what I came up with. Honestly, I'm not thrilled. There was a lot of detail down in the prominences that I just wasn't able to bring up without washing out the solar disk, the Sun ended up brightening towards the rim where it should darken, and overall the whole thing looks flat.
The data itself might be okay, but I just don't have the skills to show it. So I've uploaded the original. If anyone else wanted to take a try and processing, I'd love to see.. especially if you share the techniques you use!
Project Gutenberg has a host of pre-1924 astronomy books, and authors then tended to go overboard with flowery phrases along the lines of "a light dusting of jewels in the black void" to describe open clusters or globular clusters.
On the other hand ... this splendid photograph shows they weren't exaggerating.
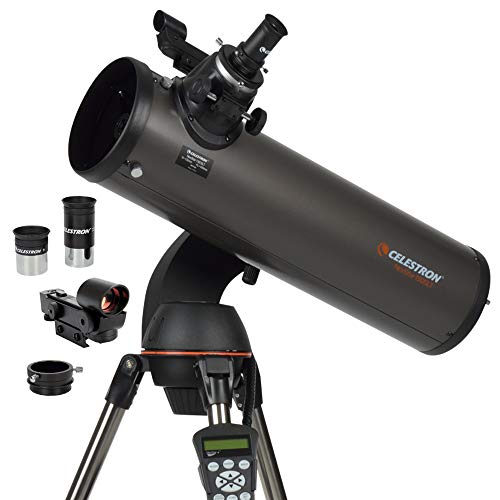
Thank you so much. I didn't expect it to be an incredible setup, but hey, you got to start somewhere right?
I'm just happy I'll finally have a telescope to get some experience on.
One more question: I have this tripod, or one identical to it.
If you think Orion's included tripod is relatively low quality, would I be able to mount the equatorial system on mine?
Orion Starblast 4.5 on an EQ1 mount.
GSO 1.25" 2x Achromatic Barlow Lens #GS2BL
3D printed Sony E Mount to 1.25" adapter
Sony NEX-5N
ISO 100
F4 @ 1/250, but I think the 2X Barlow means it was really F5.6
Thanks for looking!
Try Eos MovRec. It allows you to capture the Live View video feed; when zoomed in 5x, the feed gives you 1:1 pixel resolution (on the other hand, you don't capture the full sensor). Eos MovRec is also super handy for planetary imaging. Either way, your images are truly impressive, congratulations!
You don't need to worry at all about stacking images for wide-field shots. Just put your lens at 18mm, ISO 1600, and shutter for 30 seconds (use timer delay to reduce vibration).
The hardest part will be getting focus. You'll need to point to a bright star, lock the tripod down, then magnify the live preview without zooming the lens. I'm not sure how to do this on Nikon, so take the camera manual along. With the bright star zoomed in on live view, you should be able to finesse the focus ring (manually) to achieve sharpness. One focused, back back out of the magnified view, frame the camera and release the shutter.
> Is Alt-AZ worse than equatorial for astrophotgraphy?
Yes, AltAz isn't suitable at all for long exposure tracked AP, unless an Equatorial Wedge can be added. This is because of...
> Can you explain field rotation?
Yep. :)
Fire up Stellarium and center on a large object with some shape. M42 is a good candidate.
Hit F5 to bring up the "Date and Time" control, and start rolling time forward and back. Watch M42 rotate in the field of view.
If we think about the stars rotating around a fixed point (the celestial pole), then we realize that their orientation, with respect to the pole, stays the same. In other words...the part pointing at the pole is ALWAYS pointing at the pole. Meaning, from our "fixed" point of view, the object rotates.
AltAz scopes track the sky the same way Stellarium does in its "default" view...by simply moving Up/Down (Alt) and Left/Right (Az). They keep the scope pointed at the object...but they don't rotate the scope with the object.
You can, if you desire, put Stellarium into "Equatorial" mode (Ctrl-M on the PC) and you'll see that the field rotation stops. The equatorial mount's RA axis is the same as the Earth's...that is, both axes point at the same spot...the celestial pole...so the scope "rolls" around the path, just as the objects in the sky do. :)
Settings
- Exposure 15 secs
- ISO 800
- 50 Light frames
- 20 Dark frames
- 20 Bias frames
- Unguided
- DSS / Lightroom 5 / PS
Equipment
- Canon 70D (Non Modified)
- Orion 8" f/3.9 Newtonian Reflector (800mm)
- Celestron Advanced VX
That looks really good. Are you familiar with the Snapzoom? How does the Orion compare? I have the Snapzoom and Celestron 8se and I have trouble getting it aligned and keeping it centered. https://www.kickstarter.com/projects/1409008983/snapzoom-the-universal-smartphone-scope-adapter
I just discovered that f.lux (A tool that automatically dims your display and adjusts your color temperature based on time of day) also has a "darkroom mode" that would be perfect for that.
If you have an Android phone, you can use Polar Finder. Its only 99 cents. Its what I use with my iOptron SkyTracker.
Platesolving is when you take a picture of the stars via your scope and match it to a database of all known stars to get the exactly location in the sky that your scope is pointing to. I noticed that you are using BackyardEOS. BYEOS integrates with Astrotortilla for plate solving. https://sourceforge.net/p/astrotortilla/home/Home/ It takes a little bit to get it setup, but once you have it going, it is really nice.
amazing dedication! let me know if you're ever down wollongong way. Few of mine are here (though mostly just testing my equipment.. really should make something good one day..: https://vimeo.com/xelfer/videos
© 2019 Mike English CC-BY-SA 4.0
Nikon D3500, Nikon AF-P DX 70-300mm @ 300mm
9x( 1/25s, f/32, 400 ISO)
9 photo stack processed with Hugin and EnfuseGUI
Post-processed in digiKam
Shot with a Nikon D90
Lens used was a Sigma Pantel 135mm
f/32
ISO = LO 1
No filter
Can't recall shutter speed because I shoot older lenses exclusively, no metadata to check. I'll guess 1/1000s.
Small album for those wanting more: https://imgur.com/a/niRY5#0 .
Here is the stack out of DSS. I still haven't been successful in doing stacking with PixInsight, so I've continued to use DSS since it's pretty simple and effective.
I did notice that the stars seemed a bit dead, but I was more concerned about the galaxy itself, so I wasn't too bothered by it.
I followed a similar workflow to that video, although I admittedly probably forgot a couple of steps. In fact, I just realized I forgot to color calibrate.... lol.
First thing I did was Dynamic Crop around the galaxy to select only the areas that didn't have stacking artifacts.
Then DBE to remove gradients.
Then Background Neutralization.
I should have color calibrated here, right? But, I forgot that step....oops, ha.
I then did a histogram stretch using the parameters from STF auto-stretch.
At this point, created a mask using Ranged Selection to separate the galaxy from the background.
I stretched the galaxy to be a bit brighter and the background to be a bit darker.
I did an HDR Recovery on the core of the galaxy.
Then I extracted Luminance and combined it using the LRGB Combination. That's where I increased the saturation a lot.
Some final Curves adjustments.
Then I think the last thing I did was some sort of noise reduction on the background, although I honestly can't remember exactly what I used.
I think that covers everything!
Which one of you midwest bought a new scope?
I don't even have a backlog to work on during cloudy nights anymore because there's been too much damn rain
Hi guys,
We haven’t been out in a very long time so were delighted when the weather cleared up tonight and allowed us to take some photos! We decided to do Andromeda as it was sitting in a really nice place for us. Acquisition details:
- Celestron CG5 GT
- Bresser Messier NT150L
- QHY5 with 9x50 finder guider
- Canon 450D with BYE
- DSS
Photoshop
29*120s lights
8*120s darks Our processing knowledge is pretty awful so if any of you guys want to take a look at the TIFF file and have a go we’d be delighted to know what we’ve missed out on, if anything:
Thanks, Joe and Dan
We have an uncommonly long dry and warm period in Bonn for the last two weeks and although nights (astronomical dark) are short, I managed to get little more than 2 hours of good data. I really like this nebula because you can see all kinds of shapes in it. A bunny to the left, two jumping frogs more to the center, a wolf/dog with wide spread mouth right of the center and the "Elephant Trunk" to me looks much more like a nomad stepping out of a dust cloud. I do not know why my imagination runs so wild with this very nebula but I like it :) CS, Ben
Acquisition:
- 79 x100 sec subs @Iso 800 on Canon 40DA Mono DIY with Canon 300/2.8 no TC
- 150 dark frames & 30 flat frames
- SkyWatcher Star Adventurer - unguided - polar alignement with sight on polaris
- shot in Bonn - Germany on the 7th of May 2018 - temperature dropping from 18-7 ° C over the course of lights and darks
- Elevation was between 26° and 42° during acquisition
Processing Details:
- stacked from cr2 to fits converted and image magick cropped files in AstroPixelProcessor
- basic stretch in LR
- export to Photoshop for Star size reduction (I did both a masked stretch and a small amount of masked minimum Filter on the stars for smoother transitions)
- Some cosmetic cleanups in LR and fiddling with the tone curve to bring out the nebula more
Without being an expert, this is what I think:
1) Sounds about right. Don't think the noise will be as much as you expect -- source: I'm used to shooting ISO 12800, 6400 and 3200 in a Canon G16 which has a sensor with 1/10 the area your sensor has -- it's ugly, but manageable.
2) I'm a bit lost here. "Ultra smooth" is usually considered for 48+ fps, if anything 24 fps would give a "less smooth" result. Why not 30 fps? If the frame is relatively still you can apply frame interpolation (with Twixtor or slowmoVideo) and push it to 48 fps without changing your plans. Under good conditions, a 2x increase in frames while keeping the same length of video gives a smooth result without making the artifacts noticeably. If you want to see what kind of artifacts these softwares create, get one of them, interpolate to 10x frames and playback at 1/10th speed -- it's similar to a morphing effects between frames.
3) No experience here, sorry.
4) Just apply batch processing after tweaking a few of the shots and applying the same settings to the following pictures. Then you go to sleep, cause it will take a loooong time. And storage. If you can affor that, I don't think RAW is overkill -- it'll give you better image quality and more control over the source material.
5) Take your time to learn the After Effects tools you'll need. It'll save you lots of time, and as you said, being another Adobe program the UI isn't that much different from Photoshop. AE has been made specifically to process video and is optimized, both in workflow and operations, to make this easier for you.
Looking forward to seeing the end result!
Just looked at the night sky from your location in Stellarium.
Not sure what kind of gear you have. But assuming you want easy, large DSOs, here are some top objects that are high in the sky for you:
1. Andromeda Galaxy (M31)
2. North America/ Pelican Nebula (NGC7000 and IC5070)
3. Heart and Soul Nebulae and Double Cluster (IC1805, IC1848, NGC869/884)
4. (If you have a scope or long lens) Dumbbell Nebula (M27)
Another resource for this kind of thing is DSO Browser.
For this picture I brought up the whites and lowered the blacks to try and create as much contrast as possible. Also I guess the light pollution nearby created the orange colour. It seems like you took your picture pointed straight up? Try and aim for the galactic center/core part of the milky way. There's a lot more detail in the core and you can get the colours to pop a bit more. It's still a great picture though!
This program is good for figuring out where the milky way will be at any given time. http://www.stellarium.org/en_CA/
You should download Stellarium.
You can set the date, time and location, and it will show you exactly what the sky will look like, down to details like satellites, asteroids, etc. The rotation of the celestial sphere is shown in real time. You can also increase the brightness of the Milky Way so that it shows up more clearly.
It's a really impressive program, and it's free.
I tried to go out and really take some time getting a good polar alignment this weekend. It was good, but still not great... I was able to get 75s captures unguided with minimal streaking. Capture details for each:
- Sky-Watcher 80ED APO
- Celestron AVX
- Canon 1000D w/ Orion Field Flattener
- All images captured in Backyard EOS and stacked in DSS
M31
- 20 x 30s @ ISO 200
- 20 x 30s @ ISO 400
- 20 x 65s @ ISO 800
- 20 x 75s @ ISO 1600 (not included in stack)
- 30 x Bias Frames
- 30 x Flat Frames (not included in stack)
M45
- 20 x 15s @ ISO 200
- 20 x 30s @ ISO 400
- 20 x 65s @ ISO 800
- 30 x Bias Frames
- 30 x Flat Frames (Not included in stack)
Both images were processed in Photoshop CS2, then Pix Insight, then Photoshop CS2...then Pix Insight, lol. I definitely had issues getting great results out of Pix Insight, but I did find it useful.
That said, I'm still not thrilled... if anyone is interested, I'd love to see what you can do with the M31 image in Pix Insight. The TIFF is here.
I also had issues with flats. I'm still building my lightbox, so I tried just using a t-shirt and pointing the telescope near the full moon. The flat images look evenly vignetted, but the results out of DSS only corrected the vignetting on one side of the image. I think this may have been due to the fact that I didn't turn auto-rotate off on the camera and some of the light frames were portrait while others were landscape. All of the flat frames were portrait.
Anyway, I'm pretty happy with them overall but there's more work to be done. Love to hear what you all think!
*Edit - Fixed link.
I shot this image on the day of Saturn's opposition. It's the best one I've got so far now that I've discovered the high-speed mode on Sharpcap, which lets me reach about 75 fps with low exposure settings.
I achieved this with my short FL Zhumell z114 Dobsonian reflector and a planetary camera, using the drift method with consists of framing the planet and letting it drift off the FOV. I'm really proud of this image!!
50% out of 17.000 frames were stacked
Equipment (photo here):
-Zhumell z114
-ZWO ASI 120 MC-S
-SVBony 3x Barlow (link)
Sotware:
-Sharpcap 4.0
-Registax 6
-Autostakkert 3
-PIPP
I like using a bahtinov mask better than the BYEOS feature. They are not expensive to make or buy.
Make: Use this generator, print out the result. Tape the print out to the plastic cover part of a spiral notebook, and cut out the white parts. Make a filter cell out of cardstock the same size as your dew shield, and attach this to your bahtinov mask to finish the filter.
Buy: Lots of cheap choices on Amazon.
Or alternatively, if you have access to a 3D printer, I can give you an STL file to print out.
I bought this filter for my Celestron C8. Fits on snug and is plenty safe. Great quality. I bought it a while back and looks like amazon doesn't have it anymore but it should be available if you search around. Make sure you either remove the guide scope or get a filter for that as well.
I'm just planning on shooting stills with my D750 (through the C8) and I caved and bought an autoguider just for this event so I should only have to worry about shot intervals now.
I use the dslr controller app and a cheap usb otg dongle.
37ish captures stitched together in photoshop.
Each capture was a 1000frame avi.
PSD and captures can be downloaded from https://onedrive.live.com/redir?resid=60692894D2B97B6E%214155
- Scope: Celestron Nexstar Evolution 8
- Camera: ZWO ASI120MC-S
- Captured with Firecapture
- Stacked with Autostakkert
- Wavelets in Registax
Before I start I'd like to say that any critiques or advice would be greatly appreciated.
- Nikon D5100
- 18-55mm kit lens
- 18mm
- f/3.5
- ISO 800
- 13 seconds
- 25 lights
- 15 darks
- 20 bias
- no flats*
I think it was about a 7 on the Bortle scale.
No tracking and no tripod (I was at a beach house and I didn't even think about taking any pictures of the sky until I got there). I laid my camera down on the deck railing facing straight up then put my wallet under to put it at a slight angle.
Stacked using DeepSkyStacker. Edited using RawTherapee. This is my first stack and my first serious attempt at astrophotography. I'm sure there are better alternatives for editing, but I'd like something free (and legal) if possible.
*As this was my first time stacking, I've never taken flat frames and I was pretty limited on resources (as I mentioned I didn't even have a tripod) so I tried taking some by putting a white image on my phone and placing it directly in front of the lens but that didn't seem to work very well. Is the white t-shirt thing the easiest way to get flats?
One last thing: here is the full uncropped image. What is causing the bright blue/purple bar on the right of the image? I'm assuming it has something to do with the way I stacked the images, but I really have no idea.
If anyone wants to try their hand at editing my image, here is the stacked TIFF. I'm sure you guys can come up with something better than I could.
If you're handy with a soldering iron you could opt to make your own. It has many features that are not present on any of the commercial ones.
It does present a learning curve if you're not familiar with electronics tinkering though...
If the weather cooperates tonight, I'm hoping to do my first Milky Way mosaic (from south to north). Won't be posting here since there will be landscape though ;)
It will be untracked 15 second exposures at f/1.8. I'm just wondering if there's much benefit in waiting for true astronomical dark to start shooting? I'm in an orange light pollution zone and only have from 12:53am until 1:37am for this if I wait for astro dark... Tempted to start like 30 minutes before just so I have more time, but not sure if it'll make a big different in my photos (especially considering this is already in an orange zone). Sunset is 9:18pm, nautical twilight ends 11pm, astro dark at 12:53am. Getting info from here: http://www.timeanddate.com/sun/canada/victoria
Camera: Nikon D3500 with AF-P DX 70-300mm lens @300mm
Processing: Hugin + EnfuseGUI to stack 3 frames for noise reduction, GNU Image Manipulation Program 2.10 to crop & add metadata
License: ©2019 Mike English, CC-BY-SA 4.0
Edit to add: f/6.3, 1/2000 and I used an old Focal 20-08-40 tripod.
This is my 2nd attempt at M31. There is tons of data there that I have been unable to bring out because of my lack of Photoshop skills and a little star trailing.
- Camera: Canon Rebel XTi
- Telescope: Orion ED102T CF
- Mount: Atlas EQ-G
- Exposure: 20x120s lights and darks, unguided
- Additional stuff: Baader Moon & Skyglow Filter, HOTech SCA Field Flattener
The original stacked .tif file: https://www.dropbox.com/s/yx96868vx4a4k0o/M31origtif.TIF
No, the only difference is that you load a bunch of JPEGs instead of the avi file. You can also use PPIP to preprocess your JPEG. What it does is crop out your black areas and turn all your JPEG into an AVI. It is helpful if you have trouble with alignment in Registax
Lately I've been using glow-panel flats. You can get an inexpensive electroluminescent panel online. One of these (with a matching inverter) will do a pretty great job, and you can control the brightness by varying the input voltage. This works great with my 130mm telescope, although the panels get pretty expensive if you need to cover larger areas.
From what I can remember the Elephant's Trunk is in Cepheus so I have to wait until a bit later in the year to image it. Last year I shot it back in September with a slightly different setup..
Great shot. I took this one this past February in Yukon, Canada.
Exposure: 20
Aperture: f/3.5
Focal Length: 18 mm
ISO: 800
This post is mostly a followup to the HorseHead image I took earlier in the week. This is the Rosette Nebula, taken with the same settings and processed using some of the techniques /u/PixInsightFTW suggested.
This is the first image I've taken that I've processed completely within PixInsight, and I'm starting to have a lot of fun with it! I created a mask from the luminance data, and used it to selectively smooth out the noise in the dark areas around the nebula. Contrast and sharpness in the nebula itself was done with a combination of wavelets and LocalHistogramEnhancement. If nothing else, it's a huge improvement over the picture I took of this same object last year.
If anyone is interested in trying their hand at processing the raw data themselves, I've posted it on dropbox. I'd love to see what other people can come up with from this.
Capture info:
- Canon EOS 1100d (peltier cooling and full spectrum mod)
- Sigma 10-20mm @ 11mm F4
- ISO1600
- 60x1min lights
- 32x1min darks
Tracked using motorized 3d-printed barndoor tracker
Processed in Pixinsight, DSS and photoshop Cropped version without landscape to obey posting guidelines, although full version is also available on astrobin.
Lots of light pollution from nearby city, giving a orange hue.
I used this one: http://www.thingiverse.com/thing:39308
I haven't tested it yet, since it's still coming to me in the mail. My brother, who lives in a different state, has access to the printer, so he made it and is sending it here.
No telescope, just the cheap canon 75-300mm.
Canon EF 75-300mm f/4-5.6 III Telephoto Zoom Lens for Canon SLR Cameras (Bulk Packaging) https://www.amazon.com/dp/B003MOHM0C/ref=cm_sw_r_udp_awd_XYF6tb1ABMF9E
Jupiter on 2021-07-16 over two and a half hours. It's fascinating how fast this planet rotates. Making animations is a good way to see artifacts vs real features.
8" LX200R, Meade 2x barlow bringing it to F/20, ZWO ADC, QHY5III462C camera, each frame of the gif is best 50% of 5000 frames [~36-40s] at 7.5ms exposure, 320gain, seeing was good-excellent on Clear Sky Chart. The gif has 31 frames in 5min intervals. I used AS3 for stacking, Registax for Wavelet chronosynclastic infundibulum, and made a GIF in GIMP, added the looping in https://ezgif.com/reverse
PixInsight offers a 45 day free trial with no limitations.
If you have access to a Windows license, you can get VirtualBox for free to create a Windows OS partition on your mac to get access to DSS, Registax, etc.
Processed in Pixinsight
- Automatic Background Extraction
- SCNR - Green
- Masked Stretch
- Starnet++ - Create starless layer
- PixelMath - Create starfield from starless layer and original Masked Stretch layer
- PixelMath - Create nebula mask for starless layer
- Curves Transformation on Luminance and Red channel of masked starless layer
- PixelMath - Combine starless and starfield layers
- TGVDenoise
- Dynamic Crop
Goal was to give the nebula a bit more pop while preserving the starfield.
The data was really nice to work with, i was fairly gentle with it as i didnt want it to get noisy.
This list has Andromeda I as the 28th nearest galaxy to Earth. Note some of these galaxies are in dispute as to whether they classify as such.
The Public Data thread has many TIFFs/FITs files where you can practice processing. It isn't exactly the same as getting your data -- this files are already stacked, so you "lose" that part.
I have also uploaded a few files on Omega Centauri (also Centaurus A is barely visible to the right side of the images) to Mega. On those you can practice everything from stacking on. The data is actually quite bad, because it was acquired from inside a city which is over 9000 in bortle (about 9 really). Exposures were at 0.8" and about 100 or 120. The dark files are in the "Darks.zip" file, and there are some XCF files which show a comparison between various stages of processing and far better images.
I'm still trying to get somebody to upload a planetary video (Jupiter, Saturn or Mars would be awesome), so I'll be waiting to see what you can get in that area :)
I got an XCF (a GIMP file) with those JPGs stitched together ~~currently uploading~~ available here. I had to hand align both images to get a good alignment on the edge, but the result is pretty much like yours.
Then I corrected the colours from the darkest image to match the lightest. Finally, I blended both images with a mask that was blurred, so it wouldn't make a sharp edge at the "stitching area".
Result: http://i.imgur.com/u38w2Tr.jpg
I'm still interested in the videos if posible, want to try a few tricks :)
This is my favorite shot and really captures how I saw the eclipse.
A single frame of this photo was featured in this article: The 2017 Solar Eclipse: The Kotaku Review. I put it out while we were on the road from Madras, Oregon to San Francisco. Once home I found I had a few frames of the same exposure I could use to help with the detail and noise. I also wanted to remove the purple fringing around the diamond light.
Equipment
- OTA: Takahashi FC-100DF Flourite APO 100mm Refractor with FC-76D flattener - 770mm F/7.7.
- Mount: Celestron AS-GT.
- Camera: Canon 6D stock.
Acquisition
- Custom LUA script running on Magic Lantern on 6D to automate all exposures, synced to onboard GPS time.
- Four consecutive frames 1/100s ISO100.
Processing
- Four frames were stacked and mean averaged in Photoshop.
- Purple fringing removed in Lightroom .
- Stretching, clarity, saturation adjustments in Lightroom. Slight luminance noise removal.
Such a cool galaxy, and SMALL!
​
I photographed this one last week using the Sky-Watcher Esprit 150 (1050mm focal length) on the EQ8.
​
A few more lessons learned on this one, the big one being optimizing exposure times depending on target/filter.
​
I shot 7-minute LUM exposures - which were not ideal. Next time around I'll shoot shorter subs and try to rack up a lot more.
​
- 10 x 300-seconds RED
- 10 x 300-seconds GREEN
- 10 x 300-seconds BLUE
- 18 x 420-seconds LUM
​
Equipment:
​
- Starlight Xpress Trius 694 Mono CCD
- Sky-Watcher Esprit 150 APO
- Sky-Watcher EQ8-R Pro
- Starlight Xpress Lodestar X2 Autoguider
- Starlight Xpress 7-Position Filter Wheel
- Astronomik LRGB Filters (1.25")
​
Processing:
​
- Stacking/ Calibration in DeepSkyStacker
- 20 Darks, 20 Flats (each filter), 20 Bias
​
Final Processing in Adobe Photoshop (See my image processing guide)
​
- Slight Crop/Levels for Each Filter
- Construct RGB Image from each filter
- Levels and Curves for each RGB Channel
- Apply Luminance Layer from Lum Filter
- Curves Adjustment with Stars Masked
- Color Balance for RGB Master
- Selective Color Boosting (See my tutorial on YouTube)
- Selective Noise Reduction (Topaz Labs DeNoise AI)
- Selective Sharpening
​
Thank for looking! Clear skies!
I'd highly recommend using Autostitch. It's an amazing free program that's super easy to use. Just select the pictures and it does the rest. It'll automatically adjust the images so that you don't see the boundaries like that.
This was filmed on a Canon PowerShot SX520 HS, utilizing a makeshift mylar blanket light filter. I stabilized and color corrected the video in the open source software Blender 3D.
The EQDIR cable you purchased works with the EQMOD platform. The screenshot you showed was of the Skywatcher ASCOM driver, so your mount will not show up because you are not using supported software. In fact, you do not need the Skywatcher drivers at all to use EQMOD. I would recommend downloading Cartes du Ciel and then following the EQASCOM quick start guide on the EQMOD website to get started.
http://i.imgur.com/xtztL2S.jpg
I took this picture with the camera a couple of weeks ago, just pointed it up and ran
raspistill -o picturename.jpg -ex night
I haven't tried using RAW settings nor any kind of photo stacking with it.
There was also this post on the raspberrypi.org site about mounting the camera to a telescope. - http://www.raspberrypi.org/astrophotography-with-the-camera-board/
I have the camera module and an RPi. I have played extensively with both and even pointed it through my scope. Check out http://www.raspberrypi.org/wp-content/uploads/2013/07/RaspiCam-Documentation.pdf that is most likely the software you will be using to send commands to the camera. As you can see you can adjust it on many levels and it is indeed quite a bit more versatile than a 30$ webcam.
If you doing this because you want a project to tinker around with i would recommend. However if you are looking for great images i would look elsewhere. I ran into tons of problems including that darn 7 inch ribbon cable! I had to mount my pi on my focuser and the entire scope became hard to deal with. I might try it again however, and if i do ill send you some results, clear skys permitting.
I recommend using stellarium you can select any location and time to see how the sky will look like. I use it every time I plan on going out to watch the sky or photograph it. :)
I'll start at the beginning.
Like any good astro shot, there needs to be some planning. I use Stellarium and TPE. With these, I can figure out what the sky will look like, when things will pop above the horizon, when it'll be dark enough to shoot, and a whole lot more. This gives me times and dates when I can get the shot I want.
Once I know when I can shoot, I keep an eye on the weather and wait. I got lucky this time and got it on the second attempt (the first one had too much cloud). When everything lines up, I head out and start shooting.
Getting the shot was no different to any other astro shot; expose to the right, make sure the focus is right, and check the framing. Getting there early gives you the time to dial everything in.
Post processing was fairly simple, and definitely explained better by almost everyone else. Curve adjustment was done to bring out the galaxy, and that was coupled with a gradient mask so it only affected the galaxy. Frequency separation (google it for a heap of useful tutorials) was used to clean up the splotchy noise.
You need to enable the satellite plugin. Go to the Configuration window [F2] and go to the plugins tab to the right. Look for "Satellites" near the bottom of the list of plugins, check "load on startup" and restart Stellarium.
You'll see an icon at the bottom called "Satellite hints" [Ctrl+Z] and you'll start seeing satellites (it automatically shows the orbit for the popular ones, like the ISS, but in the plugin configuration you can change these settings.
For more info: http://www.stellarium.org/wiki/index.php/Satellites_plugin
You can use Stellarium to see where the moon will be tonight/morning as well as when the eclipse will happen and how much of the moon will be occluded. It is a great tool to have in general.
Example: Toronto, Canada
You could definitely get Pleiades or the Andromeda Galaxy. If you haven't already, download Stellarium here and set your location to wherever you live. Turn on the constellations (hotkeys c and v) and nebulas (hotkey n) to see what's visible. You'll obviously be limited to certain objects based on the amount of light pollution in your area as well as the object's magnitude, but use the app to help choose new objects to capture.
Do you use a program like Stellarium? I use it to plan my nights, because if you input your location it will show exactly what is visible at different times of the night.
It won't help with the clouds, but at least you can find out exactly when the Moon will rise, etc.
Stellarium has a eyepiece/sensor plugin in which you specify your telescope and eyepieces or camera sensors. You can then look at any object through any combination of telescope and eyepiece/sensor and see exactly how big it would appear.
Acquisition details:
26cm Aperture Refractor (achromat)
400cm Focal Length
Eyepiece projection with 10mm Hyperion (13mm with 14mm extension) to Nikon D3200 at 1980*1020. 669 Frames
PIPP and Registax
So, seeing wasn't briljant yesterday, but I really wanted to try out eyepiece projection with my DSLR. Not really satisfied with the end result, but maybe I am just expecting too much.
I'm really interested in any tips on how to set up my DSLR or what I can do to create a better image. If someone wants to try it out on the original file (please!), I've uploaded it (stripped the sound) with my intermediate files: https://files.fm/u/8uqgy7m4
Even with five 2TB external drives (2 are backup, and this is everything including RAW Video- HUGE files!), I can't keep my PixInsight projects because they get so big. So I share your pain. I do keep many of the working files (calibrated, integrated masters for example) if I think I might return to an image, so I could quickly recreate the project using the notes I keep (and post to reddit). So I don't have any great news for you there, and your solution of keeping detailed notes with screenshots in a word doc sounds about right to me.
> Does PixInsight include any kind of file compression services?
No, but your operating system likely does or you could use something like 7-zip. Is it worth it though? Compressing your project like this will probably only shave off about 10% of the total size requirement, and takes a fairly like time to compress/unpack.
I think if I continue as I have been, I will start looking in to a 12TB RAID soon.
D700 158 frames of 8 secs. 120mm with f/4. 10 darks, flats and bias. Taken in Lummen, Belgium. No tracking mount.
I stacked the images in DSS, /u/IKLYSP /u/Bersonic were very helpful and looked at it in Pix and used its magic to make my picture look good :). Afterwards I adjusted exposure a bit, tried to remove some of the vignetting and upped the contrast in Lightroom.
If anyone wants and thinks they can improve this image a bit, https://mega.nz/#!jlEWVZKJ!n9c6eLVfof6yq_mhG5l6Cx7d2DW9Iz0I_RCtOqgsN0g this is the original TIF.
I know it's not very good data, but I tried my best and am quite happy with the result.
Tonight I took an image of Saturn with my new ASI 120 MC-S camera!! I managed to pull this out with average seeing, at 50° altitude, with USB 2.0 and with a short focal length 114mm Dobsonian telescope. This is my first time using a dedicated planetary camera, and I am just amazed!
Equipment
Zhumell z114 (114/450mm)
ZWO ASI 120 MC-S color camera
Software
Sharpcap
Autostakkert 3
Registax 6
PIPP
Extras
Captured in RGB24 -Other settings here-
I have this one with a WO z61, T3i, star adventurer. It weighs right at 20lbs.
I bought on B&H but its not available.
https://www.amazon.com/Traveler-Travel-Tripod-Monopod-Aluminium/dp/B07KD3BL6M
Something like this
...but you need to be aware that most Newtonian telescope focusers don't have enough inward travel to reach focus with a DSLR camera (or most cameras). You may have to replace the focuser with a low-profile type meant for astrophotography.
the setting is BULB keep increasing the time past 30s it should say BULB eventually, then you attach one of these set the number of pictures, the time between each picture, and the exposure in this case 120s and hit start.
You can buy a DSLR mount for your telescope. They go in the place of the eyepiece.
Here is part of what you would need from Amazon: https://www.amazon.com/gp/product/B0001Y56RM/ref=oh_aui_detailpage_o05_s00?ie=UTF8&psc=1
And here is the related t-mount https://www.amazon.com/gp/product/B0132IISAU/ref=oh_aui_detailpage_o08_s00?ie=UTF8&psc=1
There are other variations on how to do this - but they follow the same basic setup.
(I have an old Meade 2080 and a Nikon D750 - that with time I will figure out how to use for astrophotography.)
I don't think much heat will travel along the vanes to the secondary. Too far and too much surface area. I guess if you heat the air in the tube enough it will keep the secondary warm, but that might heat might cause turbulence. The commercial secondary heaters are attached to the secondary.
I bought one of these PWM controllers for $24 from Amazon. to control the power going a dew heater. I will power it from a cheap 12V wall wart type of supply that I have lying around.
As IDLC suggests, for a couple of bucks, just tie a hand warmer to the secondary (out of the light path). If you like how it works, then move to an electric system. I started with handwarmers and elastic bands on my camera lenses, then upgraded to Kendrick gear.
Dew heater straps. They're basically cloth straps wrapped around nichrome wire. You need the strap and the controller.
Lots of examples on the market those are just the first to pop up on amazon.
Edit: They might be called dew straps/strips/bands ect. but they're all the same thing.
I ended up buying this AC power adapter on Amazon so I don't have to constantly swap batteries. It hasn't failed me yet. I do all my imaging outside my home though, so it's a little more convenient to have access to the house's electricity.
Use solar filter paper - you can get an A4 sheet for £25 from Amazon, then make your own frame to fit over your camera lens.
Personally I got this battery a few months ago and I love it. There's a couple other clones of it on amazon that may be cheaper. I use it for my Sirius mount and laptop. I've never had it run out of charge during a night of imaging.
Equipment;
Telescope: ED102CF
Mount: Celestron Advanced VX
Guide Scope: Meade ETX80 with a cheap mono-cam off of Amazon (It's not being sold anymore at the price I got it at, around $60)
Camera: Canon Rebel T5i with a Explore Scientific 2" Field Flattener
This is just 10 frames taken at 120 seconds.
This was captured with Astrophotography Tool and stacked in Deep Sky Stacker. I edited this with Photoshop and used the Astronomy Tools bundle and GradientXTerminator. After that, I uploaded the image to google photos and used their slider labeled ‘pop’ to bring out the edges a bit more.
This is the first real deep sky object I’ve taken. I’ve practiced on the Orion Nebula to get used to the equipment, and stacking software. I live in a HEAVLY light polluted area, at about a bortle 8. This photo was taken at a beautiful camp site near Tampa, FL called Peace River Campground in Arcadia. This area is a bortle 3.5 area, and truly took my breath away as I looked up into the sky. Coming back to my home, at an 8, made me realize just how bad it is. Now, sadly, because this was the first trip I took with all my equipment, I wasn’t very experienced with breakdown and setup. It took me quite a few hours to find a good spot, get everything built up and get aligned. By the time I was ready, it was about 50^f out, and the ground all around me was covered in a layer of thick fog. Tip: don’t browse r/nosleep when everything is pitch black outside, and you’re alone in an unfamiliar area.
I still need to purchase dew heaters. Because of that, I only got 20 minutes of exposure before everything got unmanageable. Still, one of the most breathtaking nights I’ve had so far. It really hit me, got me excited, after the first frame and I could clearly make out the galaxy.
Ok I'm pretty sure it's this one from amazon
Absolutely, there's a few ways to accomplish this. The first way is a little more expensive, but a better overall solution (I think), they make what's called a clip in fliter. It clips in between the camera body and the lens itself. This means you can use any lens with it.
The second option is what I've used in the past, it's to buy step-down rings and use a 2" (48mm) filter on the end of the lens. I went with this option because I already had 48mm filters that I use for my telescopes, so I didn't feel like buying the same filter in a different form factor. The issue with this is on a full frame sensor, the outer edges are black and your field of view is more limited. You also have to take the rings off of whatever lens you're using and place them on the next lens, which takes time and adds some annoyance. Oh, one other note is most step-down ring sets don't actually offer a 48mm option. So I had to buy a set of rings and then buy a 49-48mm ring individually in order to get it to work.
I hope that helps you a little bit.
Not that lens, though I do wish I owned it. I may add it to to the Astromoto bag for this summer. We'll see. This photo was taken with this lens.
Rokinon 24mm F/1.4 Aspherical Wide Angle Lens for Canon RK24M-C
I recommend you to use this android app called Sky Map. It's useful to know which planets or stars you can see.
https://play.google.com/store/apps/details?id=com.google.android.stardroid
And I think that is Jupiter.
Great! I have the same mount. You shouldn't have to drift align to get a good polar alignment. Here is what to do:
Use a compass (one on your phone is fine) to roughly point the mount north (the counterweight shaft will point to the north).
Level the mount. There is a bubble level on the mount. Ignore anyone who tells you this isn't important. Always level your mount before imaging.
Release the RA clutch and rotate in RA until looking down the bore hole on the front you can see that the polarscope isn't blocked. Lock the RA clutch.
Shift the mount around until you have Polaris in the field of the polarscope. You will know when you get Polaris in the field as it should be quite a bit brighter than anything else in your field of view.
Then I suggest using an app like PS Align Pro (iOS) or Polar Finder (android) to tell you where on the reticule circle to place Polaris. Use the altitude and azimuth knobs to get Polaris to the right spot. Your polar alignment should now be good enough for astrophotography, especially if you guide.
Release the RA clutch and rotate it back until the counterweight shaft is down. This is your generic "parked" position where the mount expects to start from.
Hope this helps. I've never liked drift alignment. If you feel really need super precise polar alignment, I recommend the QHY Polemaster, it's worth the price, because it just works and it's fast.
I use the dslr controller app and a cheap usb otg dongle.
This lets you control everything, including focus, from your phone or tablet. For focusing, I zoom 10x on a star and then slowly adjust focus one tap at a time. The app sends a command to the focusing motor to move by the smallest amount possible, so it's literally the best you can do.
The height doesn't matter. Make sure you're checking the location of Polaris based on some app. I personally use Polar Finder on Android, as it has an overlay showing the SA's polar scope.
I usually set it at a comfortable height so I don't have to do too much contorting when I try to align. Lower is always better though.
I use this: https://play.google.com/store/apps/details?id=com.ed_morana.iss_transit_prediction_free
The math isn't too bad if you want to do it yourself. This would be a good start: http://rhodesmill.org/pyephem/
Does anyone have a recommended cloud coverage forecast tool? I have been using the Clear Outside app and ClearDarkSky.com
The Clear Outside app is nice since it seems to be pretty up to date.
There's a lot to be done with a Galaxy s4 camera! My first experiments in astrophotography several years ago were made with an old Canon PowerShot A75 coupled to some old broken binoculars, so I know a bit about... "challenging" cameras :P
There are a few things you could try:
- Take a lot of photos and stack them, with Autostakkert or Registax. This should take care restoring some detail that is washed by noise reduction and the JPG artifacts.
- Download a RAW camera application -- I've tried this one in the free version, that is limited in resolution and format. It's cheaper than buying a new camera, and will get you some more control (specially getting the RAW file) to get more detail -- like turning off noise reduction!
- Buy a semi-pro compact camera, a mirrorless or a DSLR. Anything that gives you RAW format and is good quality. The bigger the sensor (pracitcally anything is bigger than a cell phone camera sensor) the better the quality -- maybe not always true, but it's generally like this.
Just get Reddit Enhancement Suite or Reddit is fun on mobile and filter out the "curves" flair.
Or come back tomorrow. It's not a big deal?
Tracking would be nice, I took a single exposure of the milky way a few weeks ago but noise reeeeaaaaallly bothers me. I was hoping stacking would provide me with superior results
This is a big issue for me. I have a full time job, a toddler, and another baby on the way - so sleep is a big priority for me. The way I do it is automation and speaking for myself it has been 100% worth the investment. Just last night I got 6 hours of data with the scope set up all night and didn't lose any sleep. For this to work you need to invest in some additional things you may not already have.
The primary thing you need is an application that supports full automation. Needs to be able to set image sequence, control Filter wheel (if you have it), plate solve / meridian flip by itself, periodically re-focus on it's own throughout the night, and manage your autoguider. I use Sequence Generator Pro, which I think is probably the best software for the money out there ($100).
Along with SGP, you'll need the hardware for it to control. Starting with the focuser, there are a lot of options. I went with Moonlite ($700 for the focuser, motor, and controller). If you have a mono camera and filters then you'll also need an electronic filter wheel. Your mount will need to be controlled via SGP to, so you'll need any cables/drivers that are required for your particular mount. Finally, you'll need to install the plate solving catalogs so SGP can point the scope by itself. Fortunately these are free.
It's definitely an investment; but worth it IMO if you want to enjoy the hobby without sacrificing sleep.
EDIT: Link to great DIY motor focus project if you are handy and want to finagle something on your own. Guide is pretty good on the electronics end; the only thing you're left on your own for is figuring out how to mechanically attach the motor to your focuser.
Shoot a video. That will get rid of motion blurr. You're attaching your phone, right? If not, I recommend this. Remember to lower exposure on Jupiter to get the detail, should be able to do that with video as well.
Canon uses full spectrum sensors in its DSLR cameras that can see into the IR part of the spectrum but since the human eye cannot Canon installs an IR cut filter in front of the camera sensor to mimic what the human eye sees more closely. If you want to see into the IR range all you need to do is remove the IR cut filter from the camera and replace it with the proper sized clear non-filtered glass. You can still use the kit lens that came with the camera and if you use the rule of 500 to expose the sensor you can have yourself some nice IR astroimages. There are YouTube videos and instructions available on the internet on how to do this or there are several reputable people that will do it for you for a fee.
https://lifehacker.com/follow-the-500-rule-to-take-the-best-pictures-of-the-1790638135
http://imaginginfinity.com/dslrmods.html
Good luck.
Do you have an adapter clamp? Like this.
Helps a lot to hold the phone. Then try recording a video, set the brighness to low, there should be some slider after long press or something. My Honor 9X has it, so a Samsung S22 must have as well. I usually use 4X digital zoom as well so the compression doesn't do much damage, I think... But you make it just so it goes through the frame steadily.