
What are
/r/ender3's
favorite Products & Services?
From 3.5 billion Reddit comments
The most popular Products mentioned in /r/ender3:


![Redrex Ender 3 Extruder Bowden Aluminum Upgraded with 40 Teeth MK8 Drive Gear Kit Compatible with Creality Ender 3V2 /Ender 3 Pro/CR-10 Series and Other Reprap Prusa 3D Printers [Right Hand]](https://m.media-amazon.com/images/I/41rxL1V9n9L._SL500_.jpg)


The most popular Services mentioned in /r/ender3:
Cults.
Autodesk Tinkercad
Banggood
Gofile.io
SD Card Formatter
Git Bash
Youmagine
Visual Studio Code
PrusaSlicer
Repetier
ImgPile
Lifehacker
Gumroad
Creative Commons
Smash
The most popular Android Apps mentioned in /r/ender3:

IP Webcam

DroidCam Wireless Webcam

The Wonder Weeks

Sound Meter
The most popular reviews in /r/ender3:
Might be easier to just replace, they aren’t too expensive.
Ender 3 Hotend, Authentic Creality Assembled Hotend Kit 3D Printer Parts with 5X 0.4mm Nozzles for Ender 3 and Ender 3 Pro https://www.amazon.com/dp/B082XXRT78/ref=cm_sw_r_cp_api_glt_fabc_4XA45MBA9JHPGXGQ15TS?_encoding=UTF8&psc=1
So I helped a guy who had the other halves, same issue as yours, must be a funny production joke to them. Not fun for us. Anyways replace the entire wire with this, you don’t need the connector and your printer will be safer in the long run. If you are not handy or don’t know how to wire a connection, just reach out to us for help.
BNTECHGO 12 Gauge Silicone Wire Ultra Flexible 10 feet high Temp 200 deg C 600V 12 AWG Silicone Wire 680 Strands of Tinned Copper Wire Stranded Wire Model Battery Cable Black and Red Each Color 5 ft https://www.amazon.com/dp/B00TG1TSUC/ref=cm_sw_r_cp_api_i_TMJiDb6NVPB5Y
You can drop in a Creality aluminum extruder.
https://www.amazon.com/3D-Extruder-Aluminum-Filament-Creality/dp/B07B96QMN2
You may have had the nozzle a little bit too close to the bed, the skirt I can see looks a little more translucent than I would think, although that depends on the filament. Practice on another part of this bed before using the new one, just move the model off center before slicing. Let it cool all the way before removing. If it’s really stuck, take the bed off and flex it a bit. Some of them you can stick in the freezer but it depends on the bed material. You can use a plastic “razor blade” which is less likely to damage the bed than a metal blade. https://www.amazon.com/dp/B07W5Z2CBQ/
Here's the idc ribbon:
Ribbon Cable - 10 Wire (15ft) https://www.amazon.com/dp/B007R9SQQM/ref=cm_sw_r_cp_apa_i_lQBrDb15N4JW3
And the connectors:
Antrader 10-Pack 2x5 FC-10P 2.54mm Dual Rows IDC Sockets Female Connector for Flat Ribbon Cable https://www.amazon.com/dp/B07S1NFG4S/ref=cm_sw_r_cp_apa_i_uRBrDbW4SF1JH
These are much lower profile and give you back a little build space. Hold just as tight as binder clips as far as I can tell so far. Got 100 so I'll have enough forever lol.
Link if anyone is interested
Damn, that's super impressive. If you want more for 1:10 car collection there's this Lancia Stratos: https://cults3d.com/en/3d-model/various/lancia-stratos-1-10-scale-model-kit
$180 from Amazon prime shipped, $12 isn't worth waiting on AliExpress.
Interesting! Found them on Amazon for a buck a pair after discount:
https://www.amazon.com/Amass-Bullet-Connector-Upgrated-Sheath/dp/B074PN6N4K
Might be worth picking up a set and re-wiring the connections on my printer.
Creality 3D Printer Platform Heated Bed Build Surface Tempered Glass Plate for Ender 3/Ender 3 Pro 3D Printer 235x235x3mm https://www.amazon.com/dp/B07FSM8DK9/ref=cm_sw_r_cp_apa_i_Z0KGDbQPPRZFX
16.99 dollhairs to be exact.
Do you mean the little blue clips? They've been coming with those for a number of months, but yeah, do yourself a favor and just get some better quality pieces to begin with. This is what I'm using, as an example.
If you like shiny filament, try this. You can buy it in three packs. It is effing amazing. Here is my army of Christmas Bulbasaurs.
Your extruder arm is cracked. Can clearly see it in the video.
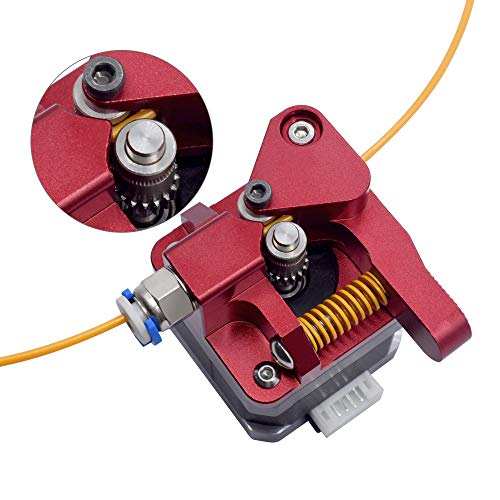
I'd skip the cheap aluminum single drive mk8 that most people get, and just skip to a much better extruder like a BMG.
https://www.amazon.com/Bowden-Extruder-Universal-Geared-Printer/dp/B08KP189KN
This did it for me.... The end of this video where he shows you how to level your bed while it's printing! (And I'll give you my Cura settings too)
Settings: Later height 0.2
(I use higher temp because I'm using this filament - https://www.amazon.com/dp/B07VGQ58J8?ref=ppx_pop_mob_ap_share )
Printing temp 210 Bed 70 Flow 100 Print speed 50 Initial layer 20 No supports Build adhesion Skirt
I've got 2 of the xuron snips and the one that come with the ender 3 pro are identical to them minus the xuron branding.
https://www.amazon.com/dp/B000IBSFAI/ref=twister_B07BSSG48F?_encoding=UTF8&psc=1
Overture TPU from Amazon.
Bed 50c Nozzle 210c Speed 15mm/s (I’ll try increasing this now) Retraction Distance 1.5mm Retraction Speed 30mm/s Part fan 100%
Ender 3 Pro with micro Swiss direct drive and hot end.
I bet you bought a 12v cartridge by mistake. If so, your 50w heater is now a 200w heater. Then it will burn up, then turn into a 0W heater.
You can pick one up at Amazon today for $180. Personally, I’d rather buy from Amazon because their support and return policy is top notch. Plus, ultra fast shipping if you’re in the States and have Prime.
This is not a hornet's nest you want to stick your head into. Especially if you are not informed enough to already recognize and read Creative Commons license tags.
The lawsuits that are currently going on over this matter are in the millions of dollars, and it only takes a second to google 3D printing lawsuits and see that this will get uglier as 3D printing becomes more mainstream. Copyright law sucks, Etsy is a pain in the ass, eBay will cooperate with authorities in prosecuting you, and Amazon will actively go after you to keep the authorities off their back. There is no percentage in them protecting some seller from a charge of copyright infringement. It is not a matter of community perception, it is a matter of copyright law, and they won't leave themselves open to prosecution. If you want to mess around with it I would suggest making sure you have a good lawyer.
Put simply, if you are not 100% certain that you have the legal right to sell an object, DON'T! Or better yet, design your own.
Since you seem unsure of how Creative Commons licenses work, and their legal implications, I suggest visiting the Creative Commons website.
in most climates PLA will be ok. In high humidity climates these bags work well and are cheap. I just throw a used spool in the bag with the desiccant packet from the one I'm opening and pump out the air.
Or just buy a Bondtech BMG clone for $15 and have a super reliable extruder that can do flexibles. The amazon link for the metal extruder in that post is way overpriced at $17 anyway. I bought this one, even though I have a BMG clone now... https://www.amazon.com/gp/product/B07FMS66ZH
You want good heat transfer to the glass. I use thermal pads and it work to bind the glass to the plate as well as fills in any scrapes. You can find it in larger sheets on amazon. You may need more then one fill the while bed, but it works great!
Something like this.
200x200x0.5mm Thermal Pad, 6W/m.k Thermal Conductivity/Non Conductive/Insulation/heat resistance/High temperature resistance/Heat Sink Silicone Sheet Pads For Laptop Heatsink/GPU/CPU/LED Cooler https://www.amazon.com/dp/B075JCQPD2/ref=cm_sw_r_cp_api_i_wS1VDbCZW205G
The brand is Ziro, and you can find it and several other colors here on Amazon
It printed best for me with a nozzle temp of 220° and bed temp of 70°. Anything below that and it wouldn't adhere at all. I am finding that now that it's been printing for a couple of hours that some of the corners are warping. This wasn't meant to be an advice post, but if anyone has suggestions I'd appreciate it. I'm sure I'll get that worked out though, and for the look of this filament I definitely reccommend.
Nice, hatchbox was my first pick, but I ended up going with this:
AMOLEN Wood Filament Bundle,Walnut,Bamboo Wood,Red Wood,Black Wood,3D Printer Filament,PLA Filament 1.75mm,200g/Spool https://www.amazon.com/dp/B08R1JGHNP/ref=cm_sw_r_cp_api_glt_fabc_27XWR1F2A3EZTFVD5M8F?_encoding=UTF8&psc=1
Since it’s my first time trying wood and I figured variety would be nice. If that goes well I’ll definitely jump on the hatchbox next. Good tip on the steel nozzles too. I just got a bunch of brass since it’s cheap, but again, once those start to run out and if I’m liking wood, I’ll grab some steel lol. Thanks for the tip!
Damaged&Stripped Screw Extractor Remover Tool and Drill Bit Set. Broken Bolt Extractor and Screw Remover Set of 6 Pcs https://www.amazon.com/dp/B0883575ZJ/ref=cm_sw_r_cp_api_glt_fabc_M4WR9MTPG4R9SRFTMVNR?_encoding=UTF8&psc=1
This or one of them like it, or even a Stanley set at Home Depot. Just one thing to try before going full drill. Plus then you got a tool for later.
You have an ender 3 pro, and it appears you tried to print directly on the bed substrate without the magnetic build surface in place, and didn't have z offset correct.
Replacing the whole bed isn't necessary. I would just blend the damaged part using putty knife and put a spring steel + pei bed on top.
https://www.amazon.com/dp/B07XBM24HN/ref=cm_sw_r_cp_apa_glt_fabc_GV8R0V6YVTGGBFD4F3G3
For a quick fix while you wait on an all metal setup , just use some super glue.
I did not have this issue you had but I still upgraded to a metal extruder parts. Here is the link to the one I use.
https://www.amazon.com/dp/B07WHYBVJ5/ref=cm_sw_r_cp_apa_fabc_886cGbZ3WVP3F
So I used this filament: https://www.amazon.com/gp/product/B07PYDNQXS/ref=ppx_yo_dt_b_asin_title_o02_s00?ie=UTF8&psc=1
​
But honestly I think their is waaaayyy to much yellow and gold. I wound up cutting a bunch of it off an only left a few M of that color of it before it changed to red.
Yeah, they are pricey... eSun, Polymaker...
But maybe a Rosewill Food Dehydrator...$40. Get (2) 1KG rolls in in. But I'd rather have the pricier ones with built in outlet for filament, but can modify the cheaper one. https://www.amazon.com/dp/B018UR4XJI/ref=cm_sw_r_cp_apa_i_TCcpFbBJ7WE2B
If your printing a lot of hygroscopic filament such as Nylon, I'd at least invest in 1 of the better ones.
It’s ender 3 pro, everything is stock.
Layer: 0.28mm Temperature: 200/65 Filament: Sunlu PLA
Bed is leveled with this: https://cults3d.com/en/3d-model/tool/print-in-place-dial-indicator-for-easy-bed-leveling
an upgrade-kit i found on amazon:
https://www.amazon.com/-/de/dp/B08G8MJ592/ref=sr_1_14
Dual Gear Extruder: since the plastic arm on the stock extruder often breaks, many people need a replacement. so this might work even better
​
PTFE-Tubing: degrades over time (especially when printing with high temperatures)
​
Yellow Bed Springs: many people recommend these, as they seem to be stiffer, witch should keep the bed level longer
Yeah I used this remix by Scott Yu-Jan he does some yt videos on his printer. It has a bl touch mount and it works with the microswiss DD carriage. However its designed to work with this parts cooling fan. I made it kinda work for now with the stock v2 part cooling fan by drilling a hole in the side of the shroud and screwing the fan in but im planning on wiring in the upgraded fan once I find my soldering iron.
TBWHL Ender 3 Pro Glass Bed Clips Swiss Clip 3D Printer Glass Bed Chip Metal Small Picture Frame Spring Turn Clip for Ender 3 Pro Ender 3 V2 CR-20 CR-10 PRO https://www.amazon.com/dp/B07X2MRW76/ref=cm_sw_r_cp_api_glt_fabc_4EVFCSVNKFBTZDJSPDGR?_encoding=UTF8&psc=1
I would ditch the idea of crystal clear filament, if you had that in your mind. But clear filament, which is not that clear, can be used to make a lamp. It's clear enough to make the light shine easily through it even if you can't see through it. But the thinner the walls are, the more you can detect on the other side. That said, I printed a lamp a few weeks ago and went with clear petg filament from Duramic and I'm quite happy about it, the light goes through enough for my application: https://www.amazon.com/DURAMIC-3D-Filament-Dimensional-Transparent/dp/B07YJLFSRG?pd_rd_w=zyOPF&pf_rd_p=4eebd874-436f-4f05-a794-09646834b2dd&pf_rd_r=D0XKQWCFKDGST6SQJT4E&pd_rd_r=c0772abc-d97d-495c-b0b9-3d248fe1a4c2&pd_rd_wg=OQfOh&am...
This set from Amazon comes with 1 meter of better quality PTFE tubing. The inside hole is smaller so there is less flex in the filament (although it does make it a lot harder to get a new color fed in) and four each of the extruder and hotend fittings.
Replacement clips can be printed from here. The 1mm clips fit the replacement extruder fittings above. The stock clip fit the new hotend fitting.
https://www.amazon.com/gp/product/B07H9X4K3K
A more constructive way to ask or suggest for one to be more specific would could be worded such as this:
"Could you be more specific which one you chose from Amazon? Did you mean a specific brand?"
I invested in a pair of Excelta 9241E flush cutters. They've lasted me 8 years and I haven't had to sharpen them once. Now, these are pretty expensive, but if you have a use for them other than just cutting plastic, they're worth it.
Otherwise, I would recommend the Xcelite 170MN, available here: https://www.amazon.com/Weller-170MN-Xcelite-General-Shearcutter-Blue/dp/B00B886R2I/ref=asc_df_B00B886R2I/?tag=hyprod-20&linkCode=df0&hvadid=309811990469&hvpos=&hvnetw=g&hvrand=5611942551294960083&hvpone=&hvptwo=&hvq...
If you haven’t done it yet to help with noise suggest replacing the mobo. Makes it so much quieter.
Creality 3D Ender 3 Pro New Upgrade Motherboard Silent Mainboard V1.1.5 with TMC2208 Driver for Ender 3/ Ender 3 Pro/Ender 5 /CR-10(Customized and Non-Standard Matching) https://www.amazon.com/dp/B07TMX9WFW/ref=cm_sw_r_cp_api_i_nJ1oFbNGM00S5
I have these. The only downside is they only come in bulk packs and you only need 4-8 of them. Search for " Picture photo frame metal spring turn clip hanger" on Amazon if the link below doesn't work.
https://www.amazon.com/dp/B07X2MRW76/ref=cm_sw_r_cp_apa_i_96qtFbTDCPTP5
Peel the sticker from the back and add a few drops of bearing oil, or pretty much any thin lubricant like 3-in-1, sewing machine oil etc.
Dude, ditch that spatula. Its useless.
Get a razor blade one that looks like this and you'll never look back.
A 3D printer, especially an open sourced design like the Ender 3, is like an erector set of endless possible configurations and upgrades. If something breaks it's an easy fix and an opportunity to upgrade!
That said, it's hard to make out what you're getting at here. If there's filament stuck in the tube, remove the tube from the machine and give it a good twirl, the filament should fly out. It's worth noting that the PTFE tube and tube couplers shipped with the Ender 3 are not great quality. If it looks worn out then replace it with Capricorn brand tube, it's way better.
I use a mini tube cutter, I've had the best results with it, I run filament inside, scare the ptfe tube, and then rotate a couple of times, and do it little by little. Its not for everyone since people can be impatient.
For reference, this is the one I have. https://www.amazon.com/Performance-Tool-W700C-Tubing-Cutter/dp/B0002KO2F2
Bought and installed these ferrules, even the crimper isn’t half bad for the price. I installed the smallest ferrule I could squeeze on each wire and, after crimping, I gave it hell trying to pull it loose to no avail. Install was quite simple and gives me more peace of mind letting it run for extended periods.
NUZAMAS Adjustable Ratcheting Ferrule Crimper Pliers Tool 0.25~6.0mm AWG 23-10 Includes 800 Connector Terminal Kit https://smile.amazon.com/dp/B074CRVJ5B/
Something worth pointing out is that I have double fan headers installed with the green ferrules. I run the hotend and motherboard fans off the same terminal on the board so they both run full speed all the time. I’m using these connectors for this and really like them.
Mecion 2 Pin Silicone Male Female Connector Plug JST 100mm Wires Cables for LED Lamp Strip RC Toys Battery Pack of 20 Pairs https://smile.amazon.com/dp/B07WR9L268/
i tell everyone that has this problem to buy this
https://smile.amazon.com/gp/product/B08CRNHF8Q/ref=ppx_yo_dt_b_asin_title_o03_s01?ie=UTF8&psc=1
its cheap, easy to install and gets rid of that problem you are having. I loathed switching filament just for the same reason you are experiencing. beveling the end "helps" but man i had that problem all the time. putting it in, pulling it out, over and over.
you buy that extruder and you really dont even need to bevel your cut. goes in all the time the first time. replaced my extruder on both of my machines with that one. And since its metal you dont need to worry about it breaking, which is a common problem people have with the stoc plastic one.
They should ship with the metal extruder. Mine broke after a week, and I didn't realize that was the problem for 3 weeks. The package with the metal extruder, including capricorn tube, couplers and yellow springs costs just $19, production is probably a lot cheaper. It would save so much pain, and help their reputation if they had that installed in the first place, without much price increase.
Amazon link in case someone is searching: https://smile.amazon.com/dp/B081DN6RM2?psc=1&ref=ppx_yo2_dt_b_product_details
Please dont go too heavy on the mods when you first start. If your anything like when when I first started you don't know what you don't know and adding too many parts without knowing how to tune your machine is going to cause nothing but headaches. Even after you learn the ropes you still need to limit how many mods you do at once. It's hard to determine whats causing your prints to fail when you changed a bunch of things vs just 1 or 2 at a time. I would suggest doing your first few prints 100% stock. If theres something wrong with the printer you dont want to add the mods to the equation on day 1.
That being said the springs are a great start. You could also get some capricorn ptfe tubing and all metal bowden tube couplers. the stock plastic ones tend to have a poor grip. An all metal extruder is also a worthy investment. I've seen post of the plastic ones breaking in the first month.
If your able to return the springs I would suggest buying this kit. They're all solid upgrades and shouldnt require you to have to tune anything on the printer. just make sure to get a few prints under your belt before installing them and even then do it one at a time. install an upgrade do a test print if all is well install another and repeat
after you have the printer for a bit (learn to level manually first its a skill you dont want to skip developing) I would get a BL Touch. the thing has improved my prints so much its not even funny.
besides that it really depends on what your going to be printing. Most people would be fine with a mostly stock printer but I also know that tinkering with the printer can be just as much fun as printing.
https://www.amazon.com/gp/product/B07JKGNB6W is what I have. Between this and my purple Elmers glue stick I have no issue with plate adhesion. For my PETG prints, I keep the bed at 40C, and it works perfectly every time. Note: I also clean the bed with a razor blade between prints.
Guessing based on this one picture but I think your bed is warped which is going to limit how well you can get it dialed.
I switched to glass due to that. I put this heat transfer pad on the bed then laid the glass on that. You don't need to use that vendor I've seen it listed by any number of people.
Once that was done I used an indicator on the X rail and shimmed the glass within +/-.001" (using an older imperial indicator I have) using aluminum foil (if you measure it its amazingly consistent in thickness at 0.016 mm).
Then you just set 1 corner with the paper/shim method and use the indicator to set all 4 the same.
First Alert makes a zwave smoke detector. https://www.amazon.com/dp/B081W4WQHC/ref=cm_sw_r_cp_apap_rV1sKxBbeU2Dp
I'm using that along with a Samsung Smartthings hub and a zwave outlet with an automation setup so that if smoke is detected, it'll turn that outlet off along with alerting me.
Try amazon smile to donate to charity automatically at no cost to you!
https://smile.amazon.com/Creality-Capricorn-Upgraded-Pneumatic-Bed-level/dp/B081DN6RM2/ref=sr_1_5?dchild=1&keywords=ender+3+extruder+upgrade&qid=1601411594&sr=8-5%5D(one)
^^^I'm ^^^a ^^^bot ^^^and ^^^this ^^^action ^^^was ^^^preformed ^^^automatically.
You probably aren't going to need the stepper dampers, I don't think they will even fit on the ender 3 pro steppers.
Is there a reason you are getting a silicone hot ender cover? Never seen anyone grab one of those right out of the gate.
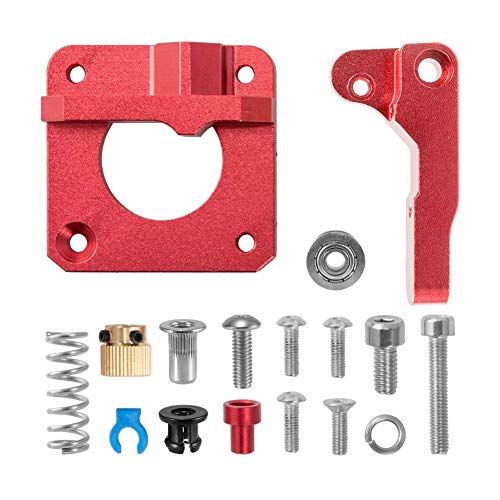
If you spend a little more on the extruder upgrade, you can bundle improved bed springs and an upgraded bowden for a lot cheaper than individually. Link to an example kit on Amazon.
If you have a microcenter close by you can actually save a decent amount getting an Ender 3 pro in store over the amazon price. Not many people do but figured I would mention it, their PLA they carry is pretty good too.
Buy it on Amazon from the seller Comgrow if you can. Good price and they are on point with the customer service.
If you are patient, they go on sale for a good discount every now and then
There should be NO movement. Put some paint dots on the tube, so you can easily see any movement. (i do this so i can see if its moving with my webcam)
Movement will eventually chew up the tube more, and allow for more movement, and eventually the tube can get stuck in the fitting, or just fall out. Use a thicker C clip to make it hold tighter, or just replace the ptfe fitting.
Also check the hotend side for any movement.
I have started moving to extruders and hotends that use a COLLET type connector - The way these printers use PTFE fittings - is really not ideal.
The collet grabs the tube more securely, and does not damage it, but they are not as cheap as these cheap ptfe fittings.
Also: That seems to be a plastic extruder - eventually it will break. Be ready for when it does.
Here is an example of an extruder that uses a collet
https://www.amazon.com/3D-Extruder-Aluminum-Filament-Creality/dp/B07B96QMN2
The collet is the little black top-hat mushroom looking thing with legs.
please don't hate me for putting a small price on it.
Just trying to understand... for example, this is one of the Creative Commons licenses listed under a STL file link. This is a non commercial license but, this means it not possible sell the STL or the printed model?
Octoprint is not designed to handle multiple 3D printers.
But, if you're willing to tinker, you can use Docker and the dockerized version of Octoprint to run two instances of Octoprint on the same Raspberry Pi
Try this if you can't get the USB port to work. But odds are you get the right com port driver and you will be set and not need this. Also make sure if you are using Arduino that you selected the right motherboard and com port. That can mess with you.
heat it up, with one of those mini blowtorch things or just crank up the heat and wait, use some chopsticks or other safe materials to scrape it out.
that black ring should come out it's a collet. may be one like this. get some spares.
https://www.amazon.com/Genuine-E3D-Embedded-Bowden-M-BOWDEN-COLLET-METAL-175/dp/B07B69947W
undo the nozzle, heat it up, push it through.
This is the best extruder you can buy for your ender 3 pro. BMG Extruder Do not buy that bad red/silver aluminum extruder. Those are scams when you can buy dual gear ones for the same price. cheaper dual gear extruder
Get some thin or super thin CA glue specifically for scale models. It dries a little slower than standard super glue but it's just as strong, dries clear, and won't leave a white haze on anything.
There's no Ender 3 V2 Pro - only Ender 3, Ender 3 Pro, Ender 3 V2 and Ender 3 Max.
I'd go for the Pro, because there's very little different on the V2 that's worth much extra money.
It has a glass bed rather than the flexible magnetic, and some people do prefer that (I don't), but many consider it old-fashioned and there are certainly many alternatives that are magnetic. It has a colour graphic screen but it's not a touch screen and its rather unique design makes it incompatible with third-party upgrade boards you might consider in the future. It has belt tensioners, but you'll rarely need to adjust them and if you want, you can find printable ones on Thingiverse.
Both the Pro and the V2 have the stiffer 4040 Y extrusion, and the good quality MeanWell power supply. Both will benefit from stiffer springs for the bed, to reduce the frequency with which you need to re-level the bed, and both will want an upgrade to an aluminium extruder like this because the stock plastic ones tend to crack. You can often buy the springs and extruder together as a kit. Both printers will benefit from a filament guide with a bearing to ensure filament enters the extruder at a sensible angle and doesn't get shaved, jammed, or wear a groove.
Finally, the cost saving in buying the Pro will easily pay for the upgrades and likely another roll of filament.
There are solderless wire splitters out there. You cut the original fan off leaving enough wire to go into the connector. Then clamp in your two new fans.
Wire Connectors - Low Voltage T Tap Wire Connectors, 3 Way Wire Connector, T Type 2 Pin Solderless No Wire Stripping Required for LED Strip, Automotive Connection Fits 24-20 AWG 12 Pack https://www.amazon.com/dp/B07114RK67/ref=cm_sw_r_cp_api_glt_fabc_VSQM5XNBCD126QQH5HN5
From the look is that it seems you may have some hygroscopic-ness happening with your filament/printing over 240C I get it as well when I had that style, all metal hotend are so nice. I actually recommend just getting the conversation heartbreak, makes the original heatsink usable and minimal parts needing to be replaced l, literally just that heat break can be replaced and just attaching the heat block / nozzle to it, though I recommend the MK8 e3d “v6” hotend nozzles instead of the regular ones, seems to have an easier time holding temp for me, here is a link to it, 2pcs All Metal Ender 3 Titanium... https://www.amazon.com/dp/B08TCD4M1S?ref=ppx_pop_mob_ap_share This will give you an all metal hotend setup with out spending $65 dollars n the micro Swiss, pair with this for good measure High Temperature CR-10 Plated... https://www.amazon.com/dp/B08NVTJM4S?ref=ppx_pop_mob_ap_share and a fresh start into all metal, thermal paste is good to use on the metal to metal contacts, but make sure to not let the thermal paste go into the filament path
The only upgrade I would do from the beginning would be to switch the stock springs with the stiffer (and flat) yellow springs. This will help keep your bed level, but it shouldn’t make troubleshooting any worse
… I would also maybe start with a metal extruder (I got this one), but I’d probably just wait because the stock one works fine (until it may crack or something) and it’s an easier swap than the springs
Sure!
As for the quality... It's good enough for monitoring prints or timelapses. Not great for recording videos of prints.
I got this one as it was more in my price range but have saved the other recomendations for when I inevitably want to upgrade it.
Usually I recommend the Winsinn transparent BMG clone, but it's been out of stock for a week. This one will probably be okay. It looks the same in hand, but it translucent, not transparent.
https://smile.amazon.com/gp/product/B076GZK62B/
You can get an awesome unit like this one for less than $40. It has enough features for ~99% of what most people would ever use it for. If you're messing with electronics in any capacity you should really have one.
If I were you I would honestly just upgrade the extruder from the stock plastic one to a metal one like this one from Amazon. It only costs like $10 and I am almost positive it would fix your problem, and it would help prevent any future problems too! This was one of the first upgrades I made to my printer.
The cube came out alright, the pieces in the back had more blobs than the few on the cube, I think the bed isn’t fully level in a corner, still new to this so gotta look more into trouble shooting... This is the filament Polymaker PolyTerra PLA Bioplastic Based 3D Printing Filament, Matte PLA Filament, 1.75mm Filament Fossil Grey 1000g(2.2lb), Fit Most FDM Printer https://www.amazon.com/dp/B08QN5FQX7/ref=cm_sw_r_cp_api_glt_fabc_TDV50KDN022W9GFT2192?_encoding=UTF8&psc=1
I print matterhackers nylon x
- Microswiss hotend
- This thermistor
- Drybox i can print from
- Filament dryer to restore wet filament
- Enclosure
- Spring steel + PEI + Glue stick
I would consider anything to keep the nylon dry part of the bare minimum setup.
You can get another one for only USD $169 plus free shipping if you're an Amazon Prime member
These Come standard with the ender 3pro and v2 i have Never had any problems with them
I’ve been using the glass bed, you can use binder clips to hold it.
I’ve been using these as they take up less bed space and have a lower profile
PAGOW 10pcs Ender 3 Glass Bed Spring Turn Clips for Creality Ender 3 Pro, Ender 3S, Ender 5 Pro, CR-20 PRO, CR-10S Pro 3D Printer https://www.amazon.com/dp/B08TT5L9K7/ref=cm_sw_r_cp_api_glt_fabc_7784WHQSPE9YGQEHG0GJ?_encoding=UTF8&psc=1
Yep what he said fire hazard for sure also potential of shorting something like the mainboard not worth the couple dollars for new ones I got these and my hot end heats up incredibly fast but I have an all metal hot end I don't think I would do this for a stock setup
Edit: would help if I posted the link:
> esteps at over 1000.
Yea.. No.
Especially if you just went to another single-drive extruder. The most significant thing that changes E steps in a mod like this is the drive wheel diameter. I suspect you didn't even need to change the wheel, and didn't need to change e steps at all.
If you went to a dual drive like this The new baseline e steps are 139, you can do e step cal from there.
Follow this procedure
https://teachingtechyt.github.io/calibration.html#esteps
Take note that the bowden should be disconnected from extruder, and keep an eye on the drive wheel during test. Make sure drive wheel secured, no slip or skip.
No so far I havnt done anything, my friend gave me a metal upgraded extruder because he had a spare and apparently its not a case of if it will break, but when.
I've ordered the glass bed, and leveller from Amazon will be here tomorrow. I'll look at springs then.
This is what I've ordered.
https://smile.amazon.co.uk/dp/B07RZBFQK3/ref=cm_sw_r_cp_apa_glc_fabc_BEG50P8R3EEHEB0XTQK1
The color looks fine to me. I have a roll of Hatchbox orange and my single layer bed calibration squares basically looked like that.
It'll look more orange the more layers you print.
If you really want to clean out your nozzle/hotend, look into doing a "cold pull". I use eSun's cleaning filament, but it's not necessary, and you can definitely use whatever filament you want. I periodically run the cleaning filament through at high-ish temps during my maintenance days.
You might be overthinking this. Are you sure the humidity is 90% or more? Even tropical rainforests are only around 77%-85%, depending on the time of year. I live in York, and today the humidity in my hobby workshop is 31%; in the past week it's mostly been around 25%, and a little lower in the rest of the house where the heating is on. It's never gone above 50%.
Anyway, at relative humidity of around 35%-45%, few filaments will suffer short-term, ie when printing. Nylon would, PVA would, but PLA and even PETG would be OK for a few days. If you store them in a heavy-duty plastic bag such as the one filaments normally come in, just putting a sachet of silica gel dessicant in the bag will allow you to keep them for many months with no problem. I bought these from Amazon; apparently no longer available but there are many similar. They work well, make it obvious when the sachets need dried, and that's easy to do in any oven.
For drying, I use a food dehydrator. Mine's a Klarstein but there are several suitable types on Amazon for £25 and up. I use it occasionally for PETG and TPU. The only time I ever needed it for PLA was for some roll ends donated by a friend, who'd stored them, un-bagged, in a damp shed for two years.
No no no clean your bed don’t use glue get reality glass bed link Creality Ender 3 Glass Bed Upgraded, 235x235x4mm https://www.amazon.com/dp/B07RD6D2ZQ/ref=cm_sw_r_cp_api_glc_fabc_1rE9FbDX4MCEW?_encoding=UTF8&psc=1
And use isopropyl alcohol
I picked up an 'upgrade kit' which included the super tough yellow springs.
Ex: https://www.amazon.com/Creality-Extruder-Aluminum-Leveling-Capricorn/dp/B088NFD8G2
I had to fiddle with the z axis a bit, but definitely helped.
I put my ender 3 pro together on 11/16 and this past week the parts fan starting making a horrible noise and I decided to replace it with this kit. You will have to splice the fans in but these connectors make it a breeze.
Looked it up, a 46mm boxed end wrench is 75 dollars on Amazon. It’s certainly possible to get a cheaper wrench but even a cheap combination wrench (which would be much longer) was 30 dollars
Teng Tools 46mm Box End Ring Type Impact Slogging/Slugging/Flogging Wrench -903046 https://www.amazon.com/dp/B00CYLVIIG/ref=cm_sw_r_cp_api_fabt1_dwPUFb4D05ZZQ?_encoding=UTF8&psc=1
Edit: a Chinesium box wrench is 40+ dollars according to other listings on Amazon
Props for designing a functional thing, but there are a lot of really low cost options out there and it makes it hard to justify printing for me
This is the cheapest I could find on Amazon. 3 with heat blocks for 14 bucks. Searching for Creality Heat Break or Creality throat will give you what you are looking for.
Creality Original 3D Printer Aluminum Heater Block with Stainless Steel Throat for MK7 MK8 Extruder Creality CR-10/CR-10S S4 S5 (Pack of 3set) https://www.amazon.com/dp/B07FTHJJQ8/ref=cm_sw_r_cp_api_qZFJBb31ZGDE6
Bought mine from Amazon.de, sold by Comgrow, shipped by Amazon. Ordered on Tuesday last week, arrived three days later. Price was 220€, but I got a spool of black PLA with it for free, so I guess I can round that down to 200€. I guess I did pay a premium, but the fast shipping and the added amazon safety is worth it I guess.
Got mostly lucky with quality control too. The extruder motor bracket is not bent to a perfect 90°, so I had to leave the Z guide screws on it pretty loose. But it prints well, so I'm not complaining.
You can buy the creality ones on amazon, I just got a 3 pack delivered today.
Official Creality 3D Hotend Silicone Sock Set of Three for Ender 3 CR-10 CR-10S https://www.amazon.com/dp/B07HP2SWJX/ref=cm_sw_r_cp_api_-0X4BbXCPE2TT
If you want to wait you can get them from amazon Flameer 4 Pack 3D Printers Heated Bed Compression Springs Bottom Connect Leveling for Creality CR-10 10S Ender 3 https://www.amazon.com.au/dp/B07ML57NB3/ref=cm_sw_r_cp_api_i_GmWOCbTFC3FN4
You have some underextrusion. The lines you're seeing are caused by too much tension on the extruder gear. It cannot get enough material to the hotend.
Mine was the idler arm breaking under the pressure. Buy the metal one from Amazon or wherever. Then print the filament roller guide. And lastly, print a better holder/roller for your spool.
That cable should not have signs of heating, the amount of current is very low....but it looks like you must have a bad connection that is causing a high resistance and heating.... you need to get a new cable end and crimp it on....
You can dig around and find a competed cable on amazon, but it is handy to be able to extend or replace cables at times... these are links for the proper connector and crimp tool... the outermost jaw is for the jst-xh...the inner jaws will do dupont connectors which are also commonly used.
MAny types on Amazon, but this will get you started it’s a 5mm to 8mm coupler
CCTREE Flexible Couplings 5mm to 8mm NEMA 17 Shaft Coupler forCreality CR-10 CR-10S S4 S5 Makerbot RepRap Prusa i3 3D Printer or CNC Machine (Pack of 5pcs) https://www.amazon.com/dp/B07842FCTV/ref=cm_sw_r_cp_api_i_O1ufDbBZ5RDQY
It helps you clear out a clogged nozzle. If you're getting the dreaded "thumping" noise, you'll know it's time to carefully move this in and out of your nozzle a few times (while the nozzle is still hot) to see if it helps your machine push filament again.
You might bend it eventually, but this is a highly-reviewed set of replacements, plus it comes with two pair of VERY nice tweezers and it's pretty cheap.
Enjoy the days when you've never used one!
Looks like this one. I have the same one. https://www.amazon.com/gp/product/B08882W9GC/ref=ppx_yo_dt_b_asin_title_o00_s00?ie=UTF8&th=1
It's most likely what's known as filament skipping. Reducing printing speeds can help with this. Also as a temporary fix if you have too much tension you can disassemble that extruder and remove the spring holder from the screw on the tensioner. It's that little thimble looking piece in the spring. This will slightly reduce the tension and may help.
Though the stock ender 3 extruder is terrible. I have had many failed prints due to that gear stripping the filament, so I would argue replacing that extruder is one of the more important upgrades I've made.
Here is what I bought for my two ender 3s and it has worked very well and I haven't had a failure since. Just make sure you recalibrate your steps/mm after installation. https://www.amazon.com/WINSINN-Extruder-Creality-Upgraded-Aluminum/dp/B07SY745CF/
Keeping your budget in minds, I'd recommend getting a kit like this one https://www.amazon.com/Redrex-Upgrading-Replacements-Aluminum-All-Metal/dp/B07TWK8FRN/ref=sr_1_5?dchild=1&keywords=ender+3+extruder+and+spring+kit&qid=1600193192&refinements=p_85%3A2470955011&rnid=2470954011&rps=1&sr=8-5
For $11 you can cover pretty much all of what people consider the essential upgrades. The stiffer bed leveling springs will have you making less adjustments between prints. The metal extruder will replace the stock plastic one that is prone to failure. While I can't speak to the quality of that specific bowden tube and its fittings, I can say that the stock ender 3 ones are trash.
Your next investment should probably be a glass bed, I got the official one that comes with a treated build surface but if you do a little research you can find much cheaper alternatives