
What are
/r/Miata's
favorite Products & Services?
From 3.5 billion Reddit comments
The most popular Products mentioned in /r/Miata:


The most popular Services mentioned in /r/Miata:
Facebook Marketplace
OfferUp
imgbox
Gumtree
Microsoft OneDrive
Amazon
Rainmeter
Google Drive
Unsplash
Dropbox
NordVPN
Microsoft Bing
Cambridge Dictionary
Emojipedia
Hackster
The most popular Android Apps mentioned in /r/Miata:

Torque Pro (OBD 2 & Car)

Car dashdroid-Car infotainment

AutoMate - Car Dashboard

GIF Live Wallpaper

Prisma

Road Recorder PRO

Trigger - Task Launcher

WheelCo
The most popular reviews in /r/Miata:
Don't laugh, but I used this $20 50w/channel chinesium amp. It surprisingly sounds great, is plenty loud, and has builtin bluetooth.
Desoldered the 1/8" jack onboard so I could integrate this thing, and stuck a buck converter back there to provide 5V to the USB port.
Just drilled a couple holes in a DIN cover and mounted the amp directly behind it.
Looks like those ones right here, expensive but damn I wanna buy em
Definitely repairable. Confident it busted the plastic end tank on the radiator. New core support, hood, and a radiator could get you back on the road... call your local JDM importer and see if they have a front clip, mine does right now at $600.
Hi, 1 of 3000 here just like you.
Love that shift knob. If you need to restore the rubber I did that recently. Costs $5
Edit: top image has the rubber replacement, bottom image is the dead rubber that stained my hand and was cut out https://imgur.com/a/MTEVoXS
Top image is made up of 2x https://www.amazon.com/gp/product/B000DZFZ02/ref=ppx_yo_dt_b_asin_title_o04__o00_s00?ie=UTF8&psc=1
Do not use Armor All on the dash. It actually causes more cracking than it prevents.
This is what you want to use on the vinyls and plastics:
303 (30307) UV Protectant Spray for Vinyl, Plastic, Rubber, Fiberglass, Leather & More – Dust and Dirt Repellant - Non-Toxic, Matte Finish, 10 Fl. oz. https://www.amazon.com/dp/B00J8NKGSG/ref=cm_sw_r_cp_api_i_G-kiBbWRPXP2G
Seriously, it matters.
Buy these if you go on extended highway trips. I wear mine anytime im doing it over 20 min or so
HaHa! Ninja Edit
I bought an 8 pack of LED strips off of Amazon for $9 and a blue toggle switch from Autozone for $4. Everything else (wires, twist-on wire connectors, zip ties, etc) I pulled out of my dad’s garage.
I used the ashtray light for power and installed the toggle switch in the center compartment (the one under your arm). It took me several hours to get it right (it didn’t work in series but parallel worked just fine). Did it all off of my existing circuit knowledge from high school which was more than sufficient.
It looks great cruising down the highway, more than makes up for the broken map lights, turns on with the rest of the lights automatically unless I choose to turn them off, and doesn’t take up any extra space.
I started with a quick wipe down with a wax and grease remover (Naphtha)
I used a red scuff pad for most of the surfaces to scuff and clean.
For the nooks and crannies I used a dremel with a pen shaped wire brush like this : https://www.amazon.com/Dremel-532-02-Stainless-Steel-Brushes/dp/B015PK3CBI/ref=sr_1_10?dchild=1&keywords=dremel+wire+brush&qid=1622414688&sr=8-10
It worked really well for the corners where the spokes meet the barrel of the wheel, around the lug nut holes and lettering, and in any of the tight radius's
I don't have a compressor so I used a can of air to blow dust off the wheel after the scuffing/sanding.
Wipe with naptha.
If you've used a silicon based tire shine, you've gotta get it off the tire or it will make paint do funky things, and tape won't adhere to it well.
Mask wheel with painters tape, making sure to get under the very outer lip of the wheel were the tire meets the rim. Small pieces, 2-4 in long help to make the radius. Make sure to get the valve stem.
Right before painting, wipe with naptha again, making sure wheel surfaces don't have any residue before primer.
yeah! AveyLum USB LED Strip Lights Car... https://www.amazon.com/dp/B071DC3ZFS?ref=ppx_pop_mob_ap_share i plugged them into a cigarette lighter usb thing and then fed the wire to the steering column cover. then i just zip tied them up and routed the other led strip underneath the dash. then i routed the other 2 led strips underneath my center console. everything was tucked and done in about 20 minutes.
Wish she was more clean, but 1,000 miles made her pretty dirty. This quick photoshoot really brings out the color and I can't get over this car and the looks it gets.
Not a direct answer to your question, but I would recommend using knifeless tape to get a clean line around that curve. Then you don't need to pull that piece off in the first place.
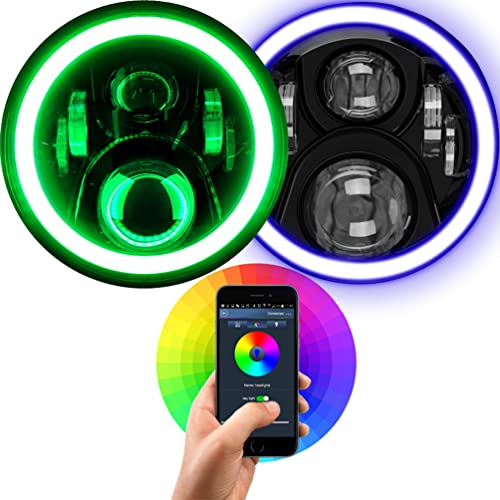
I've done this to my car as well. The install isn't super difficult, however it isn't for the faint of heart either. Main steps are:
- Remove bumper.
- Remove headlight assemblies
- Cook headlight assemblies at 200F for 20min.
- Pry the headlight assemblies apart, making sure not to touch the black glue (no huffin either). This will take some effort, but if you are exerting considerable force, heat the glue some more.
- Personally I used clear JB Weld to attach the 70mm halos. Others have drilled into the housings and used wire to secure the halos.
- Route the wires through the gap in the projector housings, exiting into the area where the rear of the bulb exits.
- Reheat the assemblies so you can reattach the two parts of the headlight assembly together.
- Wire the red wires to an Add-A-Fuse in the engine compartment fuse box. I found the engine injectors are "on" with the car. However I will be looking for a controllable alternative later.
- I bought switchback halos, so I spliced the yellow wires into the turn signal wire. The wire will be the middle green? one on the main headlight harness.
- Wire the black grounds to bare metal. I used the bolt on the fender side on the fuse box for the drivers side and the wiper fluid reservoir bolt for the passenger side.
- Reinstall everything
- ?????
- Be noticed... a lot more
here's pics of mine: https://imgur.com/a/EQ9HSB4
here's the Amazon link to the switch back halos used: https://www.amazon.com/Qasim-1-Pair-White-Switchback-Headlight/dp/B07CYYP4PH
Let me know if y'all have any other questions, or if anyone needs clarification.
Awesome work dude, looks clean. I find myself trying to convince myself it's not too ricey though 🍚
On amazon! Vinyl Grain Texture Quilted Foam... https://www.amazon.com/dp/B07CR15YLK?ref=ppx_pop_mob_ap_share $16/yard! But shipping is a little expensive. Came to like $24 total and the yard was enough for both.
If the other ideas don't work use a dent puller they make them where you use hot glue and a pull hammer.. the plate can be fixed with a hammer
racing tires or street tires?
racing rubber is relatively easy, hoosier makes several compounds & sizes in 13s, as well as Toyo which has RA1 & R888 in 13" sizes, probably more out there as well.. Keep in mind none of these will survive long on the street, the RA1 would last the longest and I would be stunned if you got 5,000 miles out of them.
street tires are trickier, but i believe there are still some being made in 13 inches for vintage cars.. the sumitomo HTR 200 (all season), along with the Falken Sincera came up with a quick google.. There's also the Federal 595 in 13 inches which is sold as a racing tire for Legend race cars, but is really just a summer tire. The BMW 2002 is often fitted with 13" wheels so that may help in the search.
also you might want to make sure the car will be drivable with 13" wheels on it, not sure if the car is lowered or not, but it will be really low with 13s on it.. Speed bumps are a one-tire-at-a-time endeavor for me, even with my 16" wheels on, but the NB miata i drive on the street sits pretty low on a racing suspension..
link for Federal 595 dealer on ebay (sorry, only place i could find them in 13)...
Please buy and read this book about turbochargers and this book about ECU tuning
Read them cover to cover. Feel free to skip chapters about diesels and things that you are 100% sure aren't relevant. If you aren't sure, just read it.
If you can't be bothered to do this, then I promise you won't be able to dig through hours and hours of forum posts and videos to solve one dumb problem that you overlooked at 3AM after laying upside down under your steering wheel for 4 hours.
If two books are too expensive then you can't afford a turbo.
Now that that's out of the way...
You need to consider what your goals are. You can research power numbers that other people have made. You can consider what failures you're willing to have. Power is always a compromise between reliability.
You can turbo a miata and make 130 HP all day. You can turbo a miata and blow it up on the dyno trying to make 600. It just depends on how you do it. Most people claim around 250 before needing forged internals. 200 is probably a 'safe' bet. Safe, only assuming you change the oil more frequently, ensure the turbo is properly cooled and lubricated, and ensure that your engine management is properly done.
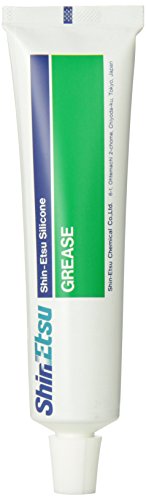
Yep: https://smile.amazon.com/Genuine-Honda-08798-9013-Silicone-Grease/dp/B00GD49GTS
It's pricey but a tube lasts a LONG time. I bought mine in September 2016 and still have a lot left. I've only done the windows on one NA but have used it for other things a few times.
Mine came with both, I use neither of them. The cup holder is useless because you can't shift if you want to hold cups, I don't smoke so the ashtray is useless.
I leave the area blank for putting...whatever, for cups I use this
I left out a bunch of details as this gallery was intended for my non-car-enthusiast friends.
- The wrap is 3M Cinder Spark Red.
- Those wheels are 6UL Gen 3s, 15x8.
- Those are eBay Altezza-style housings, tinted with VHT red after masking off the reverse with 3"-diameter stickers.
- The turn signal/parking lights are the eBay/Amazon smoked special.
- After removing the antenna/motor, I found that the remaining hole was exactly the perfect size for these wiper arm caps.
I got the AMUNIESUN ones off of Amazon. For me the headlights themselves plugged directly into the OEM harness. Hooking up the DRL and signals was a bit more of a pain - I had to connect a wire from the headlight themselves and splice them directly into the turn signal harness. All you need is some solder and/or some electrical tape, some spare wire, and something sharp and its a pretty basic install that should only take around 30-60 minutes.
That being said, when I was researching which ones to buy some people needed a separate harness to connect the lights themselves. NAs use an ‘H4’ connector. If these are the ones you are getting, then it looks like they have the H4 on them, so you should be good!
Good luck on the install! They make a HUGE difference to the style and the nighttime drivability of your car.
Just some vinyl tape. I been actually debating going thicker but this is what I have on. Only that bright in the sun.
> no one sells this kind of option
uhhh Hella Supertones come with a relay in the box. I did mine with some wire and crimp on spade connectors, but they sell cheap relay blocks on Amazon as well. It's not hard to do; I installed my horns on their own circuit controlled by a relay off the existing horn circuit.
$100 on amazon. I don’t know how well they will wear, but it’s a major improvement over the cloth that was in it. The factory seats looked blue, torn, and had a layer of dirt that I didn’t feel like dealing with. Cloth might be cooler (temp wise) but I love the “leather” look. Took me 6 hours to do both. Would def do it again if they get messed up in a couple of years.
They are M6x1.0 threaded flange bolts.
https://www.amazon.com/dp/B07DS4JB9S/ref=cm_sw_r_cp_apa_i_9GYkFb7AQ9NBA
These fit the heat shield perfectly. They also work on the plastic guards in the wheel wells.
Something you could add, if you want to expand some of your capabilities, would be to get a simple bluetooth and MP3 decoder like this: https://www.amazon.com/Audio-Bluetooth-Decoder-Wireless-Module/dp/B073F5GNVY You could possibly even route the interface to be in the glove box or armrest if you needed.
I'm currently using a $22 WiFi ELM327 adapter (this one, though the price seems to have gone up a bit) and the OBD Fusion app ($10) on my phone, and it works really well with my 1997 Miatas.
As well as the standard code reading/clearing it also allows you to create 'dashboards' with graphical gauges showing various engine parameters in real-time, which is great for diagnosing sensor problems. Want to know if the ECU temperature sensor is working (as opposed to the one that drives the dashboard temp gauge)? Pull up that readout and check it is reasonable and changes as the engine warms up. Want to test the TPS without forcing backprobes into the connector? Pull up the value and watch it change as you move the butterfly valve.
The app also does some sort of GPS tracking to keep track of fuel economy, but I haven't looked at that much.
The combination is worlds better than the standalone OBD2 code reader I bought for $70 from Kragen a few years back (only shows diagnostic codes) and has worked with every vehicle I have tried it on so far, including a Suzuki that the standalone reader failed to connect to.
I have also used a friend's ScanGauge 2 for reading the real-time OBD data, and while it enables access to all the same parameters, the process of selecting what to display was a lot less user-friendly than in OBD Fusion, and you can display less data at once on its screen. The ScanGauge claims to allow access to additional manufacturer-specific parameters, but I didn't see any for Miatas.
TLDR: buy a cheap ELM327 adapter and an app for your phone to drive it.
got it in Norfolk. if you’re still looking, I found one asking 7500 in NJ that has 70k mi but has a bit of rust and it pretty stock but I test drove and it ran great. https://www.facebook.com/marketplace/item/424848748301569/
Depends on the scope and project. I'd love to help how I can. There are some reasonably accurate uprights and an NB Steering Rack on GrabCAD.
http://grabcad.com/library?per_page=20&query=miata
Another good resource:
It's an Allen Sports Deluxe 2-Bike Trunk Mount Rack, Model 102DN-R, and it holds really well!
However, it's not exactly gentle on your paint. If you're the type to baby your car it's not for you, you'd be better served by a trailer hitch and a bike rack mounted to that.
Side note: it covers up the backup camera, so that's a little annoying, too.
Amazon stroller cup holders. They made singular ones with a clamp that work AMAZING
Accmor Stroller Cup Holder, Bike Cup Holder, Walker Cup Holder, Universal Bottle Holders for Stroller, Bicycle, Wheelchair, Walker, Trolleys, 2 Pack https://www.amazon.com/dp/B079K5F7BV/ref=cm_sw_r_cp_api_glt_fabc_62JC8Y43PR4FJ4GD9B20
I was originally looking for a storage net, but couldn't find one small enough.
This is what I got instead, and ended up being perfect.
Try this hehe
Edit: now that I think about it this could turn our little car into a kite and fly away... :/
I use a Optimus GPS tracker. And I use this.
Gorilla glue it right to your hard top.
Wow, there's something I've never seen before! If my count is right, that door has SIX speakers: the original 6.5", three 4", the original "tweeter" plus an additional one. Assuming the other door is the same, you have a 12-speaker stereo. In a Miata. Wait--I'll bet there's a sub in the trunk or some more on the shelf. Or...the head rest speakers.
It seems like overkill to me too but what do I know. Wouldn't you need crazy power to actually make them put out any volume?
Audio guru Jeff Anderson of Miata.net fame has posted about the little door speaker being a gimmick and offering no benefit from an audio standpoint. I'd bet you would be absolutely happy with one good quality 6.5" in each door and newer head rest speakers. Clearwater seems to be the default high-quality brand but they are pricey. My son recently put in a set of round 3.5" in his head rests (these) and he's thrilled with the improvement.
Cipher Auto - Enhanced Leatherette Steering Wheel With Silver Stitching For Mazda Miata NB (ESR-MZNBA112BS) https://www.amazon.com/dp/B077YSGNSM/ref=cm_sw_r_cp_api_glc_fabc_8qrbGbJHKH0V4?_encoding=UTF8&psc=1
Here's something that you might like. I also leave my car outside but for different reasons and I use this soft top cover to protect the car from snow storms. It does a pretty good job. You just don't want to leave it on for too long or it might damage the paint. https://smile.amazon.com/dp/B01COAMEL6/ref=cm_sw_r_cp_apa_fabc_NJG3FbVXCCFTG
Amazon has OEM replacements for around 20 bucks. https://www.amazon.com/Genuine-Mazda-0000-8D-D01-Cup-Holder/dp/B0091U2ATY/ref=sr_1_1?ie=UTF8&qid=1470674996&sr=8-1&keywords=miata+cup+holder
After I had to redo mine a couple times I purchased some clear headlight wrap on amazon and it seems to have kept it decent.
Edit: link Lamin-x M004CL Headlight Cover https://www.amazon.com/dp/B005MRCJWI/ref=cm_sw_r_cp_apa_-OUXxbZZ30VYQ
I got mine off of amazon. It was super cheap and the fitment was ok enough. The install hardware comes with double sided 3m...throw that out and use self tapping screws. The thing is super bendy. Just plasti-dip it before install and youre good to go. https://www.amazon.com/90-97-Mazda-Urethane-Bumper-Spoiler/dp/B00819HSLQ/ref=sr_1_2?s=automotive&ie=UTF8&qid=1477507471&sr=1-2&keywords=miata+front+lip
$15.93 via Amazon Prime - Genuine Honda 08798-9013 Silicone Grease (Thanks, u/tadfisher)
It's a common topic, but many simply have not come across it. This Shin-etsu is what Japanese OEMs use to keep rubber weather stripping like new. It can rejuvenate stuff you though needed replaced, everyone should have a tube of it and treat yearly to bi-yearly, on any vehicle.
Use gloves, apply a very thin layer, allow to sit for at least an hour. Wipe off excess with moist cloth towel.
Posting this because Tom was recommending the cheap generic stuff.
I used these 194 LEDs from Amazon!
And they've lasted unlike the cheapo ones I had before that kept going out.
Edit: Dusk but during full on daytime you can't see that the lights are on (I drive with my headlights ON)
Originally I had planned to do a shifter rebuild today. I had a few of the OEM Bushing, but cut a corner somewhere and got this Doorman shifter rebuild kit from Amazon. And it didn't work the moment I took it out of the box. turret bushing and others weren't the same.
So I had this MiataRoadster shifter that I bought during the Christmas sale. I wasn't planning on putting it on today, but since I already took off my shifter. I went ahead and installed it. Installation should be straightforward. Just follow this guide it will help.
As for the Pros and Cons. The quality is really nice, throws are super short it took me a minute to get use to it, and to be honest I'm still not use it to it yet. You'll probably be laughing at how crazy fast you shift now. Only did a quick night run with it a few hours ago so not much else to say really.
Cons. I would say it's stiffer than stock. Even though the throws are shorter I was thinking that there would be less work involved, and sometimes I feel like I have to force it in gear? Not sure if there's any break it process and if it gets any better. Also, another con, this may only pertain to me, but I'll just throw it out there. It was difficult for me to downshift into 1st gear. Again, not sure if that was my error, but it happened a few times were I had to shift back to neutral from 2nd in order to get into 1st.
I believe they're these. Though there are a ton of different brands on amazon. Someone posted buying them a while back and they were able to get them in without hardly any modification. I don't have the exact one's that were linked saved though. Try something like "RGB Jeep Halo Headlights"
You can buy pleather replacement seat covers on amazon for $100. It looks fairly DIY and the pictures from reviewers actually look really good. Probably won't be the greatest quality and durability, but for $100 it's hard to argue.
Going to order them for myself. Here's the link. https://www.amazon.com/1990-1996-Standard-Seats-Simulated-Leather/dp/B00HZ7CA4K
Also, a picture if you don't want to read the ad: https://i.imgur.com/x5pm9c5.png
I got the film from, AMAZON LINK, and figured it's only $6.00, why not give it a go. Other than trying to cut a circle, the process was easy and took roughly an hour from start to finish. The film didn't require any heating and is self adhesive.
HERE is a pic showing both finished, unfortunately it rained so couldn't get a really bright pic. I'm very satisfied with the result as now I don't have to shell out $$$ for a set of 01+ tails.
NA googly eyes! I haven't bought any for my car yet, but they're cheap and fun. I've heard you can get them at the craft store or dollar store, but here they are on Amazon:
https://www.amazon.com/Decora-Googly-Plastic-Adhesive-Decorations/dp/B071VR7NDX
​
I've seen on other forums that you should use the 7 inch ones, but I would do more research into it if I were you, just to make sure.
I bought this to put a phone cubby between the shifter and passenger seat. I've got a small coiled cable to reduce the clutter.
A post last week deleted the cig lighter and put a charging port in place. I'm looking at this one to put in my 1990 NA.
I hear Arizona doesn't get much rain.
Before you get to doing really intensive stuff:
1.) Soft top drains. Absolutely must check. https://www.youtube.com/watch?v=SghhT5K0izY
2.) Honda Shin-etsu Grease (use gloves) on the rubber. Useful for all the rubber gaskets, and on your other cars, too. https://www.amazon.com/Honda-Genuine-Shin-Etsu-Grease/dp/B006Z9TZ9M
If you're still having a problem, I don't know if you can adjust the top mechanism or if you need a new one.
This and the cheap Torque app will save you a few trips to the dealer in the future.
All of the cool kids carry one of these now: http://www.amazon.com/BAFX-Products-Bluetooth-diagnostics-Android/dp/B005NLQAHS/ (referral-free link) $25-ish
And a cheap smartphone with a copy of Torque Pro (yes, the $5 upgrade version):
https://play.google.com/store/apps/details?id=org.prowl.torque&hl=en
Five Minute Tutorial:
1- Sit in the drivers seat. Reach down to your left knee. Pull off the cover over some fuses and a magical connector.
2- Shove the ELM327 vertically into the connector.
3- Turn on Bluetooth on the cheap phone (or your main phone).
4- Launch Torque Pro. Fiddle with the settings for a moment until it sees the car.
5- Look at the real-time data. Whoo! Pretty!
6- Go back to the main menu. Press 'Fault Codes'. Wait 30 seconds.
7- Now that you have the diagnostics code, you can start doing actual research into fixing it.
8- Hidden feature for happy fun driving: In the 'Real time Data' menu, find "Toggle HUD Mode". Turn it on. Place the phone display-side-up on the dashboard at night. Golly! Them's some purty blinking lights!
this fb posting looks suspicious:
https://www.facebook.com/marketplace/item/3178222695592422
i've initiated a chat. think someone, more knowledgeable in trading miata parts could do the same?
First upgrade I did to my NA was rip out some crappy "road gear" head unit and swap it with a $40 Bluetooth Pyle. It works great but the volume is a little softer than with the tuner. I can control the phone/Spotify through it though which is sweet. 8/10 I recommend it if your on a budget. FM transmitters sounds like shit at least do aux or a tape to aux.
http://imgbox.com/LCVJvSMa - Works Bell short hub w/ Works Bell Rapfix II quick release and Momo Montecarlo. Approximately 117mm from column trim to mounting face of steering wheel. It's definitely closer than the stock wheel, but I find it more comfortable,and it gives you a bit more leg room. I can still easily reach the turn signal and wiper levers with my fingertips.
I also use this same set up with a Nardi Classico and a Nardi Deep Corn and it's fine with all three wheels.
Nah, just get some really bright bulbs and keep them on all the time! https://onedrive.live.com/?cid=11ED03B7C8D022BD&id=11ed03b7c8d022bd%211324&v=3 Oh, and lowering springs, shocks, wheels/tires, etc. ;-)
The electronics are not included in the kit, so you're free to build the electronic system however you want. I simply provide links to where I found info for my setup.
That being said, I have heard of people integrating an arduino to read canbus inputs which send data to the pi. Haven't played around with that but should be relatively straightforward. Here's a link I found on the topic: https://www.hackster.io/youness/how-to-connect-raspberry-pi-to-can-bus-b60235
Take a trip to Anchorage
https://www.amazon.com/HPR160-Aluminum-Radiator-Manual-Transmission/dp/B00FG8LPRS
It's gone up by $50 but I still recommend it. I have one. Better than stock for about the same money. May or may not perform better but no plastic parts to worry about.
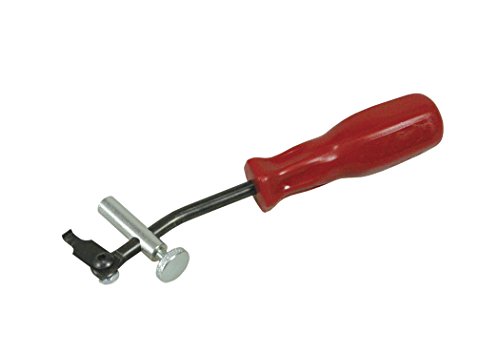
A seal puller tool like this one will pop the seal right out.
Here's my TB change worklist (this link is also included there): https://docs.google.com/spreadsheets/u/1/d/1eEStLWP0Vp9YlvqrPNLA67S31Iz0FZd0Q-2waNV_UFg/edit#gid=0
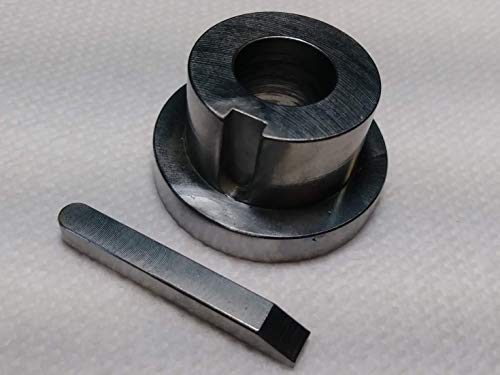
What are you planning to do about that damaged keyway?
Yeah exactly what I said because the car does “sputter when cranked” and I hear a little pop/bang meaning some sort of combustion is going on, but just nothing. Also for spark I check it out using a this spark tester and everything checked out.
For fuel first I check I was getting some by checking the fuel lines and found fuel was there. Then I jumped the fuel pump and fuel flowed out. Finally, disconnecting the fuel rail to where I can test the injectors are actually working, and they sprayed correctly with no fault.
The fuses/relays I only removed the fuel injector model the pink one because from what I found it said that on a freshly rebuilt engine it needs to have oil to circulate first, and then I plugged back the fuse and that was where the rabbit whole started.
Also mega thanks for all the time and advice!
Well I missed this post before your autocross, but my wife cut out my numbers on her cricut. We bought non adhesive magnetic sheets of 8.5x11 'paper' and she just set it to cut through it. We did some test ones and sure enough it didn't cut deep enough.
Then I just picked the boldest, clearest font I could find that would fit and went with it. It stayed on the car the whole event and even on the interstate up to 80mph.
You could probably paint or glue paper on them if your car is dark. The grey magnetic color contrasted nicely on my white NA
Edit: Here's the ones I bought
Please buy and read this book about turbochargers and this book about ECU tuning
Read them cover to cover. Feel free to skip chapters about diesels and things that you are 100% sure aren't relevant. If you aren't sure, just read it.
If you can't be bothered to do this, then I promise you won't be able to dig through hours and hours of forum posts and videos to solve one dumb problem that you overlooked at 3AM after laying upside down under your steering wheel for 4 hours.
If two books are too expensive then you can't afford a turbo.
Now that that's out of the way...
You shouldn't "actively avoid" anything. You should research what kind of forced induction you want and understand it's advantages and disadvantages. For example, a centrifugal supercharger is basically the 'cold' side of a turbocharger but instead of being spun by hot gasses, it's driven by a belt. It doesn't make as much power but the curve is more linear and they require a little less effort to make work.
Regarding just turbochargers, you can have oil or water cooled turbochargers, there are turbos with ceramic bearings. There are measurements for literally every part of the housing or the spinny bits (compressor/turbine, impeller/exducer).
If you just want a kit just go to flyinmiata.com and buy their kit. If you want to do it cheaply you'll need to source your own parts and accept the risk of your own craftsmanship.
I used a larger wire brush to do a first pass over the wheel to get all the grime off. Sprayed it down and then got in there with a smaller wire brush to get the corners. Came out pretty good. The degreaser ate away at some of the plastic paint on the hubcap but you shouldn’t have that issue.
Replace your license plate mount asap. Here is the one I recommend:
Mazda Genuine NA01-50-180A License Plate Holder https://www.amazon.com/dp/B00GKG53JG/ref=cm_sw_r_cp_api_glt_fabc_35TY3562T3E48KW1NRDJ?_encoding=UTF8&psc=1
All it does is gets it out of the mouth and places it in the center for a nice clean fit.
Fellow PacNWer!! I purchased this cover for my OTM mainly for avoiding pine needles and sap on the paint Car Cover Waterproof All Weather for Automobiles, Morhept 6 Layer Universal Outdoor Indoor Heavy Duty Full Car Covers, Scratch Resistant Snowproof UV Protection Auto Cover for Sedan(186"-193") https://www.amazon.com/dp/B08CZGMKG8/ref=cm_sw_r_cp_api_glt_i_G2WN18RKEH87GD5810YR
It was so awesome I purchased another for my GF’s car. Then I bought a MazdaSpeed Protege that has a leak from the front and rear windshield and it completely keeps the rain out. I was really expecting to be disappointed, but it’s a great cover.
Dupli-Color EHVP10200 Blue High Performance Vinyl and Fabric Spray - 11 oz. https://www.amazon.com/dp/B0007U94T6/ref=cm_sw_r_cp_api_glt_fabc_SEX47DR99FS9Q42ASPE3?_encoding=UTF8&psc=1
Will scrap/grind off relatively easy but it doesn’t budge by being pressed on or rubbed on. As long as you avoid keys and finger nails it’s remarkably durable.
I live in Florida and recently bought this one Tuningpros SS-230 Custom Fit Car Windshield Sun Shade Protector, Sunshade Visor Silver & Grey 1-pc Set Compatible With 2016-2020 Mazda Miata MX-5 4th Gen ND https://www.amazon.com/dp/B07TKRXK8F/ref=cm_sw_r_cp_api_glt_fabc_SE7V5K2Z44ZPHB8595BC?_encoding=UTF8&psc=1 . I doesn’t totally go around the lane assist but keeps the sun out. It’s in the picture in a recent post.
Here is what I got.
The back is a velcro like material, so all you need to do is slap it onto the fabric in the car.
I've had it on for a few weeks now and it's on there solid and never moves. It's also slim enough where you barely notice it.
Wolfgang Deep Gloss Sealant 3.0 FTW. Better than wax as final stage, IMO. The high ratings on Amazon are no lie. Follow the instructions. It's not easy because the final wipe-off is so satisfying, but I wait a good 45 minutes after applying it. You can't beat those German Super Polymers!
https://www.amazon.com/gp/product/B07ZYB4KZ9/ref=ppx_yo_dt_b_search_asin_title?ie=UTF8&psc=1
I bought these a few months ago and they work great. If you can make them for less than the $35 you might be able to get a few buyers. If you can't then I guess this is a good link for others.
I have nothing wrong with the original steering. Although, it would behoove you to get these items:
https://www.amazon.com/dp/B08K8FSH6M/ref=cm_sw_r_cp_apa_glt_fabc_9BTM652W1W8JCHAHRMHK
https://www.amazon.com/dp/B07P956NWN/ref=cm_sw_r_u_apa_glt_fabc_6B2XSY0RG8QZG0NSTDJE
Appreciate it! No paint. This was 80-120-300 grit sand paper followed by 000 steel wool. The real key (aside from elbow grease) is the Simple Green Aircraft Cleaner, which is a special formulation for aluminum and approved by Boeing. Pricey, but works wonders while sanding and won’t lead to corrosion.
To be real with you i don't know man but I know a real nice mobile holder. https://www.amazon.nl/YOSH-telefoonhouder-zwanenhals-autohouder-universeel/dp/B078W3T5HS/ref=zg_bs_16366480031_19?_encoding=UTF8&psc=1&refRID=S490H636F9TXB1CAX7SW I use it and I love it. Never had problems with it. I hope it helps.
This stuff worked great on those lights for my NA headlight tint really cheap and easy fix looks great will take the draw away just pop those bad boys out tint em up pop em back in
EDIT: I didn’t see the tiny fog lights till the second picture but def throw this tint on the signal lights
So basically, it looks like a regular rattle can, but inside this rattle can is a balloon filled with a chemical. You press down on a button on the bottom of the can, an internal pin pierces the balloon, and then you shake it so that the two chemicals can mix with each other. What you end up with is a two-component mixture similar to what you would have in a professional spray gun. You then have to use the can within a few days.
In regular rattle cans, you can only have single-component paint, since it's premixed from the factory, and a two-component paint would harden inside the can before you use the product. The two-component paint (or clearcoat) should form a significantly harder surface, that can be polished or sanded a lot better.
There is a bladder on the inside of spray can that contains a separate reacting agent. 2k clear coat is almost the same as legitimate automotive clear coat and holds up to sunlight much better than standard rattle can paint. There is a mechanism on the bottom of the can that is used to puncture that bladder and activate the paint for use. It is only good for a limited amount of time after first use though. https://www.amazon.com/U-S-Chemical-Plastics-4333062164-Spraymax/dp/B0043B7UQY
so I was planning on buying some of those headlights. Not for the color changes but just because bright and kinda cool. Plus I think they can change color for turn signals. do your research but I think somehting like this might work https://www.amazon.com/90-97-Mazda-Miata-Headlight-Lights/dp/B07TZY8GQC (disclaimer I am drunk so dont listen to what I say without research) Jeep headlights connect up I think so look at those.
They were quite easy. Just a T-tap and about 15 minutes, a wire stripper and a screwdriver. The kit includes about 4 feet more wire than needed! Here’s the link..
Set of Two LED Sun Visor Delete... https://www.amazon.com/dp/B07ZYBB76J?ref=ppx_pop_mob_ap_share
I feel like there is a slight difference. It is difficult to tell and could be a placebo effect but for the price (~$30) and ease (since I had already ripped up the carpet) I think its a worthwhile project
https://www.amazon.com/gp/product/B082Q2J2T4/ref=ppx_yo_dt_b_asin_title_o06_s00?ie=UTF8&psc=1 18sqft was just enough for the interior
I used a vinyl repair kit on my leather seat if u take your time and use the right texture swatch that’s could work here is what I use
Black Vinyl Leather Repair Kit
This is the one I was thinking about, I've heard it in person and it's quiet for neighborhood driving and highway but once you get over about 4k rpms it gets a nice deep loud roar.
They're actually the Storm S1's in 15x7, actually going to the Dekagrams in 15x10.
​
The lip is an Amazon special, GV knockoff. https://www.amazon.com/gp/product/B00FEXCKTC/ref=ppx_yo_dt_b_search_asin_title?ie=UTF8&psc=1&fpw=alm
I used a reupholster kit. it takes some time though https://www.amazon.com/1990-1996-Standard-Seats-Simulated-Leather/dp/B00HZ7CA4K/ref=mp_s_a_1_3?dchild=1&keywords=miata+leather+seat+upholstery&qid=1606958150&sr=8-3
https://www.amazon.com/Sierra-Auto-Tops-1990-1996-Seats/dp/B00HZ7C85Q/ref=mp_s_a_1_4?dchild=1&keywords=miata+seat+upholstery&qid=1606268446&sprefix=miata+seat+upholstry&sr=8-4 The material is decent, but the fitment is almost perfect!
Stubby antennae can lower the radio quality. I use one from Amazon. They're like $6. You'll need to buy a new mast as well, $20-$30. Moss has a 16 inch antennae with mast for I think $30. That's where I started, but hated how dumb it looked flopping in the wind, switched to https://www.amazon.com/dp/B00JMUKIHO/ref=cm_sw_r_cp_awd_PZhkxbGK42VAA
I rarely use the radio, usually have my phone playing music. Also have an aftermarket stereo.
Flushing isn't really the right word, all you're really doing is bleeding the brakes. You're just moving enough fluid through the system to introduce new fluid and remove the old. You can do it without a power/vacuum bleeder if you have someone to help you. I'm not sure if AutoZone has one, I honestly avoid shopping there. I've used this kit from Amazon on multiple cars and it's been great. I've heard a few people mention using a kit they got from Harbor Freight as well.
A trombone brush is a good, cheap tool to clean out the drains. If you have a music store near by you can most likely pick one up there, or order one off Amazon / the internet. This is what I use. Herco® HE76 Nylon Trombone Flex Brush https://www.amazon.com/dp/B000K3E9KO/ref=cm_sw_r_sms_apa_l.HOxb3YC906G
I agree it looks promising and the price is OKish although the remaining visible damage from the (literal!) fender bender wouldn't be cheap to fix. Rust is always the #1 concern to watch for. Seller claims none but you should confirm this yourself, especially considering your location. Look for damage behind the fender and under the hood. I'd watch for bent suspension components.
On the plus side black NA paint is single stage and oh-so-restoration friendly. Seller is correct with statements about the "Black and Tan" 1992 Miata. BBS center caps are missing, and somewhat hard/costly to obtain if you want them. Glass rear window indicates a replaced top, probably a good thing. Bonus if it includes the original boot cover because the tan ones are going up in price on eBay. I got one for $100 in June but they were all $130+ last I checked.
Ultimately this resource is the gold standard for Miata inspection: http://www.miata.net/faq/usedmx5.html
Bring tools. Be careful if you pull and inspect spark plugs; do not tighten more than 11-17 ft-lbs (132-204 in-lbs). Not noted in that guide is the radiator color. Black is OK. Olive is showing age. Brown is time to replace ASAP. Miata engines do not like to overheat, so a well-sorted cooling system is critical. But replacement TYC on Amazon is affordable and easy direct swap.
Good luck! Post back with an update if you look at it or buy it.
Cheaper and almost identical to the NA rad that works great. I bought a TYC rad from Amazon last year for my NA and it fit perfectly and ended up being a Koyo.
https://www.amazon.com/dp/B000IYPQPC/
You don't need all aluminum unless you're tracking regularly. The plastic/aluminum last up to 20-25 years on NAs so durability isn't a concern with the OEM rads. They usually gunk up internally and become inefficient before they leak or fail.
Agree with everything you said, I'll add a bit more.
I have the Hella E Code conversion that I bought from amazon. https://www.amazon.com/Hella-Halogen-Replacement-Headlight-Standard/dp/B000FKIURK
The "E" stands for European, as in conforms to European lighting specs, and are therefore NOT DOT approved headlights. This could be an issue if you have to go through a state inspection, not sure I don't have any. You also may have to upgrade your wiring harness with a relay/fuse. I used 100W high beam bulbs and had to upgrade. If you do regular 55/60W bulbs, you would most likely be fine with the stock harness.
As far as install goes, /u/Tandyman100 is right that there are in fact 3 screws that hold the retainer ring on. There are 2 other long screws that adjust the headlight aiming left/right and up/down. Make sure you're unscrewing the correct screws unless you want to re-aim your headlights!
Pretty sure this is exactly what he has: Amazon link.
Put an aux in and plug the aux into a cheap Bluetooth unit from amazon?? Then you could just shove it all behind the head unit and call it a day.
APPS2Car Wireless Bluetooth 4.0 Hands-free Car Adapter with 3.5mm AUX Input and 2 Port USB Car Charger https://www.amazon.com/dp/B01K1UETXW/ref=cm_sw_r_cp_api_OERuybXS9X9BX
You could also wire this straight in and run the wire into your center console to be descrete
yah, I got this one in my basket, cuz Amazon says it fits my NA.
I got hoses in there too. I'll go ahead and add a cap. Thx again Internet Miata Bro.
I don't remember if it's a 360mm or a 400mm, but it's a convex Broadway mirror that I bought from Super Autobacs a few years ago. I found a vendor on Amazon for ya!
Amazon https://www.amazon.com/gp/product/B071CMFL6F/ref=oh_aui_search_detailpage?ie=UTF8&th=1
​
They sell an RBG version which can be fun, but one of my bulbs burned out and we don't have great street lighting in all areas down here. These are GREAT for increasing visibility at night!
OK, with that info, let me craft a different assessment. I'm no stranger to restoration of a neglected Miata. We bought a '91 that had a bad top and was drenched with rain. The paint was faded and someone had stolen the radiator. The keyway was destroyed in a theft attempt. BUT it was $700 and came with a new vinyl (basic) top. It had about 120k miles. Here's the story for your reading enjoyment.
First, do you really want an automatic Miata? It's totally your call but most enthusiasts just would be perpetually disappointed. HOWEVER - if you can restore it and later sell it for a profit, perhaps it is your path to a better Miata with manual transmission.
So maybe you could offer them something like $1200. All they can say is no. I suppose they could say "go to hell and don't ever contact me again" but that seems unlikely.
The top is an immediate need. No point doing much with the interior if it's gonna get wet. The most basic top can be had for just $175 on Amazon. If you can afford it, the better option is one with a new rain rail since you will have a bad time trying to preserve the original one. https://smile.amazon.com/Convertible-Plastic-Attached-Pre-Installed-1990-2005/dp/B07FPV32VB
The interior is probably salvageable except for those seat skins. New leather skins can be bought from Interior Innovations but there are cheaper cover options that you could live with for the time being. You could also just sit in the seats as they are. You'll want to remove everything from the interior and clean/dry it as well as you can. Get it DRY and make sure there's no major rust on the shelf.
I think the fender dent could be fixed by a talented PDR guy.
My driving needs are like yours, plus casual autocross. When I replaced my pads I went with Stoptech Street Performance from Amazon (https://smile.amazon.com/gp/product/B003K2EIO4 and https://smile.amazon.com/gp/product/B003K2EIPS). This was based on lots of research and probably a miata.net forum post. Tip: use Google, not the forum search function there because it is awful. "topic site:forum.miata.net" does the trick.
Pro - much improved brake performance. I bedded them in properly, you don't want to skip that.
Con - quite a lot of brake dust.
Also, I fully agree with u/Cozmo85 on rotors. Standard rotors are what you need.