
What are
/r/modelmakers'
favorite Products & Services?
From 3.5 billion Reddit comments
The most popular Products mentioned in /r/modelmakers:


The most popular Services mentioned in /r/modelmakers:
Cults.
Google Photos
Thingiverse
World of Tanks
Google Play Books
Camelcamelcamel
Banggood
War Thunder
Walmart
Emojipedia
Autodesk Tinkercad
Trustpilot
Wikiwand
Inkscape
SmugMug
The most popular Android Apps mentioned in /r/modelmakers:


The most popular reviews in /r/modelmakers:
I got mine from Hobbylink Japan - but amazon seems to have it as well - https://www.amazon.com/Bandai-Hobby-Noodle-Spirits-Chronicle/dp/B089DGYZTY
​
its very real - its like 50 pieces!
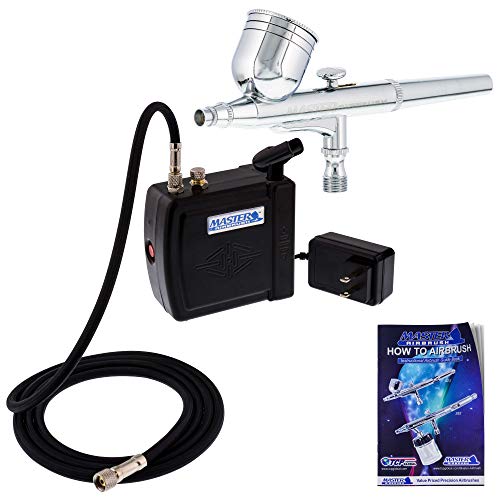
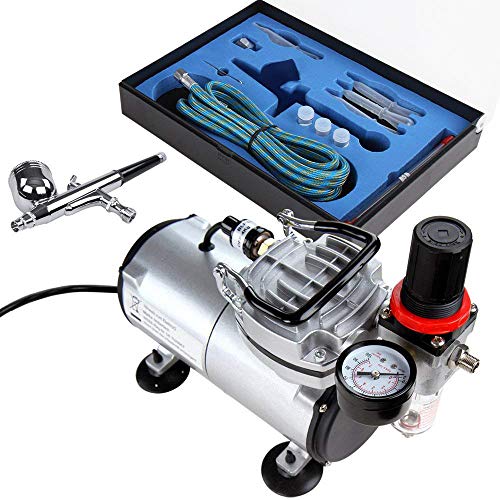
I would say don't. The paint is shit, you likely won't use the two siphon feed brushes, and the compressor doesn't have a tank.
I bought this airbrush and this compressor and I've been very happy with them.
Patience will pay. The longer you give for things like prep, paint drying and gluing the better the result.
For a beginner I'd suggest get a cheap nail set and a goodish fine paint brush. The nail clippers are good at taking parts off the sprues and the file will be useful for sanding of any molding defects. The included paint is useable but you'll find a fine brush will help with detail.
Get yourself a shoebox you can put the model in whilst your not working on it. If you have Kids/pets/wivesyou will appreciate this.
I'll probably get shot for saying this but the kit won't have all the paint especially the metallic. Sharpie pens a good enough rather than spend on paint. Aldi sell their version for cheap in the metallic gold, silver, bronze tones.
Paint as much of the model on the sprues as you can, many light coats is better that one thick coat. You could try slightly thinning the paint to help with this but I wouldn't bother if this is your first time.
I'd start with the spit as it's pretty common (Again aldi have them for a fiver) should it go totally tits and It's probably the easiest.
Take your time gluing, use less than you think you'll need. A pin or toothpick can be helpful over relying on the nozzle. Pound shops have little plastic clamps like these that I find hold well enough so your not sat holding models over dinner.
The last step is to buy lots of other kits. You won't have time to build them but that's not the point.
Condoleances with your uncle. Please see this topic from someone with the same problem as you have.
You can also send everything to my place in the Netherlands ;)
edit: typo
Weirdly enough, I just got a "poo set" of Play-Doh in my company's annual white elephant gift exchange. It was a joke gift and I was legit not sure WTF I could use it for.
Thankfully, I have a bunch of painting projects in the works, so now I've got another tool for my model making toolkit. Thanks for the tip, OP!
I got it from an online shop called Amazon
Tamiya America, Inc Electric Handy Drill, TAM74041 https://www.amazon.com/dp/B01LX208SY/ref=cm_sw_r_cp_api_glc_fabc_z.t4FbY7AJZ76?_encoding=UTF8&psc=1
B-17s aren't good first models.
The FAQ along the sidebar and the wiki provide some basic starting information. See: https://www.reddit.com/r/modelmakers/wiki/index
Without any idea where you are in the world (though guessing from your reference to high school and the B-17, you're American), it's hard to recommend much.
You need glue, knife, paint, sandpaper.
Cheap is relative. Without any actual notion of what your budget is, what you're willing to spend, this is a vague and ambiguous question.
The cheapest B-17 you're likely to find is either in 1/144 or 1/48 scale (Revell US/Germany). Neither of these are good first kits. See, e.g.: https://www.amazon.com/Airfix-A55107-American-Mustang-Starter/dp/B0071LF3VM/ref=sr_1_6?ie=UTF8&qid=1533179707&sr=8-6&keywords=airfix+starter+set. Amazon has a B-25D, but I think that's the decades old one. You don't want the decades old one.
An Airfix starter set that you can order online will include (not so great) paint, glue, a paintbrush, and you'll need to add a knife.
The faq names a number of kits, including from Airfix. Their modern kits are quite good, if you know what you're looking for, and they don't cost much. A single engine, simple two or one overall colored plane is a much better choice. B-17s aren't cheap.
Get a snap off blade type knife, like this: https://www.amazon.co.uk/dp/B07VZP61LP fully extend the blade and then saw it. It’ll leave a lovely clean line.
Just be careful as those blades are fucking sharp. I sliced a five inch cut down my finger and had to improvise steristrips to hold it together last time I wasn’t paying attention. I probably should have gone to A&E and have stitches.
They have no certain scale, there mostly random (here’s a link to the kit kit)
Second vote for white spirits, someone recommended it to me for Tamiya panel liner and it works perfectly and didn't affect the future coat underneath. I bought this, op: https://www.amazon.com/dp/B00IIWQFO2/ref=cm_sw_r_cp_apa_glt_fabc_4AAXCVJZCW9E2DCDT7VS?_encoding=UTF8&psc=1
This is 8 dollars on Amazon Master Airbrush Brand Airbrush Quick Release Disconnect Coupler & Plug with Airbrush Airflow Adjustment Control Valve 1/8 in. BSP Male and Female Connections https://www.amazon.com/dp/B002KDSRQY/ref=cm_sw_r_cp_apa_i_nZ-.CbTH8R5S6
Hobbyboss kit #82429 with Friul metal tracks and after market chain and ball set.
Built between December 30th and May 2nd.
Full album can be found on my Flickr
Comments and critique are always welcome.
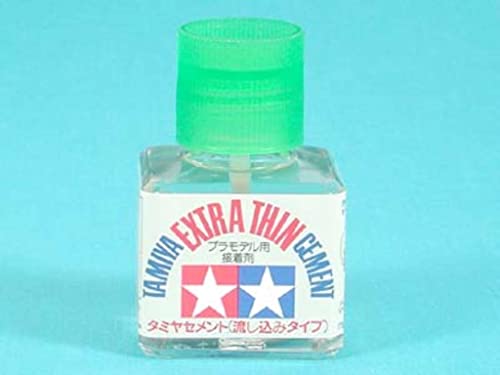
- Tamiya Sprue cutters - They're the only one's you'll ever need
- Some extra thin cement - Either Tamiya Extra Thin or Mr. Cement S will do
- A good xacto knife
- Sanding sticks - I find these are the best but there are plenty of cheaper options that work well too
- Some good primer - Rattle cans of Mr. Surfacer are an easy option but you can go a lot of ways here
Other than the paint, this should be most of what you need to get started.
The modelmaking default is usually tamiya extra thin
Bandai star wars kits retail for anywhere between 20-30 USD. If you have an Amazon prime account, some as low as 22 USD.
Armor: 1/35 Tamiya Bulldog, Panzer II, Panzer III, Jeep, Mutt (newer jeep), Hanomag Half Track, Panzer IV. The Bulldog can be found for as low as 12 dollars, usually around 16. The Panzer II is about the same price, as is the Jeep, and the Hanomag (including figures) goes for 16-20.
At 10 dollars, your choices are limited. Modern airfix kits (look up on Scalemates.com) in 1/72 retail for around that price, for example, the P-51D, FW-190, ME-109E, Folland Gnat.
A-wing is 20 dollars, a snap kit and good quality: https://www.amazon.com/Bandai-Hobby-Wing-Starfighter-Building/dp/B01CFKZJR6/ref=sr_1_3?s=toys-and-games&ie=UTF8&qid=1500506739&sr=1-3&keywords=bandai+star+wars
£50 is too low for a decent quality kit, I fear. I went down this route too and found Revell's airbrush to be adequate for myself. It's cheapest here on the German Amazon website. I bought mine for about €80 a year ago, it seems to have become more expensive.
It's a single-action airbrush - meaning it can only shoot paint when triggered. Unlike the dual-action airbrushes that allows you to shoot air seperately.
The compressor doesn't have any indicators of pressure, but have 3 different power levels to choose from. The maximum pressure it has is 1 Bar, which equates to 14.5 PSI. That's the highest pressure. Some might say it's a bit weak but I've found it's enough for general airbrushing and some minor camo work.
This will last you for years and is a lot easier to use. double sided tape.
For bigger stuff I used this large double sided tape or carpet tape.
I also use the big stuff for woodworking for holding pieces temporarily when required.
aweseome! if you want a totally clear finish, pour a layer of resin overtop of the the entire thing to get a clear finish, i just finished this project and it worked quite well https://photos.google.com/share/AF1QipNpF0S965M7QCb4H_RjBshr2IgaGHFaFGbPxctCBuWmEKBfO7DDKPK6Dtb8QzXLDA?key=TThHMzR6SGg0V3NMUURHeV9ERmhuOXV5dmo5RGNR
You won't believe this, but with a quick google search I've already found your answer (well, the serial number at least, not about which went down). There were 2 B-29s with the name "Her Majesty". Serial numbers were 42-63375 and 42-93975. Source
Idk how to make them, but I’ve heard people say they use https://inkscape.org/ to make images smaller and keep the detail of the image. And if all else fails talk to a business that specializes in printing, I’m sure they could help you out. Best of luck!
Attention resin kit manufacturers! The material you use to produce your kits is brittle. Placing 20 thin parts made of brittle material in the same plastic bag is not conducive to their remaining intact. See: potato chips.
Sign up for some type of Amazon Price Watcher tool, you'll get an alert whenever the price drops.
I use a site called camelcamelcamel, that's how I was able to snag it when the price dropped. You just give them a link to your Amazon Wishlist, and they track whenever something goes on sale.
Badger 105 all the way. I love mine. You can find tons of reviews on youtube. It is a all around great beginner airbrush. The build quality is amazing and the company stands by its products.
http://www.amazon.com/Badger-Air-Brush-Patriot-Gravity-Airbrush/dp/B002W84GTO
Sometimes they pop up on amazon for 45 bucks too. http://camelcamelcamel.com/Badger-Air-Brush-Patriot-Gravity-Airbrush/product/B002W84GTO
Yep, it does. Each country has its own priorities and ideas about what makes a good TD or medium or heavy tank. (The US really didn't bother with heavy tanks at all in WW2, and the German heavies that saw battle were sort of effective but tended to break down or get bombed.) The US wanted rapid tank interceptors-- M18 Hellcats, for example-- while the Germans wanted to dig in, soak up shells, and act as mobile artillery emplacements. (The World of Tanks thing where German TDs drive around fighting is pretty much an arcade thing. Fun, and you can check my WoT TD stats to see how much fun I think it is, which is a lot, but not historical at all.)
Started working no this over the weekend at out club's group build. This is the new tooled kit. No major problems thus far, just a couple of fiddly PE parts on the road wheels.
It's from Iron Blooded Orphans. It's... "different," from older installments. I know what you mean about them looking more like armored core than gundams. What makes it okay for me is that the whole thing is a brand new story, new world-building, new everything, completely separate from all previous shows. That makes it easier to drop any expectations I had of gundam shows and just enjoy the series as itself.
The second season just finished this month, and the first season is already voiced in English http://www.daisuki.net/us/en/anime/detail.MOBILESUITGUNDAMIRONBLOODEDORPHANS.html
6 mm is a good start, tape.
Not too cheap. Xurons will work OK, Godhand makes one that retails for about the same as Tamiya's now. https://www.amazon.com/GodHand-Nipper-PN-125-Plastic-Cutting/dp/B07NWBG938/ref=sr_1_7?dchild=1&keywords=godhand+asic&qid=1623576743&sr=8-7 (basic, but probably OK).
OK.
Squadron used to make sanding sticks, you might try that but don't pay more than 10 dollars for a pack of five (this is a pack with smooth through very coarse) Women's manicure/sanding sticks are widely available, buy rough to very fine grits. https://www.amazon.com/s?k=squadron+sanding+sticks&ref=nb_sb_noss_1. Other companies make stuff like this, just pick one that has various grits from smooth to rough. Sanding sponges are literally a spongy/softer sanding tool sanding surface mounted on a soft sponge-like block, so it can conform with curves.
No, not in particular. I have an inherited pair from somewhere, I think No. 1 size. A women's makeup section at a pharmacy might carry merely OK ones. I just didn't think much of Excel's cheap but expensive hand tools. They should be OK - so maybe just get them.
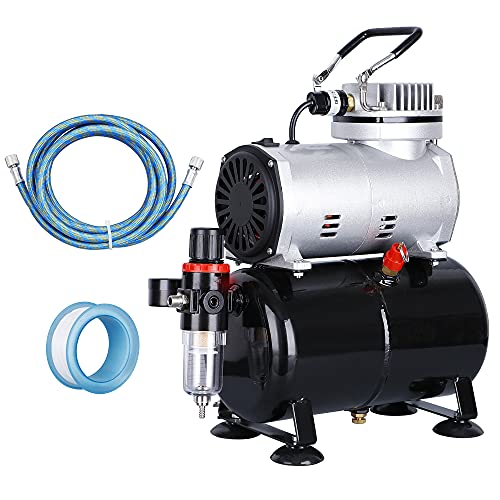
The AS186 compressor is a bit of a staple in the modelling industry. Mine was by a different company but they’re all pretty much the same.
It’d a great compressor for the money, mine is now five years old and very much going strong. Having a tank is an absolute plus imo, this helps deliver a steady stream of air and also means the compressor cuts out when not in use. They are all a similar price, I’d probably get the best reviewed one that comes with a dual action gravity fed brush, of which this does. Siphon fed brushes are fairly wasteful and a pain to clean.
If you’re looking at this kit: https://www.amazon.co.uk/Airbrush-Fengda-FD-186K-compressor-accessories/dp/B01984G4SU/ which I assume you are. Then the airbrush looks a fairly standard Chinese dual action gravity fed brush. I started out the same.
It’s certainly not the best airbrush but won’t be the worst either. I moved onto an iwata neo fairly swiftly after getting a kit like yours, and then again onto Badger brushes, my favourite being a Sotar2020.
The airbrush will be good enough to get you hooked but likely will leave you wanting more. I still use my Chinese brush for priming and gloss coating models and some base coats depending on the paint.
I think if I were doing it again I’d miss the neo out and go for a Harder and Steenbeck 2in1 ultra, two needles and nozzles so you’ve option for higher detail spraying for a similar price.
So yes, seems a good kit for the value. Remember you need airbrush cleaner, thinner, flow improver etc and depending on what you’re spraying you may need a respirator, extractor booth/hood and the like.
> I’m looking for advice on sanding. I have a dremel...
Dremel and plastic are usually not a good partnership.
> The problem is that my dremel is way too powerful.
Exactly.
> a dremel with an extra slow setting, but everything I’ve found online starts at 5000 rpm.
Which is why they are too powerful. The motor is designed for high speed, and stepping it down to a speed we need for modeling with plastics means there is no torque. The “right” speed is about 100 rpm or so and anything other than a very light touch results in the dremel motor just stopping.
> Does anyone have any recommendations?
You can add a speed control from Amazon that can slow it down quite a bit. With practice you can find the sweet spot of speed and pressure. I find it is either still too fast or just not enough torque so rarely use it.
> Am I going about this all wrong?
I prefer good fitting kits that don’t require Dremels, big files, or belt sanders. If I’m thinking of using a Dremel then I have to realize I’ve lost all the details and I’m going to spend more money or more time getting it all back.
Wood kits are a different matter. I use my Dremel on wood often.
Most hobby compressor hoses are 1/8" BSP, as are most airbrushes.
Note that some larger non-hobby compressors might use 1/4" BSP at the compressor...so you would need a hose with a female 1/4" BSP fitting on one end and a female 1/8" BSP fitting at the other. You also might need a low pressure regulator.
Also, Badger uses propriety M5 thread, so you will need an adapter for the airbrush to allow it to fit standard 1/8" BSP.
If you want a quick disconnect style...
With the airbrush thread adapter attached, your Patriot will fit this quick disconnect.
That's a lot of money.
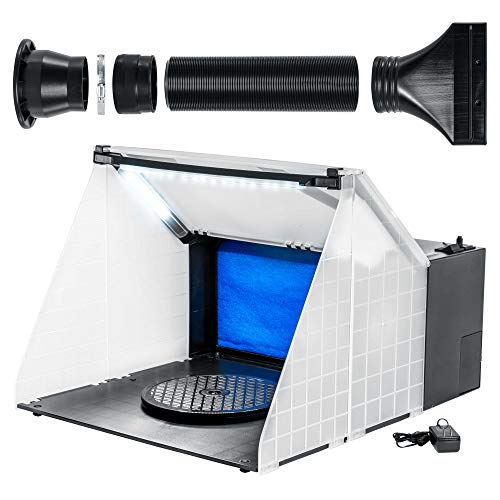
No lighting either.
Maybe this would be better...comes with the exhausting ducting as well.
Is your current booth exhausted outside?
What is the air outlet fitting size on your compressor...remember that size means the inside diameter of the air passage of the fittng/hose.
If it's 1/8 BSP, you can do one of these two things.
1 Get a hose with one end matching the Badger airbrush thread, which is M5, and the other end matching the compressor fitting, probably 1/8 BSP if new and a hobby type. Both Iwata and Sparmax sell this type of hose. You might be able to buy it where you bought the airbrush.
Or
2 Buy an adapter fitting which fits to the Badger airbrush and converts M5 to 1/8 BSP. You might be able to get this where you bought the Badger airbrush.
Option 2 is easier.
Adapter Badger part number 36-010
If you have an older compressor, the air outlet fitting might be 1/4 BSP.
1 Buy a hose that matches the airbrush and compressor, Badger makes these too.
Or
2 Buy the Badger adapter fitting and get a generic 1/8 BSP to 1/4 BSP hose.
Some people use dish soap as a surfactant.
Tamiya acrylics are alcohol based and brush painting can be a challenge due to their quick drying. Are you thinking that using a surfactant will help with that? Tamiya does make a drying retarder.
Otherwise, straight water isn't recommended as a thinner for Tamiya acrylics. Tamiya X-22A is essentially a water/alcohol blend thinner with helpful additives. You shouldn't drink it, but it's not like mineral spirits or lacquer thinner.
Alcohol is water soluble, so washing your hands would do it.
Brush clean up could be done with isopropyl alcohol to save money, then clean the brush with dish soap and water.
Though proper ventilation is always good no matter what you are doing.
Hand brushing always is easier if you use primer. Lacking an airbrush, Tamiya makes Fine Surface Primer in a spray can. If you use that, very good ventilation is required...garage or outdoors.
Much easier, if you are brush painting, is to use a water based acrylic like Vallejo...though I've heard good things about AK 3rd Generation paints too.
IMO, it's always better to use each brands thinner rather than water.
Helpful video...though he uses water based acrylic.
Whether you make custom decals or a mask you may find creating the artwork is necessary. Any drawing app that can create vector graphics will work — I use InkScape (it’s free). You want vector because it’s easy to scale properly.
Printing the artwork is easy. Just print to decal paper then use like a regular decal. Do NOT use setting solutions as the decal sheets are very fragile. Hot water is just fine. If you get the ink jet paper for obvious reasons, you have to coat it first or the ink dissolves.
The easiest method is to use existing decals and adapt.
For the Navy Corsair — there are a ton of aftermarket decals available. Given both Navy and Marines are part of same Department, the markings are usually very similar, with only unit markings being unique.
You want a compressor with a tank. If you want a compressor with a 5 year warranty sold by a solid distributor, get this.
Costs more, but you won't end up buying another one in a year.
Get a Iwata Neo CN airbrush to start off; if you get better later, you can save the Neo for primer and varnish.
I'd advise getting some beeswax for the nozzle cover and cup thread...fellow Neo owner.
Compressors.
You want something like this, with inserts for both particles and harmful vapor. I don't know if you can order through Amazon in The Netherlands though.
Note that 3M masks come in different sizes.
The cartridges are actually more expensive than the mask
The main choices/options on the compressor are tank or tank-less, and the regular and water trap. I’d recommend a compressor with a small tank, that way it’s not continuously running and it evens out the airflow (not a huge deal when you’re beginning). There is one called the AS-186 that I use and really like - not too loud, relatively inexpensive. They’ll come with a moisture trap which helps stop water from entering the airbrush, and a regulator which you’ll want for adjusting pressure. I use an Iwata Neo which is a decent starter airbrush, and the hose that came with the compressor connected to it. If it doesn’t, you can find adapters for your airbrush of choice!
Alligator clips on sticks:
There's dozens of options on Amazon. Some include a handy base with holes for the sticks if you want.
No, not a full cotton swap, just a tip of a rolled tissue which is much narrower.
You could try to look for dedicated nozzle brushes, or a nozzle needle like this one: https://www.amazon.com/Harder-Steenbeck-Nozzle-cleaning-nozzle/dp/B003Z9QH2I
Keep in mind nozzle walls are really thin brass, so it's easy to break them if too much force is used trying to jam something inside.
Ultimate way to clean anything is an ultrasonic cleaner of course, but that's another topic
For the undelivered Humbrol paints I picked them up individually from [Hornby America)(https://www.hornbyamerica.com/shop/humbrol/acrylic-paints)
Sadly these are the slowest to be delivered items and are also the ones I bought specifically for the first two kits to try my hand at thinning, retardants, and actually following painting suggestions for once. (I've never once followed painting directions in my previous modeling tips.)
For the huge box you see in the pictures I bought those from Amazon as a kit. It includes every Badger Minitaire paint and ghost shade available. (Linked to amazon item) I bought the kit because the 1 oz bottles go for around $1.50 - $5 each depending on where you buy them from and the kit is only $158 so you save almost $100 buying that kit over buying each one separately.. are there colors I'll never user, probably.. but I'd rather have them and not need them, than need them and not have them.
(Amazon Prime ALL THE THINGS!)
General Pencil Company The Masters Brush Cleaner & Preserver 2.5 0z. https://www.amazon.com/dp/B0009RRT9Y/ref=cm_sw_r_cp_api_KcfbybB907DS3
I hope that link works. This is what I use to clean my brushes and it works wonders. Also helps condition and keep the brushes in good condition longer. It's inexpensive and a container lasts a long time. Easy to get on amazon or most art supply stores.
The Alan kit I got at a local swap meet, I had never heard of the brand, the guy only wanted $10 for it so why not?
The kits an odd mix of 2 different plastics that look like theyre from 2 different molds. The hull and turret are from one, theyre pretty well detailed and are good castings. The road wheels and treads are pretty poor quality plastic that was very fragile and had very soft details like some vintage Monogram kits. However, those could be replaced with some Fruiels or other same-model treads easily. If you're looking for one, the kit I got was imported by Stevens Interational
The Pz. 1 C I got on Amazon https://www.amazon.com/Hobby-Boss-Pz-Kpfw-I-Vehicle-Building/dp/B0041Q3D2Q
Here's a 1:20 scale Guillow's Wright Flyer kit on Amazon for $27.25.
The major parts will be laser cut, but he'll need a hobby knife to trim and cut some stick parts.
He'll also need glue, either Testors wood glue or "CA" cyanoacrylate super glue to assemble, T-Pins to hold parts in place, and Dope and some paint brushes for the tissue covering. Basically see the "also bought" list at the bottom of the amazon page.
I'd also recommend buying a ceiling tile from a building supply store to use the back side (non textured) as a work surface, as they're cheap, flat, and the T-pins stick in easily.
You might also advise your cousins parents that he may require a little supervision, and to use the covering dope in a very well ventilated area, as it can stink a bit :)
The F-5 is an old Revell kit, 90s era. Decals are original to the kit. It is painted with a tamyia silver spray can and miscellaneous testors paints. The stand is from Trumpeter. You can find it here on Amazon: https://www.amazon.com/Trumpeter-TSM-9915-Aircraft-Display/dp/B003M2L5AC
I don't have a local hobby store unfortunately. There used to be three but they've all gradually closed down over the years. I picked this up from amazon when I spotted it on sale https://www.amazon.co.uk/Airfix-Quick-Build-Spitfire-Aircraft/dp/B00DUBH220. To be fair, he's only just turned 3 years old so he needed a lot of help. I pointed to the stage on the instructions and he was finding the part maybe 60% of the time after a chat. He then managed to line most of them up with a little direction and needed help squeezing them on as it's basically like lego... His fingers are still a bit small / weak :)
With the stickers I couldn't bring myself to leave it with 3 year old placement! He showed me where they should go, I lined them up, he pushed them on.
I'm looking forward to building some proper models with him as he gets a bit older. In the meantime I'm giving him spare 1:72 figures that are his and he can paint.
Also, 40 bucks will put you just shy of the money needed for a decent starter airbrush.
For that kind of money, you can probably buy anywhere from 6-10 colors of brushable paint. Why waste the money on a one time use spraybomb that you can't use for detail painting?
https://www.amazon.com/Gravity-Feed-Dual-Action-Airbrush/dp/B004INERK4
That brush can often be found for 45-60 USD on Amazon Prime. Also, go to Dick Blick; they often have coupons that allow you to take a significant discount off the same airbrush, which can be had for 40-60 dollars.
My best guess would be to use a thinner for that type of glue, if one is available. If one isn't, you might need to just gently flick and peel them off or softly sand them down. Wish I could give a better answer :(
Also, I'd recommend making the jump to cement glue as it creates very small seams that can be sanded down to near invisible levels with some patience and a delicate hand. Though if the model kit is of a good quality, you probably wouldn't need to. Tamiya example on Amazon. An example of a model maker using that type of glue. He also gives great tips throughout his videos, if you find yourself a fan of his.
Thanks! I picked these up from Amazon.
I have two more I can dink around with. :)
I bought something similar to this awhile back on Amazon...figures that for a few bucks more than one pair, why not get a bunch and figure out what works best?
https://www.amazon.com/dp/B06XXXQHS8/ref=cm_sw_r_cp_api_yz5EBbRMFENY7
I also bought reverse tweezers for holding parts but they didn’t work so great. Better off with sticky tack or alligator clips.
What kind of fan did you use? I bought materials to build my own booth, but all the bathroom fans at my local big box store are hardwired-only. I’m torn between just buying one, or trying this fan from Amazon.
Hon&Guan 6'' Home Ventilation Fan Bathroom Garage Exhaust Fan with 150mm Opening Ceiling and Wall Mount - Strong Exhaust for Kitchen/Bathroom/Bedroom/Office (Ultra Silent) 150A https://www.amazon.com/dp/B01MZ6C3HT/ref=cm_sw_r_cp_api_i_53MQCbTC73EAK
The reviews for this kit on Amazon are hilarious. Apparently some people are dumb enough to think they can get a real motorcycle for $10?
Are you in the US? If so, master airbrush on Amazon. Master Airbrush Multi-Purpose Airbrushing System Kit with Portable Mini Air Compressor - Gravity Feed Dual-Action Airbrush, Hose, How-To-Airbrush Guide Booklet - Hobby, Craft, Cake Decorating, Tattoo https://www.amazon.com/dp/B00BF0MW9G/ref=cm_sw_r_cp_apa_i_xws.CbXG4VKAT
Bandai Scout Trooper and Speeder bike. I bought it on Amazon in June for $50, but now it looks like it's going for $130, so that's crazy.
Looks like 63375 was retired in 1946. Source
93975 apparently was retired in 1954. Source
https://www.moddb.com/mods/equestria-at-war/downloads/equestria-at-war-134-riverlands
I think this is the last version that compatable with old version.
I'm terrible too, I just never bother with Navy or tank. (Mass assault for the Win!)
Yes. For modern stuff it works well when dry brushing. Should work for W2 German too ( not something I build) below is a link to a build I did as a group project for the museum at ft Stewart. If you look at the drive sprocket you can see the use of red brown and olive drab there too (abrams were originally NATO green prior to pairing tan)
A basic search shows pretty mixed reviews. They seem to be a legitimate company, with the majority of the issues being shipping time and additional surprise shipping charges.
That is 1/32. I've decided to focus more on the bigger scale. I've done Tamiya's Corsair, Special Hobby's Tempest, and now this. It takes about 4x as long to do a 1/32 build as 1/48 but I really enjoy the extra detail and quality in the end. The problem is finding a place to put them (especially the B-25 and F-18 I have in the stash).
Because the builds take considerably longer, I don't really post as much as the progress is much slower. I used to post some on scalemates, but really don't much anymore (until a build is finished).
Thank you for the compliments, by the way.
Here is my work in progress album that I keep populated with in progress shots and reference photos I use.
Certainly isn't exactly what you're after, but I find War Thunder is pretty solid for referencing with screenshots.
You can 360 degree around all vehicles in the hangar (Air and Ground) and take screenshots and reference scales off the wheels for example.
Perhaps something to keep in mind.
The outside shell is probably ABS plastic, so much of what works on plastic models (made of polystyrene) won't be really applicable.
You could just sand off the scratches, but then you're going to get a flatter spot and it'll look weird.
You may be able to use something like Apoxy Sculpt putty to fill them in and then sand that down, but you'll end up with whitish places where the scars were.
If you're willing to take apart your DS (check http://www.ifixit.com for a teardown to see how well that will work) you could do something like taking off the back, filling the scratches, sanding it down, and respraying it with plastic paint. You could do some custom stuff that way too if you felt enthusiastic.
Here's some info on repainting the case:
http://www.dcemu.co.uk/vbulletin/threads/59503-LIST-How-to-Spray-Paint-Your-DS
While the takeapart info there is about the older non-3D DSes, the painting info should be the same.
I REALLY wouldn't suggest spraypainting it while it's assembled, though. A little overspray could ruin important electronic bits. If you want to spray it, take it apart.
It's not too bad a scrape, though. It gives it character! My old DS phat was pretty beat from being thrown around and carried in a bag without a case and stuff... 8)
http://camelcamelcamel.com/Master-Airbrushing-MAS-Airbrush-Compressor-The/product/B00BF0MW9G
That kit is pretty much always around that price. I can't comment on that kit however I'm looking for something in the same price range. I suggest searching as I'm pretty sure this subject has been discussed to death!
I wouldn't call chipping alchemy, exactly, but there are a ton of variables at play and they're frustratingly difficult to keep track of. Just off the top of my head - sheen of underlying paint, thickness of hairspray/chipping fluid coats, type of paint put on top, thickness of paint put on top. Drying times allowed. Amount of water used to set off chipping reaction. Type of brush used. Type of stroke/technique used with type of brush.
I've found it best to work as small as possible, with as little water as possible. Additionally, chipping over a flat paint will usually give you much smaller chips and prevent the sheeting that can happen.
On my Dauntless I actually used an old airbrush needle in places: https://www.smugmug.com/gallery/n-Mgf9br/i-7qJmjpb/A
So it looks like you got acrylic paints as the package says “cleans up with water.” Enamel paint need paint thinner/mineral spirits to thin/clean. That’s good! Acrylics are super easy to work with. I’d still recommend some primer like this but even so. Acrylics can be thinned with water. Probably better to thin it with isopropyl alcohol (ie rubbing alcohol) or with Testor’s acrylic thinner. Whatever you choose test it with a few coats on the interior or another non-visible area of the model. Unthinned paint looks pretty bad on a model though so I don’t recommend it.
I've got one of these for paint and a taller one for primers, thinners, etc.
Looks wildly good my man! Do you have any pictures of the inside? I'd love to see the lighting and wiring system. Does the basic kit, such as this one, include the lighting or does it have to be an specific one?
Great job :)
They look like rubber band style tracks.
If so, soft rubber band style track is harder to do than plastic or metal link track.
Are you just using pigment on them with nothing else?
It's smooth from the mold, so the pigment has nothing to grip unto.
You should rough up the track material with a stiff nylon or soft brass brush so the pigment has something to stick to.
Do rust, then dust and finally any areas bright steel from ground contact...you may have to use a stiff brush to grind it in.
"Fixing" it with anything is also difficult, due to, again, the material it is made out of.
These are cheap and you can cut down the funnel for hobby use.
Just use ordinary PVA/School glue. Apply it in tiny amounts with a toothpick or a small brush like you think of and assemble as normal. PVA glue dries clear-ish, and it is easy to take off after it has dried. It will also not damage the plastic and turn it foggy.
You could experiment with the materials that you have on hand, before you put them on a model.
You might want to consider Tamiya's epoxy putty.
It can be used for a lot of purposes besides zimmerit...you can see it being used here for welds.
Start planning on a replacement.
This isn't bad when you consider that it has a 5 year warranty and the seller is TCP Global.
Master Airbrush makes a nice, complete starter set
You welcome!
You might be able to get a portable work light.
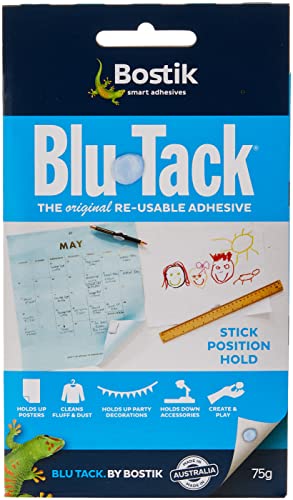
You can get Blu-Tack, or something like it, at most stores in the office supplies section, it was originally designed to stick posters to the wall; Loctite and Elmer's make some too...you could probably get away with using playdoh too.
Very good for the first time!!
It's easy to miss small spots, having very good lighting helps a lot. You can get/make holders and use a lazy susan to spin the part without having to touch it.
I always expect to have to touch up though, or just do two thin coats and not worry about it.
I like using Blu-Tack to mask off areas that will get something glued to it, like bogies and final drives. It also helps to glue some parts before painting.
These are link and length tracks (I think that's what they're called) in 1/35th scale for the elephant tank destroyer. They're plastic so they are cheaper than friul-model tracks, but they are made of individual links so you can add more if the tracks too short or take some off if they are too long. The elephant is an "upgraded" ferdinand, and the ferdinand is porche's attempt to use the tiger (p) hulls they built, so these should work fine for this model.
You're welcome!
Regular cleaners will work.
One trick, when your done, flush and spray it out, then put water in the cup until you get a chance to clean it...keeping things wet stops the drying process.
It helps if you have one of these spray pots.
I ordered one of these kits
Youtube reviews were pretty positive, hopefully it'll go ok when it arrives
I've used this with multiple paint brands with no issue,
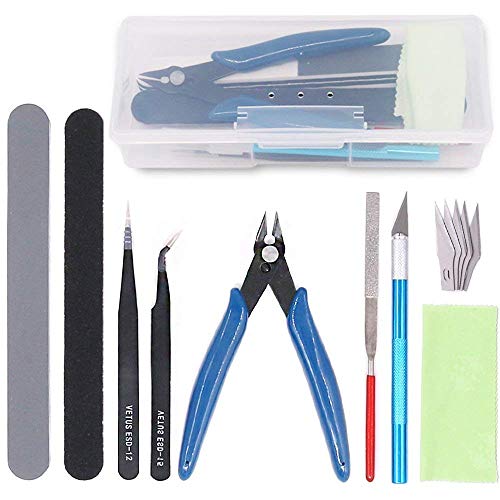
I'm also new to the hobby and to be honest you don't need much to get into the hobby. For tools something like this (https://www.amazon.com/dp/B071LB1T5D/ref=cm_sw_r_cp_apa_glt_fabc_Y8XGCW9KB89BE6GWRXGX) had all of the tools I found myself using my first build. At the most basic level have a hobby knife, nippers, and tweezers.
Tamiya makes good cars and military models, and Revell seems to have pretty good cars, but that's about all I've bought do far so can't really say anything else on other brands.
For painting I use tamiya acrylics thinned with isopropyl alcohol but you can use anything that's available to you like Testors enamels or Model master. Just make sure you have some quality brushes and thinner. Painting is almost always necessary unless you buy a prepainted kit. You could get away with not painting anything on a Tamiya kit as the plastics are usually molded in the same color you'll be painting it anyways (at least with the ones I've seen), but there will be noticable mold marks. The Revell models I have are all molded in white plastic, so you'll have to paint those.
Oh yeah, I also get most of my stuff from Amazon and local hobby stores, including the models themselves.
Hope that helps, go to the "New to the Hobby" thread at the top for a more detailed approach to how to get started.
Really good nippers could work on the wipers, but a PE saw blade would work better.
You could panel the kit doors just like on the real vehicle, using sheet styrene; just cut off the window cranks and elbow rests first and re-attach afterwards.
I noticed the cfm rating...you're really paying for it though.
The Master booth converts from cubic meters to about about 140 cfm.
What paint are you using??
Is it possible that your current system has expended activated carbon filters that need to be replaced...instead of the entire booth?
Amazon does has a less expensive single fan model.
The float seems to be a mix of everything - depending on the use and unit, they were set up differently.
For the MS, something along those lines were my thoughts as well. I saw there's a book in German about the MS, but I can't justify 40€ on a book I can barely understand heh
I appreciate the comments! Revell 1:48 B-17G
There are a couple of methods for masking a plane’s clear bits: - Triangles — cut small triangles from Tamiya tape and use these to fill in the clear area. With practice you get to know what size works best. - Strips — cut thin strips of tamiya tape about 1mm wide. Apply to inside edge of each frame, it’ll be flexible so can follow curves. Fill in the area with a couple of squares or triangles. - One piece — apply a piece of Tamiya tape over the clear area, burnish down with a toothpick. Use a new sharp nr 11 blade to slowly and carefully cut the tape along the frame edge. - Make a mask — take a piece of wax paper or decal tissue (that thin sheet for protecting the decals) and lay over the canopy. Use a fine point pencil to lightly draw the frame on the paper. Scan that into your pc. Convert the scan to a cut file and use a Cricut or Cameo to cut the mask in a sheet of Tamiya masking sheets. This method takes some practice.
For really small windows, I stuff blutak into them paint the model, then pull out the blutak. I then fill the small hole with acrylic glue or PVA as they dry clear and while still wet can be cleaned up w a damp paint brush.
Looking to start airbrushing with Mr. Color paints in the future, so I want to pick up a respirator mask and these filter cartridges:
These should cover both vapors and particulates, correct? It doesn't need an extra filter or whatever? Is there anything else I might need? (I already have safety goggles somewhere.)
Thanks.
Could you suggest me the cheapest primer I can find on amazon?
​
Also, would these brushes be good?
Got your fix: Go to a small hardware store or an Ace Hardware. Find a small wing nut, bolt, and a washer. Make sure that wing nut can fit through both holes. Wing nut example
I use this paper. It’s clear but you can also get white. I then use Inkscape (freeware) to draw the artwork and print to my laser printer. You can also get inkjet paper. Both work best by coating with a clear film before dipping in water.
The white is good for making the decal more opaque but you need to trim the white with a fresh xacto blade.
Search some vids on YT, there are lots of ways to do it and you may find one for the specific printer you have.
Several companies make blank decal paper for inkjet printers
Something like this will make discs...you have to use a wire to pop each one out.
You can't do hex, like with some punch sets...but they are cheap.
No problem with .010" styrene, .020" is doable, but not fun.